
Creating Google Forms quizzes is a vital part of online education and training. They help educators and trainers assess knowledge, track progress, and engage learners. Google Forms is a popular free online quiz maker tool for this purpose. It offers a simple, intuitive, and free solution for quiz creation.
In 2025, Google Forms is still a top choice. It integrates well with other Google Workspace tools. It offers good customization options and is easy to use.
This guide will walk you through how to make a quiz with Google Forms step-by-step. I will highlight the benefits and disadvantages.
Additionally, we will explore free alternatives with similar functionality. These tools will help enhance your eLearning or training programs. Whether you’re a teacher, corporate trainer, or content creator. This guide will help you make quizzes that engage and assess your audience.
Why Google Forms Quizzes?
Google Forms is a versatile and user-friendly tool. It integrates well with other Google Workspace apps. This makes it easy to collect and analyze data. Plus, it’s free to use.
This is a big advantage for educators and small businesses with limited budgets.
Google Forms lets you create various types of questions. These include multiple-choice, short-answer, and file uploads.
How to Make a Google Forms Quiz?
Google Forms Quiz is a free and easy-to-use tool that lets you do all sorts of forms, including quizzes. To Create a quiz in Google Forms is straightforward and efficient. Here’s a step-by-step guide to help you get started:
Step 1: Access Google Forms:
- Open your web browser and go to Google Forms.
- Sign in with your Google account if you haven’t already.
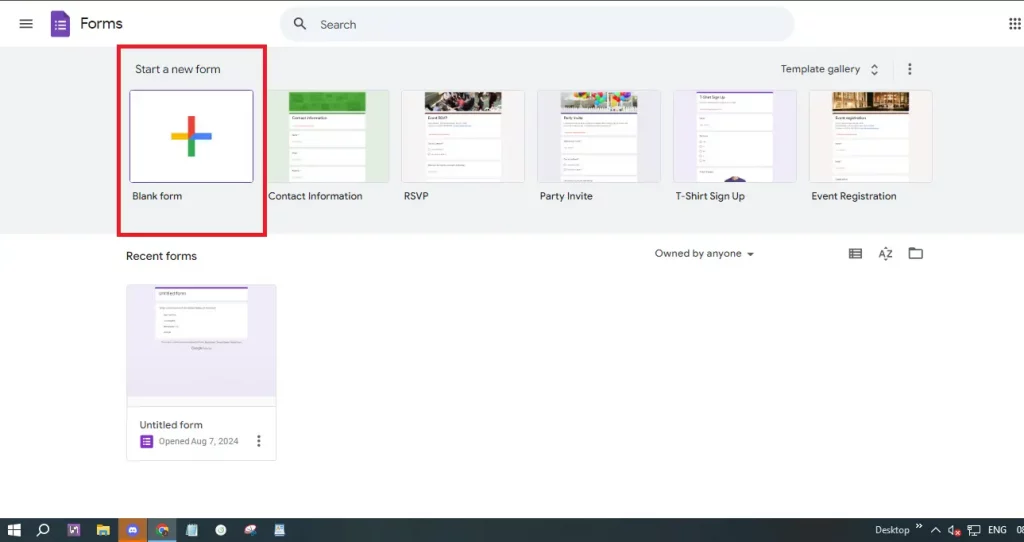
Step 2: Start a New Form
- Once you’re in Google Forms, click on the “+ Blank” button to start a new form. This will open a blank form where you can start creating your quiz.
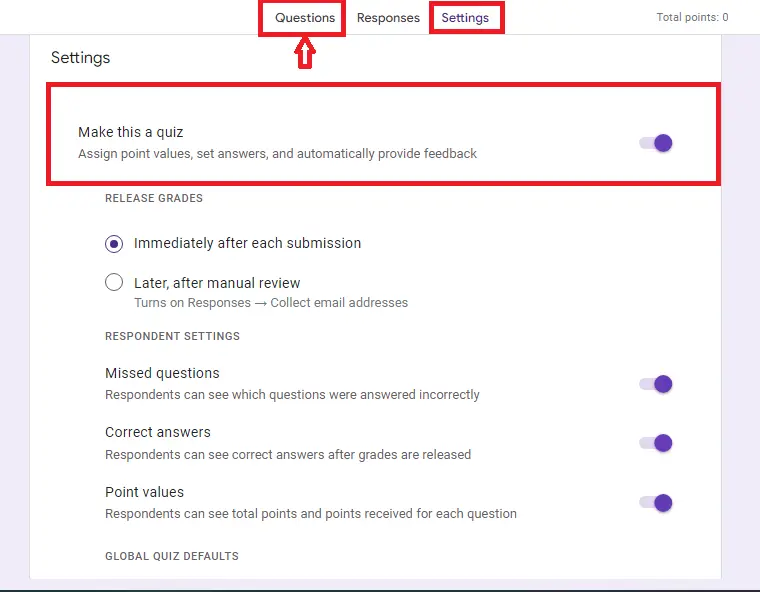
Step 3: Enable Quiz Mode
- To turn your form into a quiz, click on the settings icon (a gear-shaped button) at the top right. In the settings menu, go to the “Quizzes” tab and toggle on the “Make this a quiz” option. This enables quiz-specific features like automatic grading. After doing all this click on “Questions“.
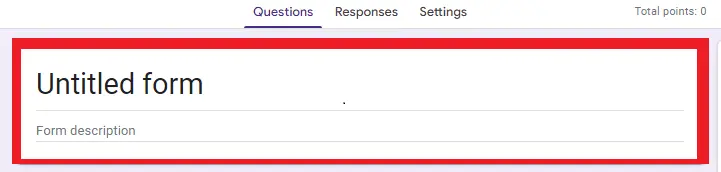
Step 4: Title and Description
- Give your quiz a title that clearly reflects its content. Add a description to provide instructions or context for the quiz-takers. This helps set expectations and provides necessary details upfront.
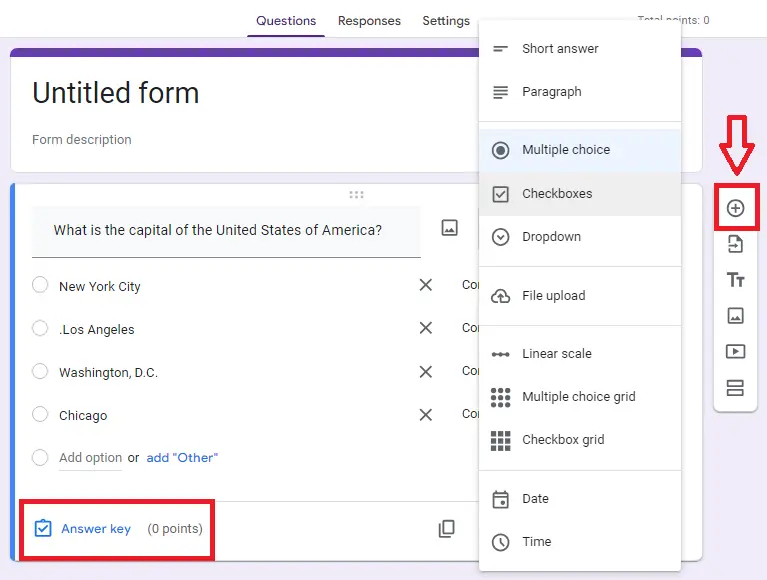
Step 5: Add Questions
- Click on the “+” button on the right to add your first question. Google Forms supports various question types, including multiple-choice, checkboxes, dropdowns, and short answers. Choose the type that best fits the information you need to assess.
Step 6: Customize Questions
- For each question, write the question text and add answer choices if applicable. For multiple-choice and checkbox questions, provide a list of possible answers. For short answer questions, specify the type of response you expect.
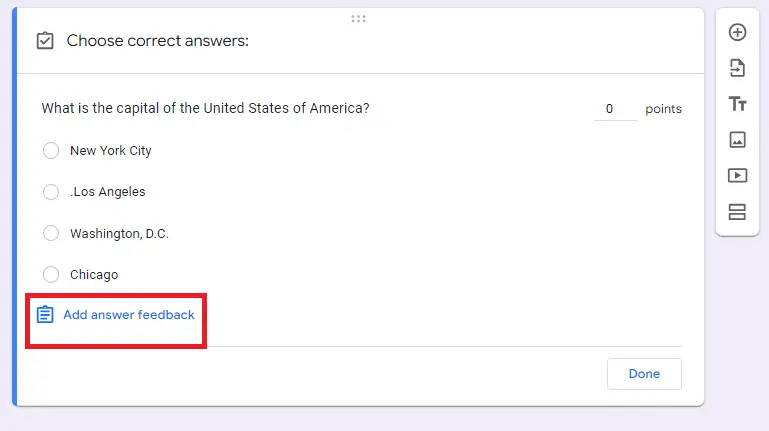
Step 7: Set Correct Answers
- After adding a question, click on the “Answer Key” option. Here, you can mark the correct answer(s) and assign points to each question. This is crucial for automatic grading.
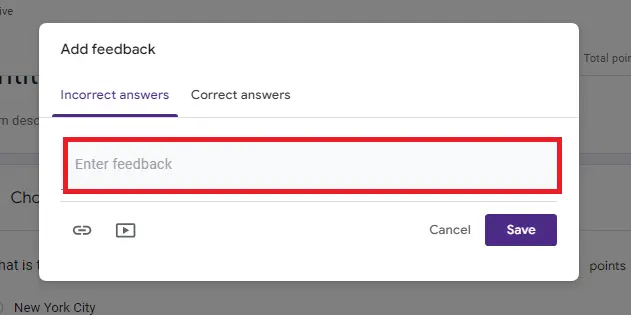
Step 8: Add Feedback
- Google Forms allows you to provide feedback for each answer. Click on the “Answer Key” and then “Add Answer Feedback”. You can add feedback for correct answers. You can also add feedback for incorrect answers. This is helpful for educational quizzes.
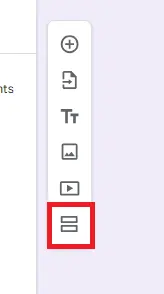
Step 9: Organize Your Quiz
- You can use sections to organize your quiz into different parts. Click on the “Add section” button (two vertical bars) to create a new section. This helps manage longer quizzes and improve navigation for quiz-takers.
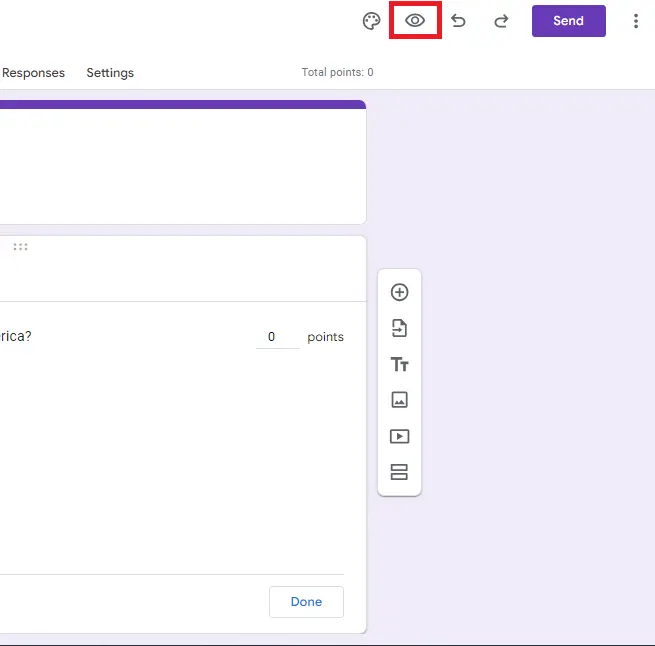
Step 10: Preview and Test
- Before sharing your quiz, click on the eye icon at the top right to preview it. You can see how the quiz looks to respondents. This also lets you test the questions and functionality.
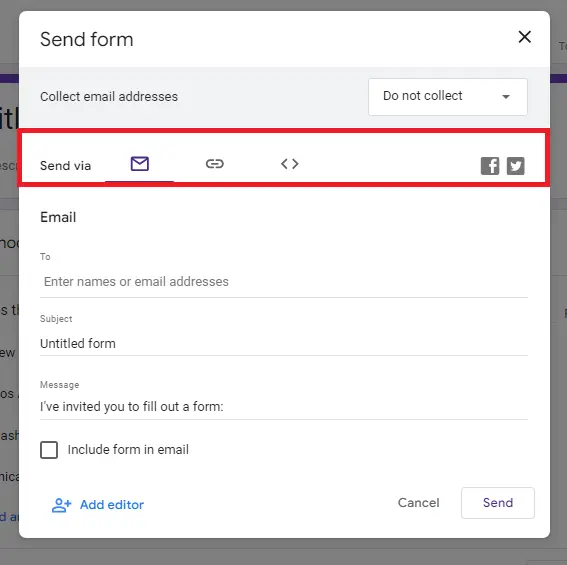
Step 11: Share Your Quiz
- Once you’re satisfied with your quiz, click on the “Send” button at the top right. You can share the quiz via email, link, or embed it on a website. Make sure to check the sharing settings to control who can access and submit responses.
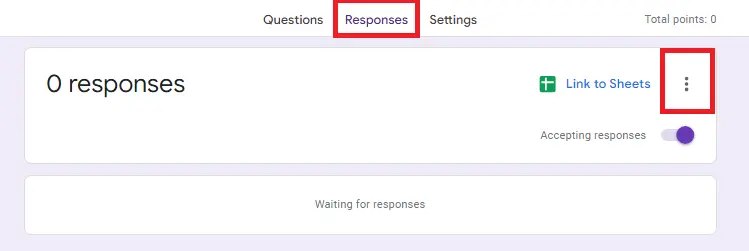
Step 12: Analyze Responses
- Once your quiz is live and people start responding, click on the “Responses” tab to view them. Google Forms shows summaries and individual answers. This helps you easily analyze the results and see how each person did.
What are the Benefits of Making a Quiz in Google Forms?
Google Forms Quiz for friends is a fantastic tool for creating quizzes, and there are many advantages to using it:
User-Friendly Interface:
- Google Forms is known for its simple and intuitive interface. It’s easy to navigate, even for those who are not tech-savvy.
- The drag-and-drop feature allows you to rearrange questions effortlessly.
Cost-Effective:
- Google Forms is completely free. There are no hidden costs or subscription fees.
- You get access to all essential features without needing to pay for premium versions.
Customizable Options:
- You can customize your quiz with different question types. Choose from multiple choice, checkboxes, or dropdowns.
- Add images and videos to questions to make your quiz more engaging.
Automatic Grading:
- Enable quiz mode in Google Forms. It will automatically grade multiple-choice and checkbox questions.
- You can assign point values. You can also give instant feedback for right and wrong answers.
Real-Time Collaboration:
- Google Forms supports real-time collaboration. Multiple users can work on the same quiz simultaneously.
- This feature is useful for team projects or group quizzes.
Seamless Integration:
- Google Forms works well with other Google Workspace tools. It connects easily to Google Sheets and Google Drive.
- Responses can be automatically saved to a Google Sheet for easy data analysis.
Easy Distribution:
- You can share your quiz through email, a direct link, or embed it on a website.
- You can access the form from any device with internet. This makes it easy for people to respond.
Response Tracking:
- Google Forms provides built-in tools to track and analyze quiz responses.
- View summary data and individual answers right in the form. You can also export the data for a more detailed analysis.
Customizable Settings:
- Set up quiz options. You can limit responses to one per user. You can also set a deadline for submissions.
- You can customize how the quiz looks. Choose from various themes and colors.
Accessibility and Inclusivity:
- Google Forms works on almost any device. This makes it easy for people with different tech preferences to use.
- The platform supports many languages. It is easy to use for different audiences.
Security and Privacy:
- Google Forms has security features like encryption. You can also limit access to specific users.
- You can control who has access to your quiz and how responses are collected.
What are the Hidden disadvantages of creating a quiz with Google Forms?
Google forms quiz maker is popular and easy to use for quizzes. However, it has some limitations that might not be obvious at first. Here are some hidden disadvantages to consider:
Limited Question Types:
- Google Forms has basic question types. It doesn’t include the advanced options of specialized quiz tools.
- There are no built-in question types for ranking, matching, or complex logic branching.
Basic Analytics:
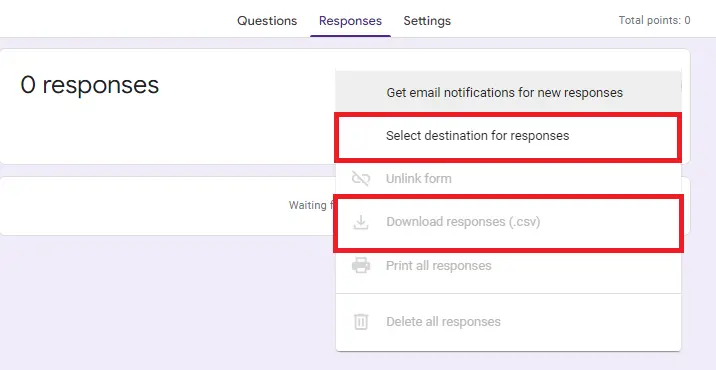
- The analytics provided by Google Forms are fairly basic. You can view summary statistics directly. For a more detailed analysis, you might need to export the responses to Google Sheets.
- Forms do not offer in-depth analytics. You cannot access detailed item analysis or performance reports directly within them.
Customization Constraints:
- While you can customize the appearance of your quiz, the options are limited. Advanced branding or design customization is not supported.
- The layout and design options are basic. They may not satisfy users who need more advanced visuals.
Limited Feedback Options:
- The layout and design options are basic. They may not satisfy users who need more advanced visuals.
- The feedback system isn’t as strong as the ones in specialized eLearning platforms.
No Offline Mode:
- Google Forms requires an internet connection to create and administer quizzes.
- There is no offline mode. This can be a problem in places with weak or unreliable internet.
Basic Security Features:
- Security options in Google Forms are limited. You can restrict responses to specific users. However, more advanced security features, like encryption for sensitive data, are not included.
- There is no built-in option for advanced user authentication or secure response collection.
Lack of Integration with Non-Google Tools:
- Google Forms works well with Google Workspace tools. However, it has limited support for other third-party apps.
- If you use tools other than Google for LMS or analytics, you may have integration problems.
Scalability Issues:
- For large quizzes or many responses, Google Forms might run into performance issues. It could face limitations as well.
- Handling a lot of responses can be difficult. Advanced tools make it easier to manage and analyze them.
Limited Question Branching:
- Google Forms has basic logic branching. However, it is not as advanced as some other quiz tools.
- Complex branching scenarios or adaptive questioning are not supported.
No Built-In Certificate Generation:
- Google Forms doesn’t have a feature to create completion certificates for quiz participants.
- You would need to use third-party tools or manually create certificates.
Response Management Limitations:
- Managing responses can be tough. It gets even harder with a lot of submissions.
- Forms don’t offer advanced features. You can’t group responses or filter by specific criteria directly in them.
How to Create Interactive and Engaging Quizzes in TriviaMaker?
TriviaMaker is an online quiz maker for creating quizzes. It’s easy to use and lets you make interactive and engaging quizzes. Here’s a step-by-step guide to help you make the most of TriviaMaker’s features:

Step 1: Sign up or Log in to the TriviaMaker website.

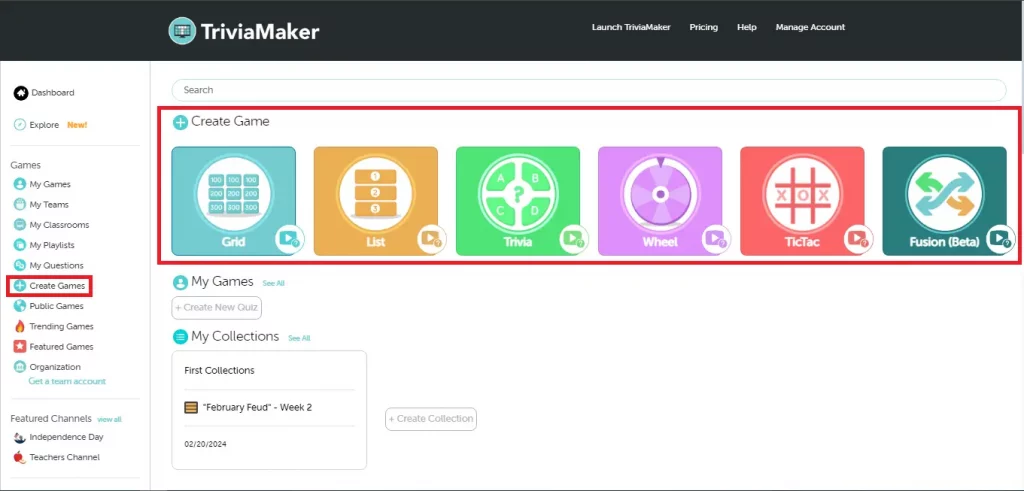
Step 2: After logging in, you’ll be directed to your dashboard. Click on the “Create games” button or select directly through “Create game“.
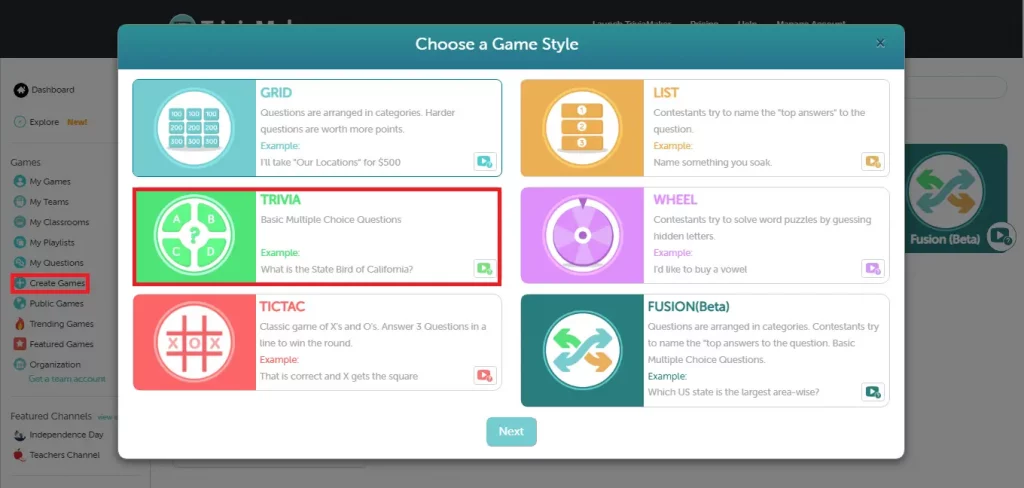
Step 3: You will be prompted to choose a game style. Select from the “Trivia, Grid, Wheel, TicTac, Fusion, or List” style for your game.
Step 4: In this step, you have to choose a theme first, after that you have to add basic details, after fill details. Click on “Next“.
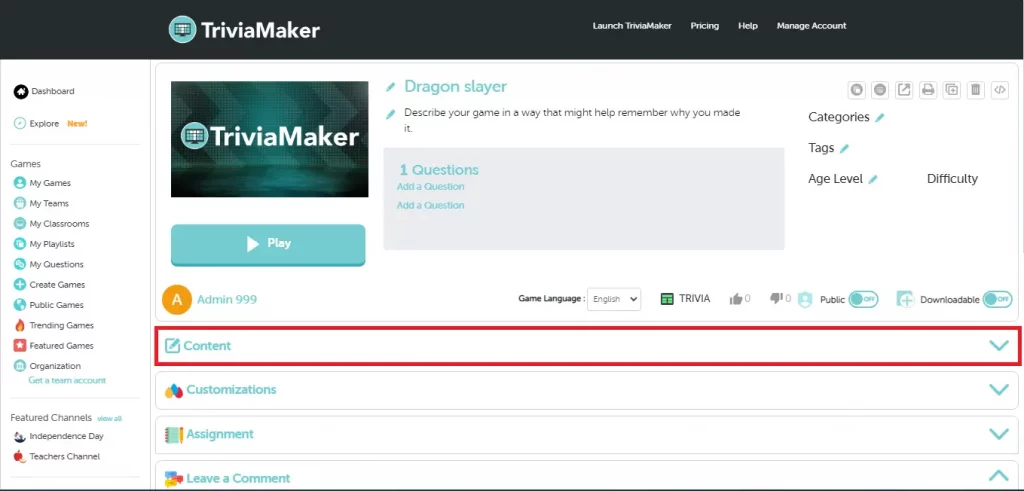
Step 5: In the image below, you can see “Content”. After getting there, you have to click on it. After clicking on it, you will see a “Set Up Your Questions” option.
Step 6: Now you must tap the “Pen icon” button to create a quiz. You can also use our “AI Questions” as you can see in the image below. To specify the topics or themes for your questions. You may need to provide some input to guide the AI in generating relevant questions. Use the timer feature to set time limits for each question or the entire quiz. This adds a sense of urgency and excitement.
Step 7: After getting input, you will see an “Add” button option to add a question. That’s it, you’re all set to play a quiz.
Step 8: Once your quiz is ready, use TriviaMaker sharing options to distribute it. You can share a link or embed it on your website. If you’re hosting a live event, use the platform’s live game features to engage participants in real time.
Why You May Love TriviMaker
TriviaMaker is a dynamic platform that changes how you assess student learning. Its game-show-style format makes learning fun and interactive. Plus, it gives you valuable insights into student performance. Trivia Maker also has an AI quiz creator tool to help you make your work easier and more comfortable. It also has the Corporate Quiz Maker ability to make employees more productive.
Winding Up
Quizzes are important for online learning. Google Forms is a good choice because it’s easy to use, cheap, and works well with other Google tools. You can change it to fit your needs.
It doesn’t show much about how students do. It also doesn’t have many kinds of questions. Other tools like TriviaMaker offer more fun ways to quiz and better ways to see results. By trying different tools, teachers can find the best way to help students learn.
Happy Quizzing!