How to Create a Wheel Game
A Wheel Game features a colorful spinning wheel divided into segments, each containing a question or challenge. Players take turns spinning the wheel to randomly select which question they'll answer, adding an element of surprise and excitement to your quiz or activity.
There are two simple ways to create a Wheel game in TriviaMaker
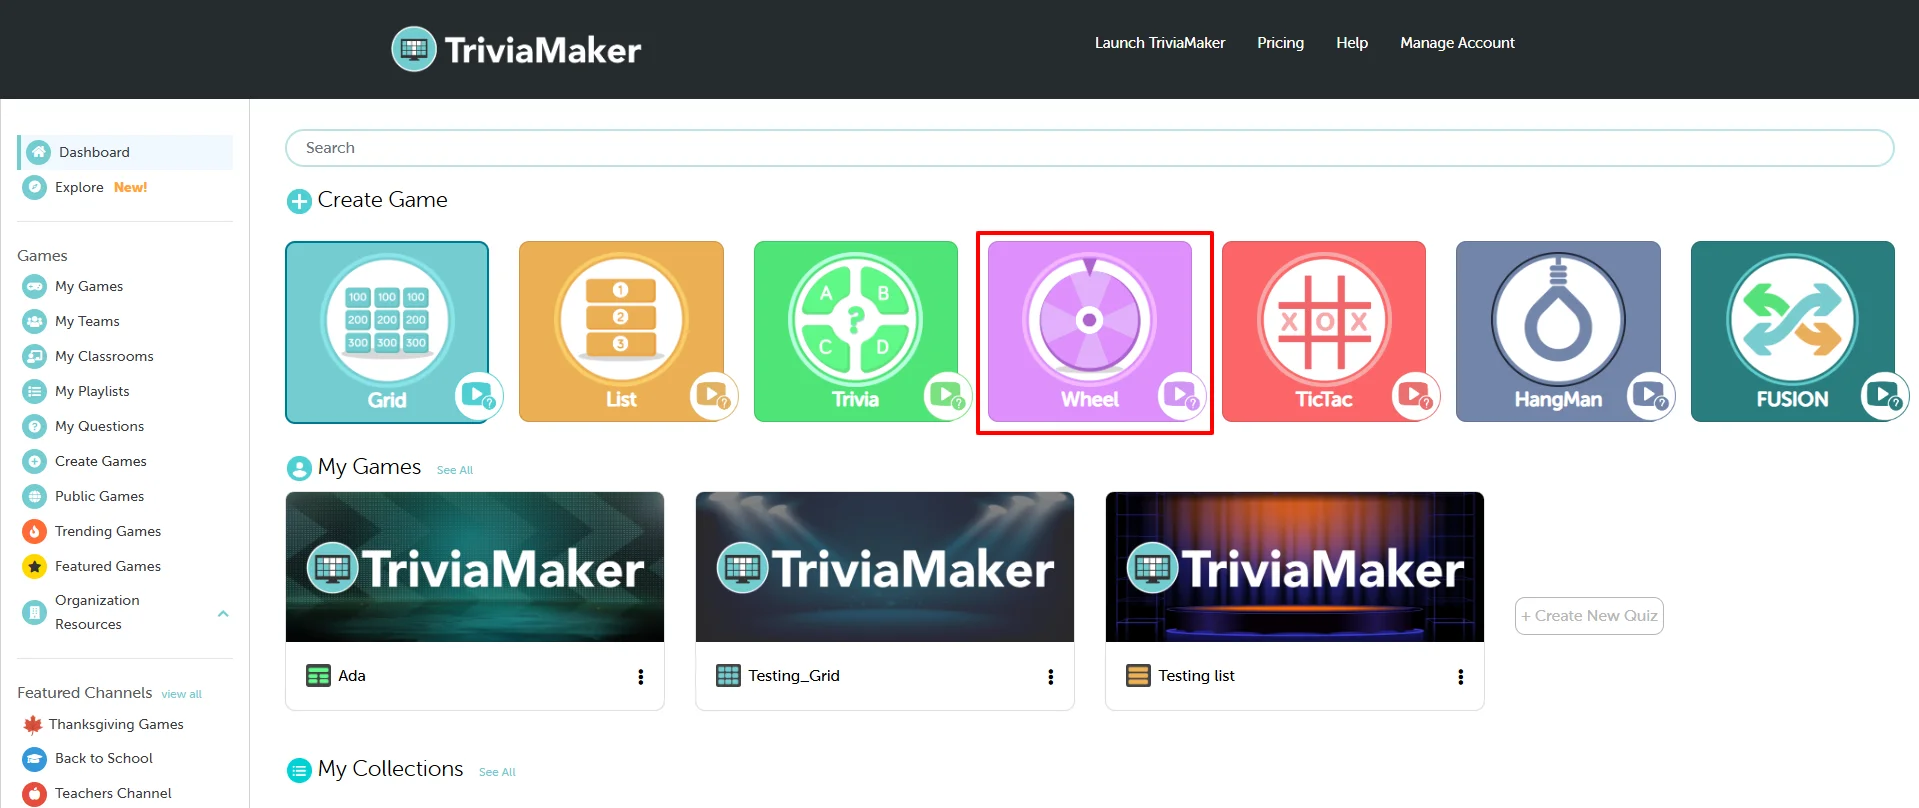
Option 1: Create from the Dashboard
Go to your Dashboard. Under the Create Game section, you'll see multiple game styles. Click on the Wheel game style.
Option 2: Create from the Sidebar Menu
From the left-hand sidebar, click on Create Games.
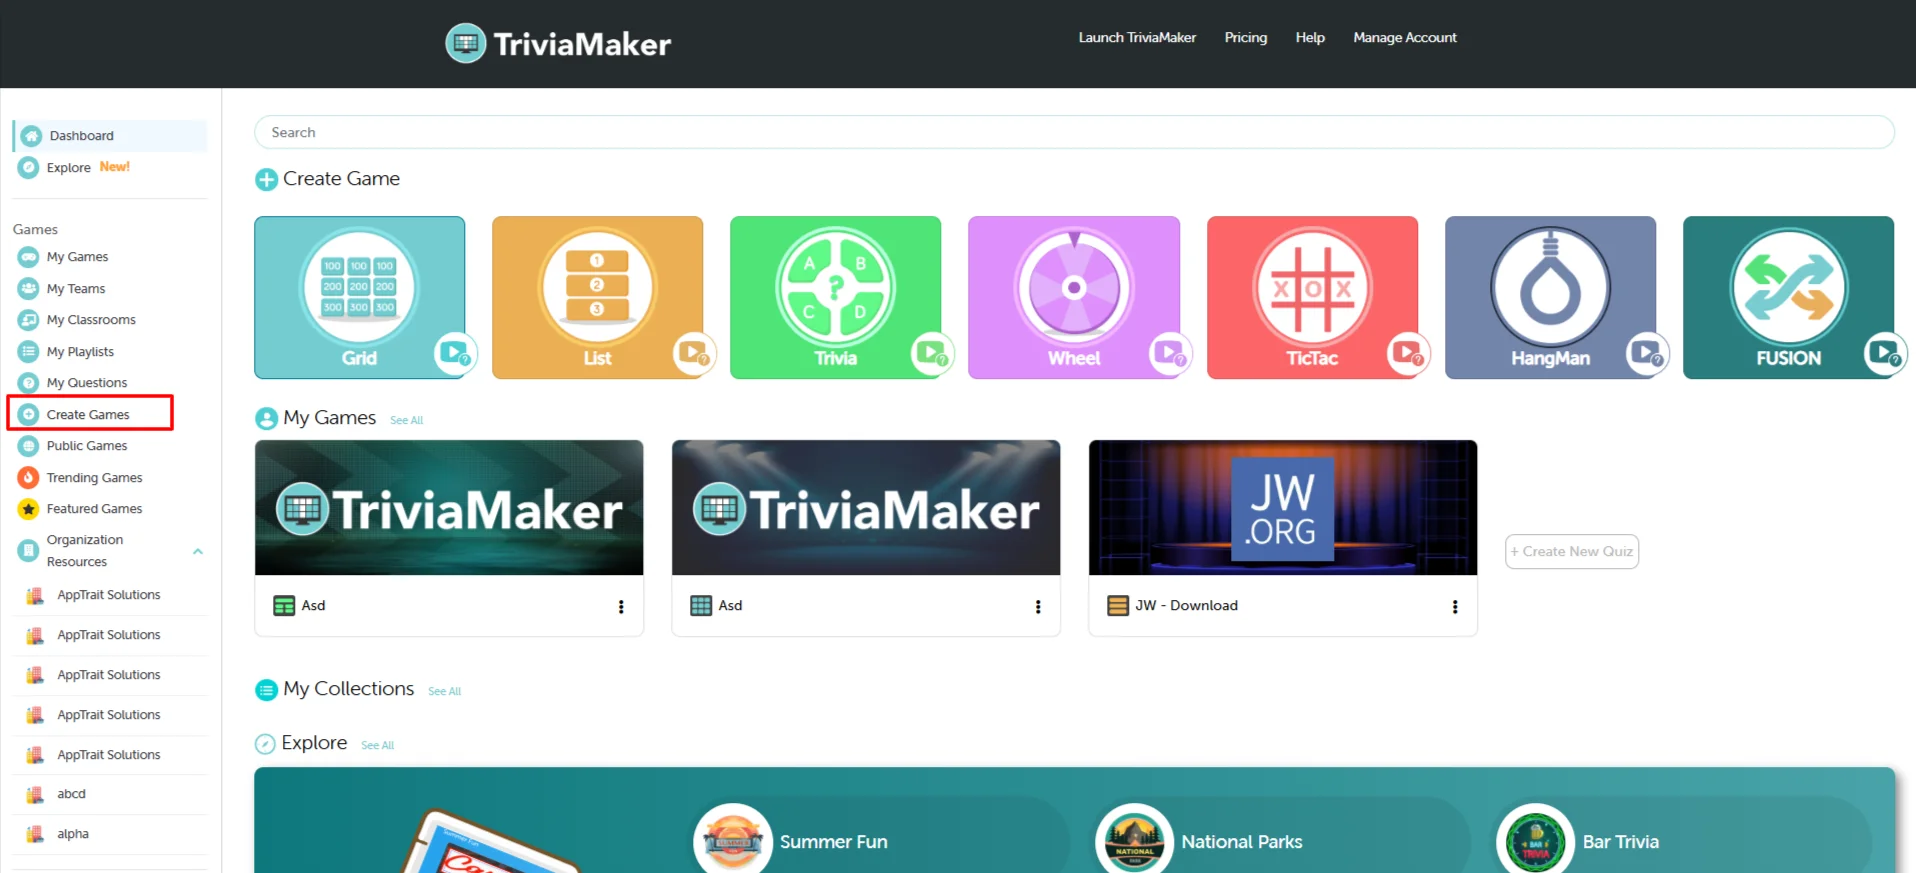
You'll see a list of available game styles — select Wheel from the options.
Set Up Your Game
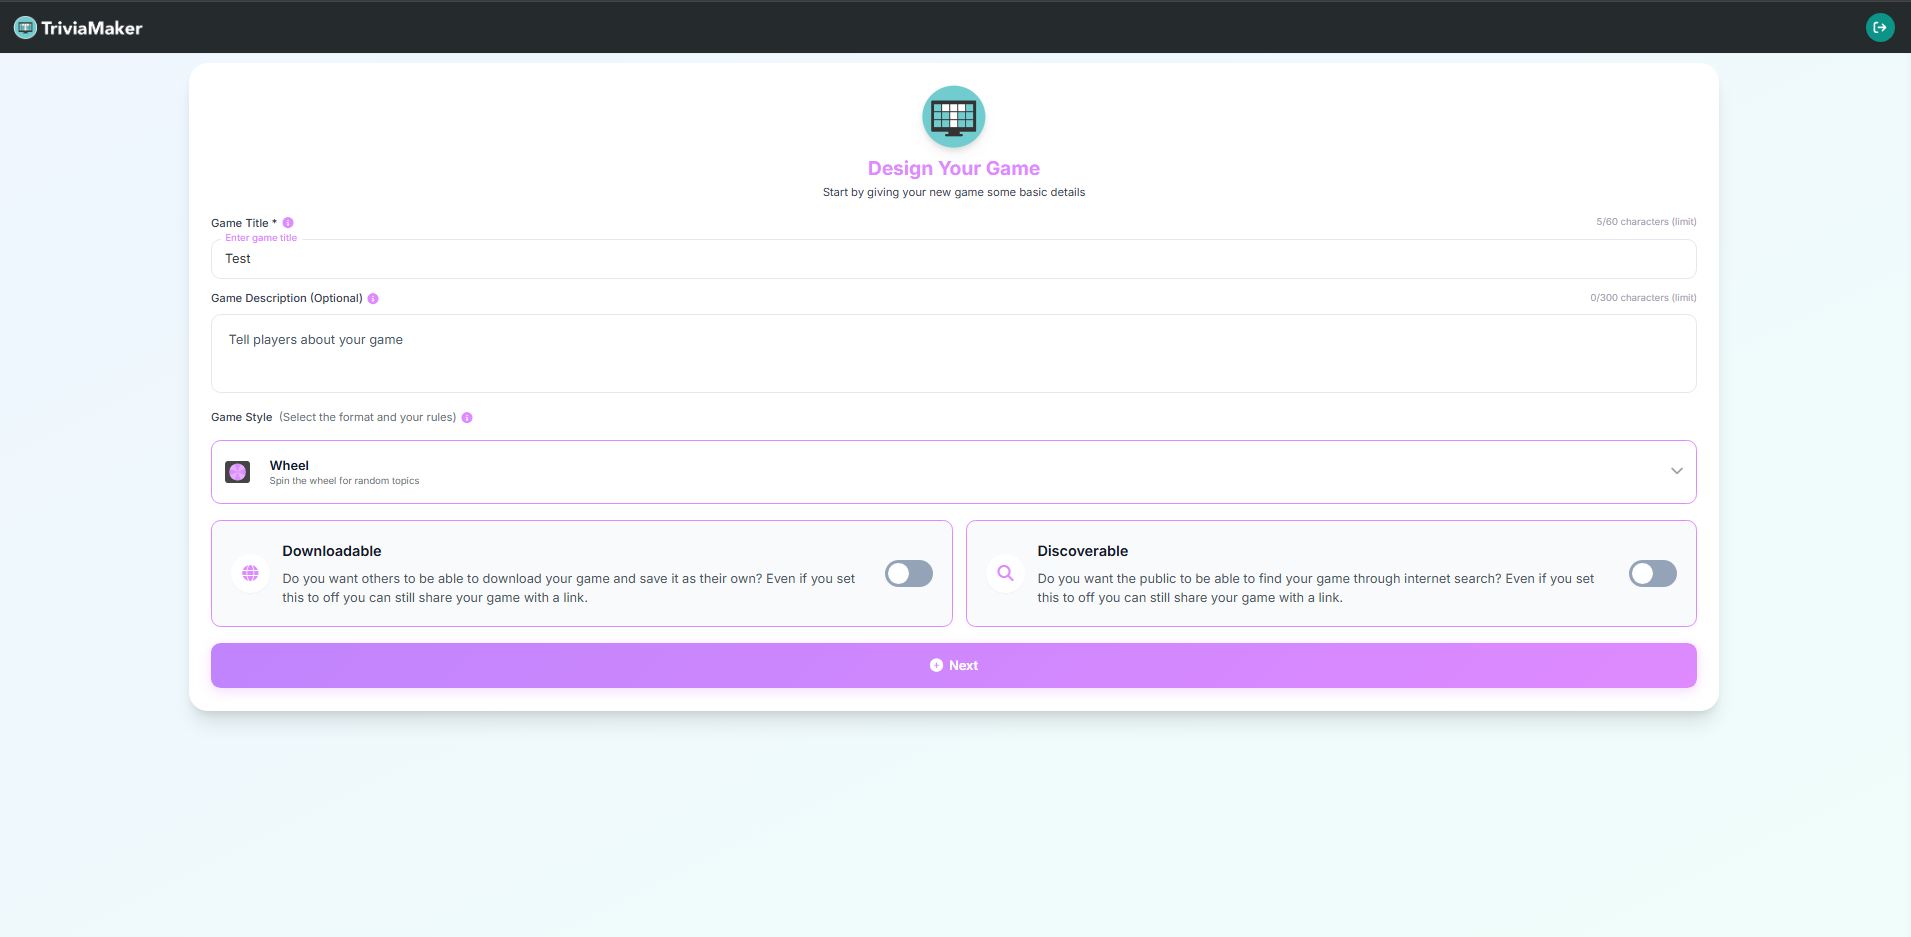
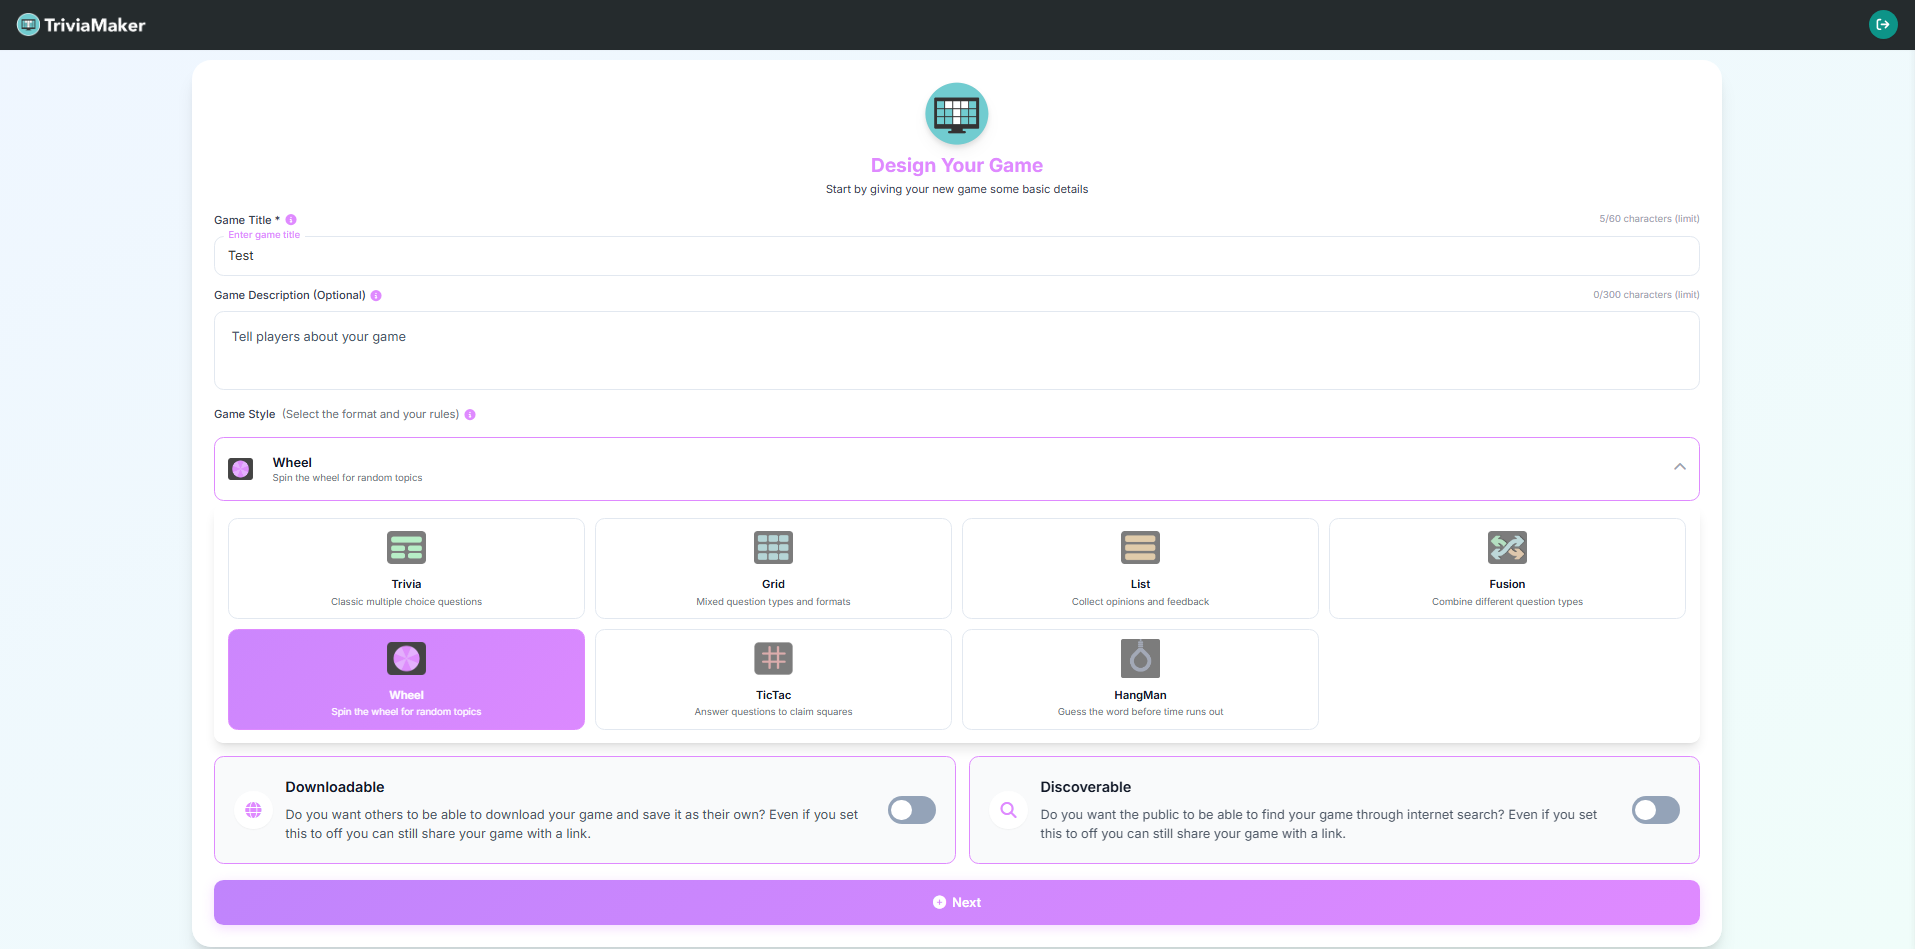
Enter Your Game Name
Give your game a unique and recognizable name. This name will help you identify your game easily within your dashboard and when sharing it with others.
Add a Game Description (Optional)
You can optionally add a short description for your game. Use this space to describe the purpose, theme, or any special notes about your game — it helps you and others remember why you created it.
Select the Wheel Game Style
From the Game Style dropdown, select Wheel — Spin the wheel for random topics. This sets the format and rules for your game.
Allow Others to Copy (Downloadable)
Toggle this switch if you want others to download your game and save it as their own.
💡 Why use this? This is great for educators who want to share a template quiz with other teachers, or for content creators who want their games to be reused by the community.
Publicly Searchable (Discoverable)
Toggle this switch to make your game visible to the public.
💡 Why use this? Turn this on if you've created a fun, general-knowledge quiz that you want the whole TriviaMaker community to find and play. Keep it off for private games for your class or team.
Click "Next" to Create Your Game
Once you've entered the details and selected your preferences, click on the Next button to proceed with creating your game.
How to Add Questions to Your Quiz
Pro Tip: Start by generating questions with our AI tool to quickly build a foundation. Then, manually add a few custom questions to personalize the quiz and cover specific topics.
Five Ways to Add Questions to Your Quiz
Choose the method that best suits your needs, whether you're starting from scratch, leveraging existing content, or using AI to speed up the process.
Use our AI Question Generator to instantly create relevant questions based on any topic.
Pro Tip: Start by generating questions with our AI tool to quickly build a foundation. Then, manually add a few custom questions to personalize the quiz and cover specific topics.
Click on the AI Questions button
In the text field, enter the topic or keyword.
Click Generate.
Review the list of generated questions and click Add next to any question you wish to include in your quiz.
Reuse questions you've previously created and saved in your my questions.
Click the Add Question From Library button.
Browse or Search for Questions in your My Questions library.
Click Add next to the desired question to insert it into your current quiz.
Convert existing text or documents into quiz questions instantly.
Click on Create questions from the document.
In the pop-up window, you have two options:
Paste Text: Copy and paste up to 4,000 words directly into the text area.
Upload Document: Upload a file from your computer.
Once the content is in place, click Generate Questions. The platform will analyze the text and suggest questions you can add.
For spreadsheet power users or bulk uploads, add questions by importing a CSV file.
Click the Prefer to edit with a spreadsheet? link at the top of the Set Up Your Questions section.
In the pop-up, you can Download Template to see the required format, or click Upload CSV File to import your prepared spreadsheet.
Important: Ensure your CSV file follows the specified column format for successful import.
Download CSV Template
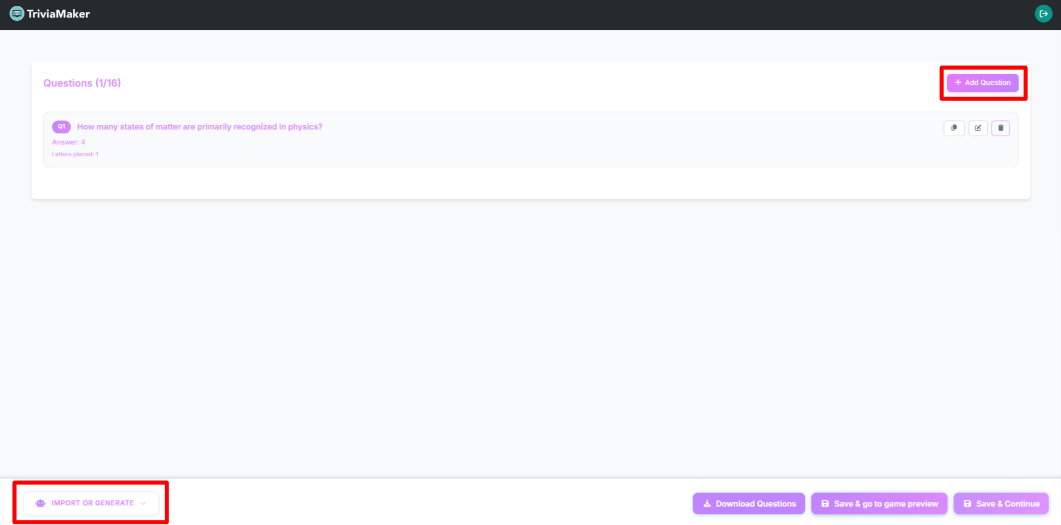
Create a custom question and answer for your Wheel game. The Wheel game style allows you to add questions with single answers that will be displayed on the spinning wheel.
Click the central Add Question button.
The Question Editor window will appear with fields specific to the Wheel game style.
Enter Question:
Type your question text in the Question field. You can also add media (image, audio, or video) using the icons on the right side of the field.
Enter Answer:
Type the answer in the Answer field. Unlike trivia games, Wheel games have a single answer per question that will appear as a segment on the wheel.
Arrange Wheel Segments:
Choose how to arrange the segments on your wheel:
Auto Arrange: The system automatically arranges the segments with random colors.
Manually Arrange: Customize the position and color of each segment on the wheel by clicking on the grid squares.
Click Save Question to finalize and add the question to your Wheel game.
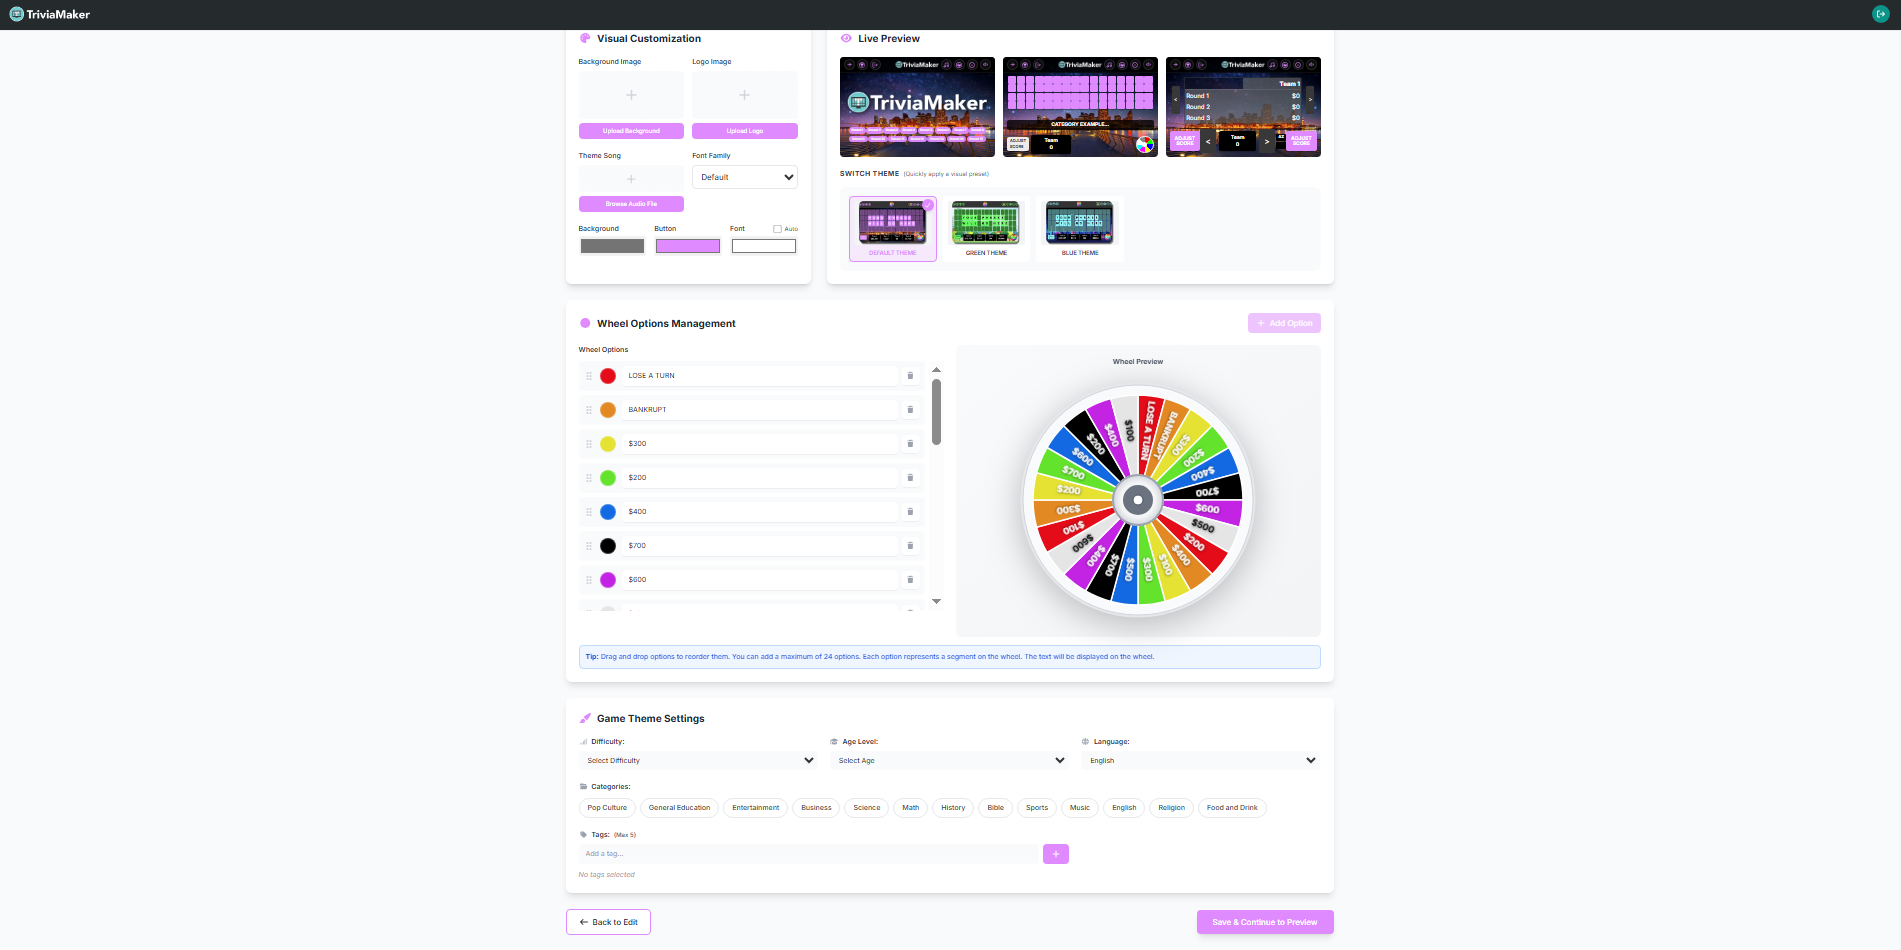
Branding Your Quiz
Pro Tip: For the best visual results, use a high-contrast color combination. If you upload a background image, choose a font color that stands out clearly against it.
| Option / Setting | Description |
|---|---|
| Font Color | Click the color swatch next to "Font color" to select a new text color for your quiz. |
| Button Color | Click the color swatch next to "Button color" to change the color of interactive elements. |
| Background Color | Click the color swatch next to "Background color" to set the main background hue. |
| Font | Use the "Select Font" dropdown to choose a different typeface for your quiz text, further enhancing its visual style. |
| Theme / Select Theme | Use the Theme dropdown (set to "Default" by default) to apply a premade visual theme (such as Space, Neon, or Jungle) which automatically customizes the layout, backgrounds, and styling of your quiz. |
| Upload Logo | Display your brand logo within the game interface. (Note: If you do not upload a custom logo, the default TriviaMaker logo will be used in gameplay.) |
| Background Image | Replace the default background with your own image to make the game visually appealing and thematic. (Note: If you do not upload a custom background image, the default theme background will be used in gameplay.) |
| Theme Song | Upload a background theme song to make gameplay more immersive and entertaining. If you do not want to set any audio, you can upload a blank audio file (downloadable from the blank-audio GitHub repository). |
Once you've applied your customization settings, your Wheel game will reflect all the changes you've made. The custom colors, fonts, logo, background image, and theme song work together to create a cohesive and branded experience. This personalized appearance helps engage your audience and makes your Wheel game stand out, whether you've created it for education, corporate training, events, or entertainment.
Game Theme Settings
At the bottom of the customization panel, you will find the Game Theme Settings. Here you can configure the metadata, search tags, language, and general classification of your quiz to make it professional and easy to manage:
| Setting | Description |
|---|---|
| Categories | Define the theme or subject of your quiz to make it easily discoverable. You can select from various pre-defined categories such as Pop Culture, General Education, Entertainment, Business, Science, Math, History, Bible, Sports, Music, English, Religion, Food and Drink, and more. |
| Tags | Add relevant keywords (up to a maximum of 5 tags) to help organize and enable easy search functionality for your games. Type your desired keyword in the "Add a tag..." field and click the green `+` (plus) button to add it. |
| Age Level / Grade Levels | Choose the suitable age or grade range for your players by selecting from the "Select Age" dropdown menu. |
| Difficulty | Select the appropriate challenge level (Easy, Medium, or Hard) using the "Select Difficulty" dropdown to guide your players. |
| Language | Choose the language for your quiz text using the language dropdown (set to "English" by default). |
| Save Your Updates | Click the green "Save & Continue to Preview" button on the bottom-right to confirm all your updates and proceed. You can also click the "Back to Edit" button on the bottom-left to return to the previous editing screen. |
Edit your quiz
How to Edit Questions
You can easily modify any question after it has been added to your quiz. Follow these two simple steps:
Step 1: Click the Edit Icon
Click on the Edit (pencil) icon next to the question you want to modify. This will redirect you to the Edit Question page for that game.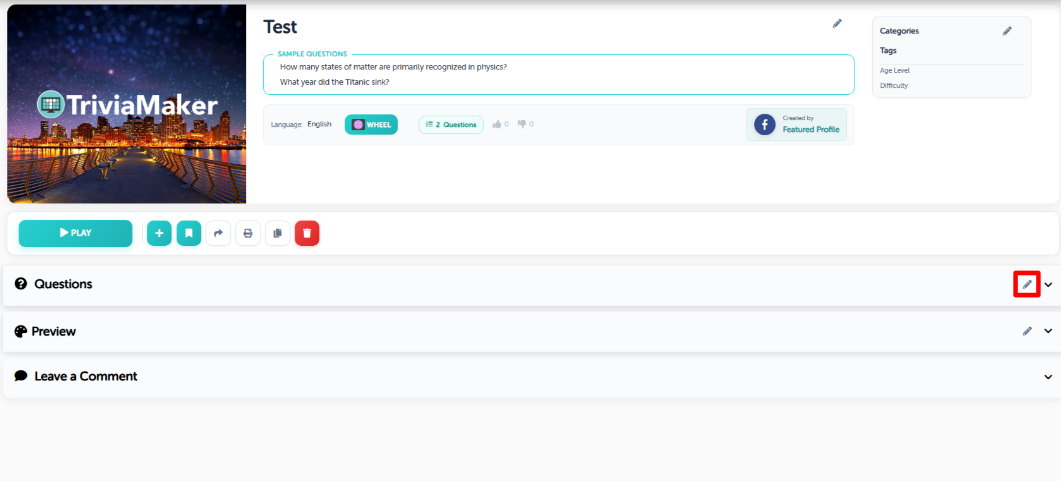
Step 2: Modify Content & Save
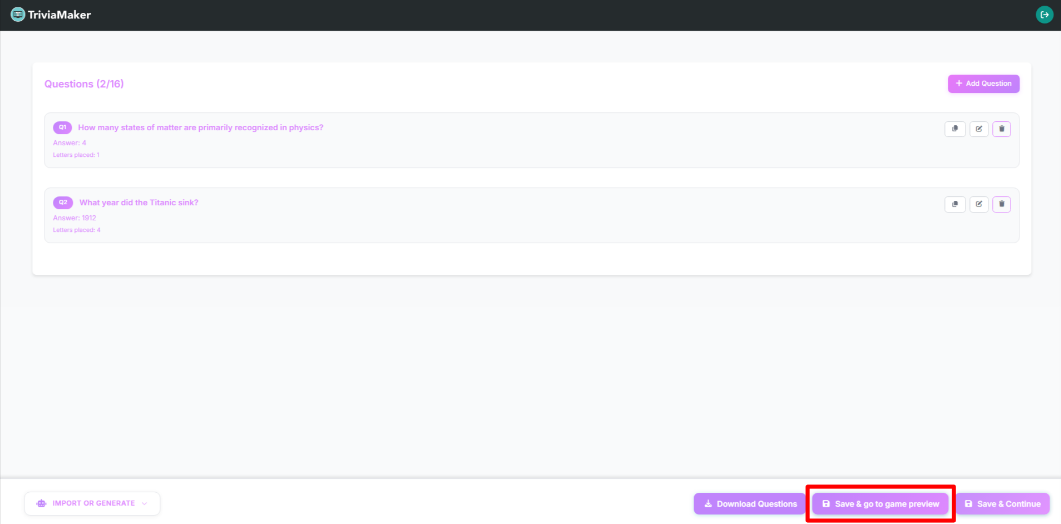
Edit the question, answers, or media as desired. Once you're done, you have two options for saving:If you want to go directly to the game preview page, click the Save & go to game preview button.
If you want to return to the customize section, click the Save & continue button.
How to Edit Customization & Game Settings
You can easily update your quiz settings, colors, fonts, background images, and general classification at any time:
Step 1: Click the Edit Icon
Click on the Edit (pencil) icon in the customization/settings header. (Note: On click of that edit icon, it will redirect you to the customization page where you can edit all the game settings and customizations.)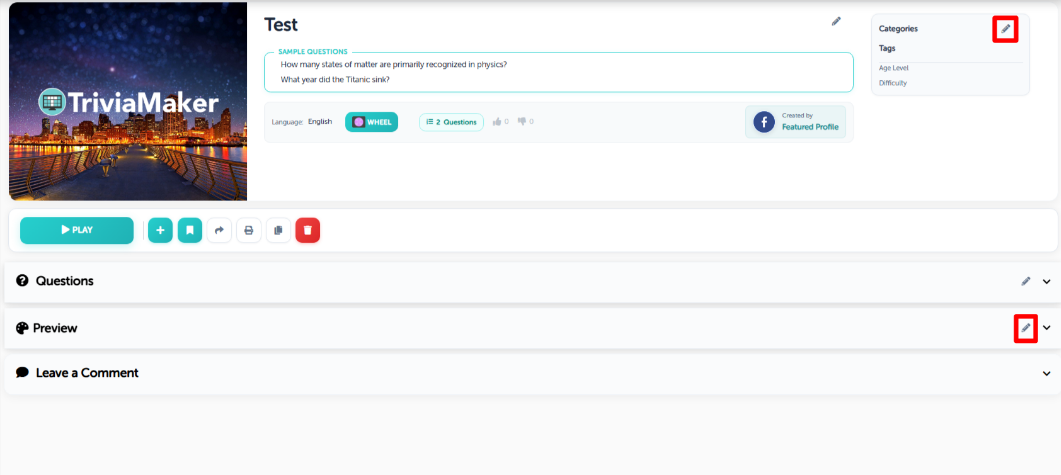
Step 2: Modify Settings & Save
Edit the styling, background music, category, tags, or difficulty levels as needed. After completing your editing, click on the Save & continue to preview button to go to the game preview.
Game Settings & Quick Actions
In the game management panel or dashboard, you can perform several quick actions to manage, share, or customize your wheel game:
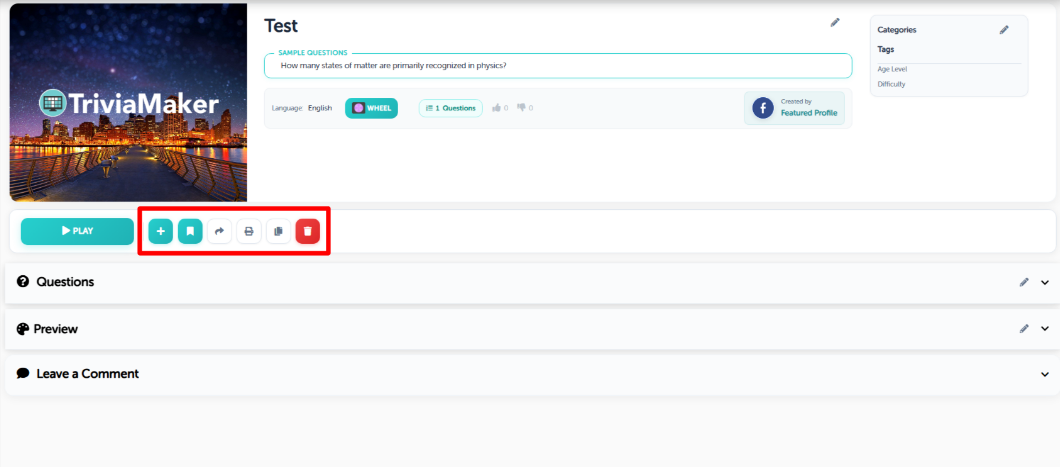
| # | Action | Description |
|---|---|---|
| 1 | Add to Playlist | Organize your game into playlists like "Christmas Games" or "Science Games." |
| 2 | Add to Collection | Group different games together for easier management. |
| 3 | Share Game | Copy and share the game link via the share modal. |
| 4 | Print Questions | Open all questions in a new tab — save as PDF or print directly. |
| 5 | Clone Game | Duplicate the game to create modified versions. |
| 6 | Delete Game | Permanently delete the game (cannot be undone). |
| 7 | Embed Game | Get iframe/embed code to display the game on any website. |
How to Play Your Wheel Game: A Quick Guide
Pro Tip: Before a live event, always do a quick test run of the game in your chosen mode. This ensures you're comfortable with the controls and that any media (audio/video) plays correctly.
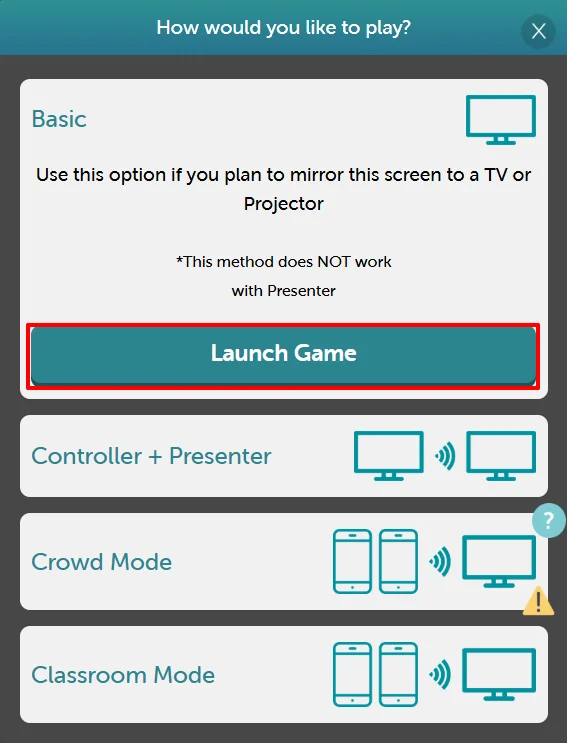
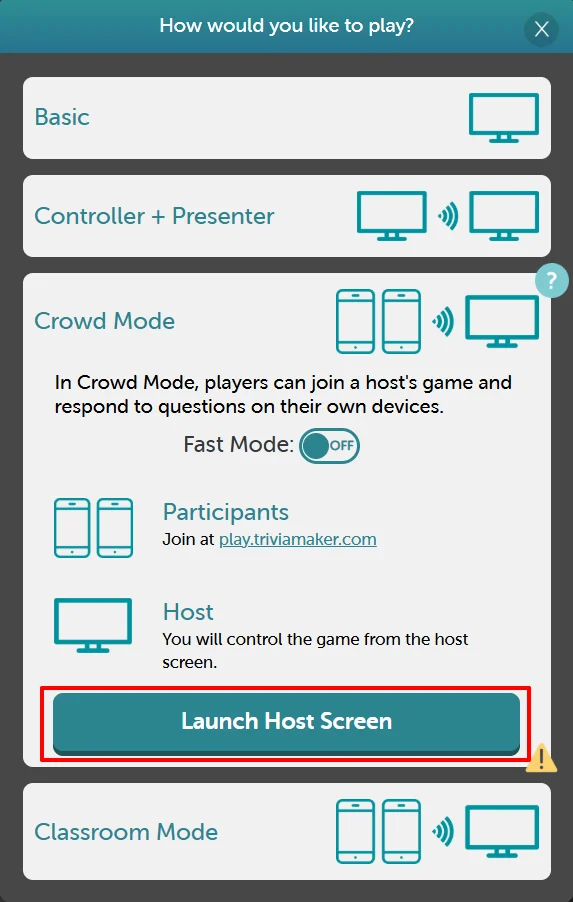
The Wheel game offers multiple versatile game modes to suit any setup, including Basic Mode, Controller + Presenter Mode, Crowd Mode, and Classroom Mode. Here's how to quickly start your Wheel game:
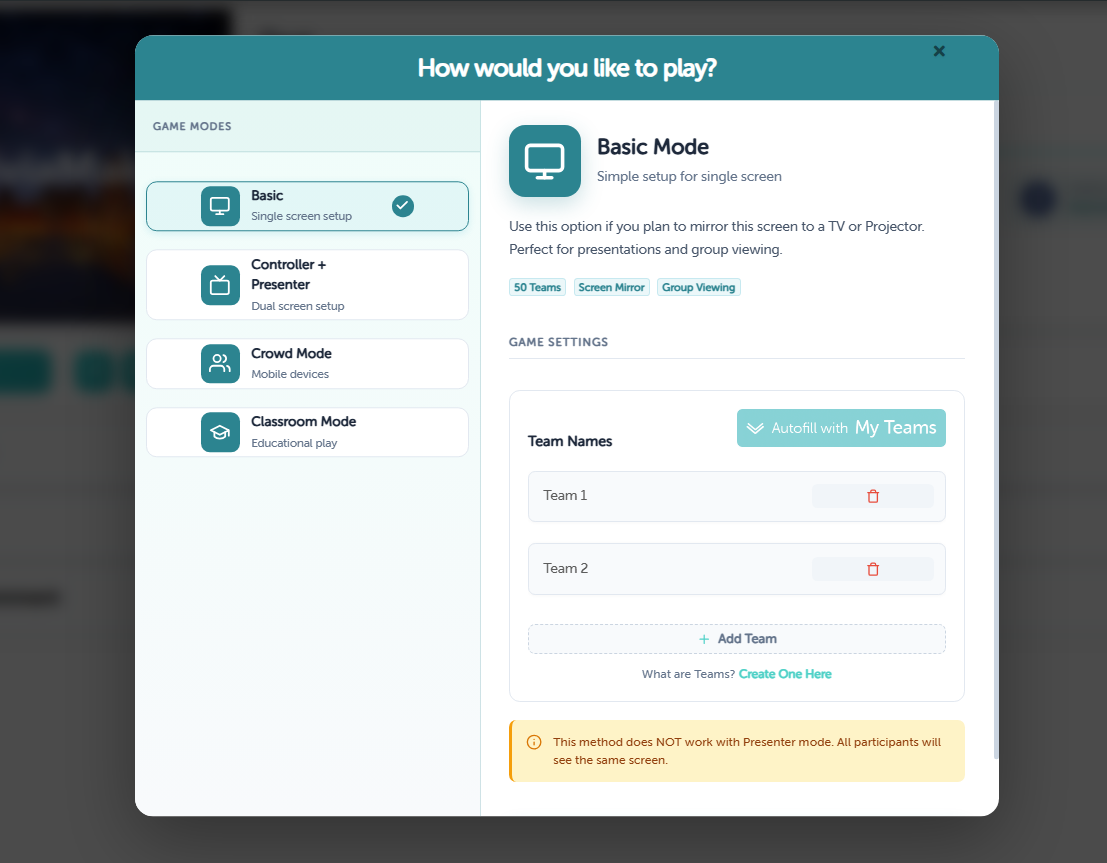
Basic Mode is perfect for playing on a single device (like a laptop) and mirroring your screen to a TV or projector. You can set up teams or play individually, and the wheel spins on the main screen for everyone to see.
Pro Tip: The spinning wheel adds excitement to game nights! Let players take turns spinning, and build anticipation by adding a countdown before revealing the question.
Launch Game Modal
Wheel Game in Action
How to Launch:
From the "How would you like to play?" screen, select the "Launch Game" button.
This will open the "Game Settings" panel.
Here, you can customize your game by toggling settings for the question screen, theme sound, and scoreboard.
You can also add your Team Names manually (e.g., "Team 1," "Team 2") or use the "Autofill with My Teams" feature.
Once your settings are configured, click "LET'S PLAY" to begin.
Playing the Game: Step-by-Step Walkthrough
Once you've launched Basic Mode, here's the complete gameplay experience from start to finish:
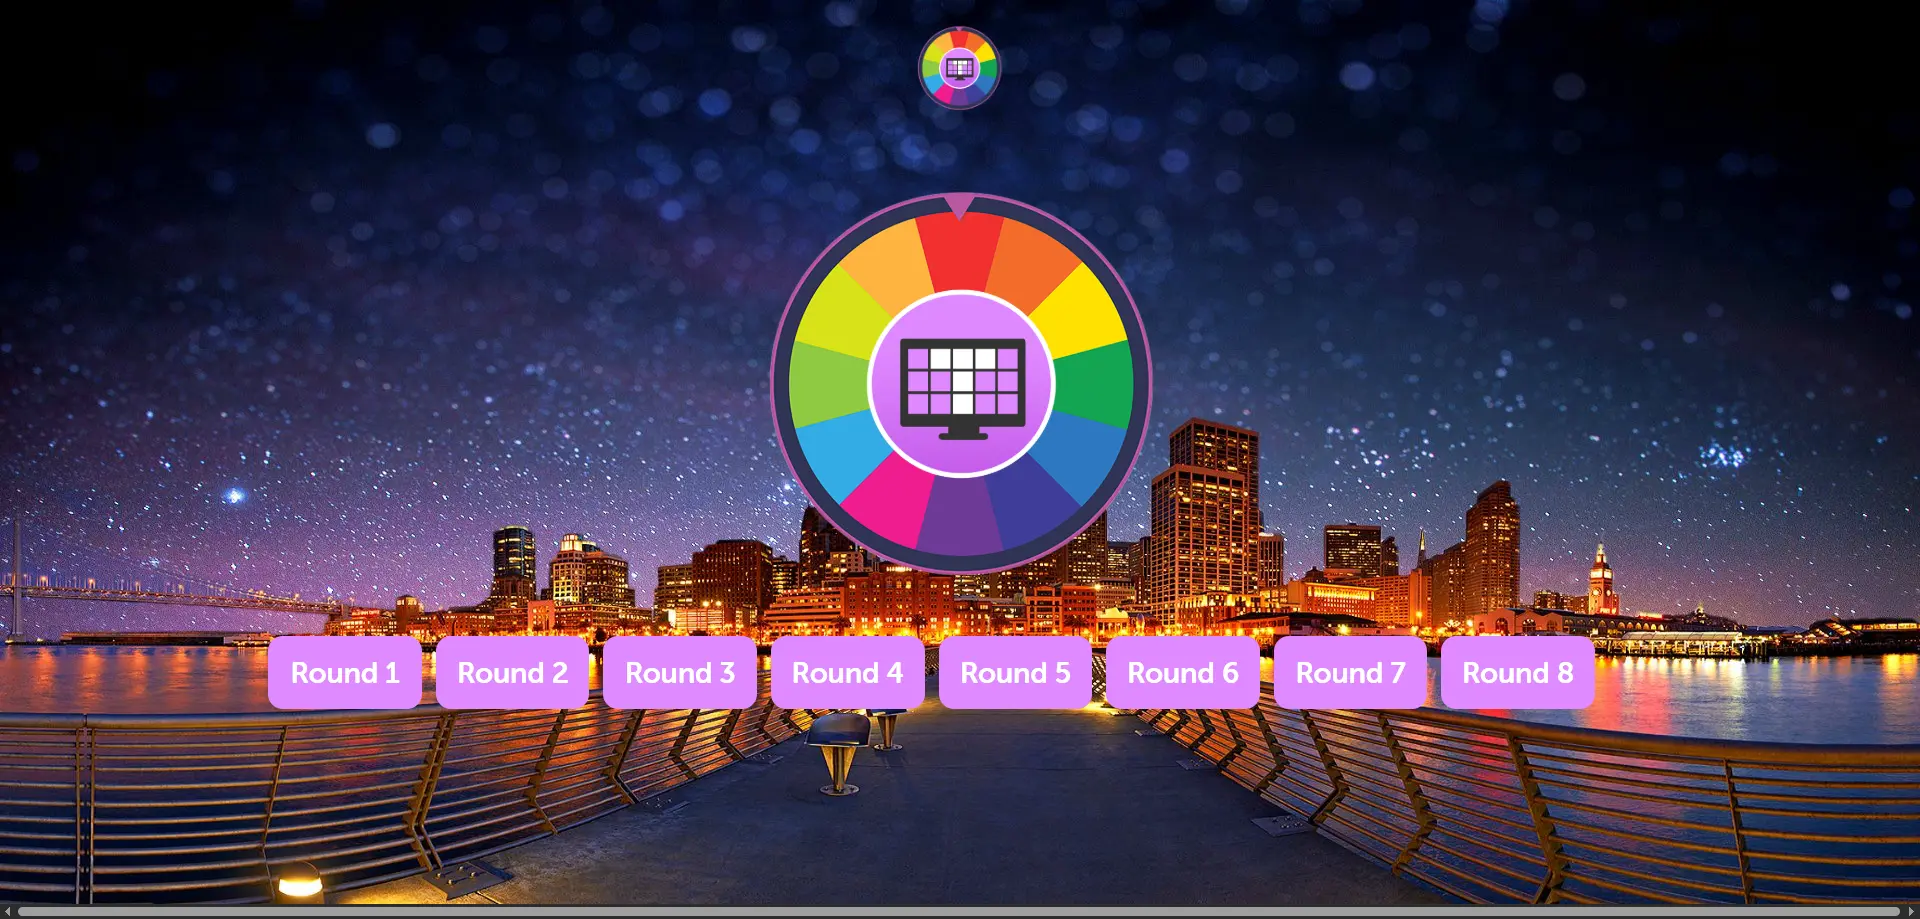
Step 1: Welcome Screen
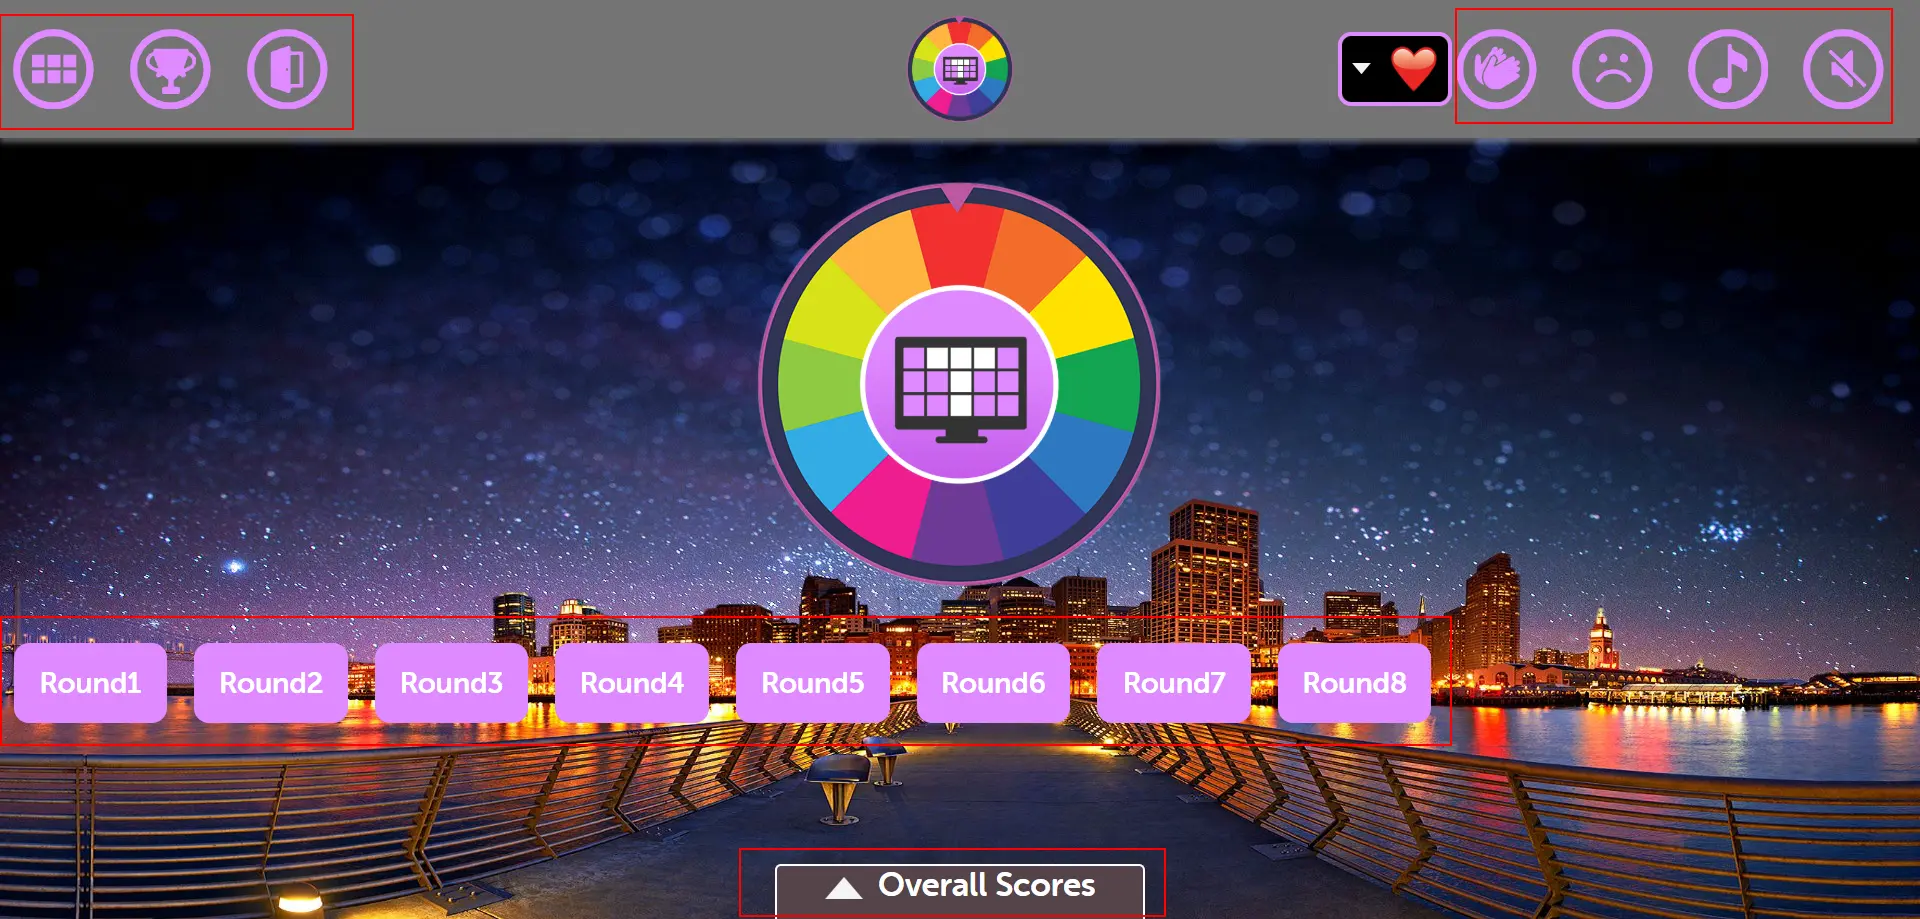
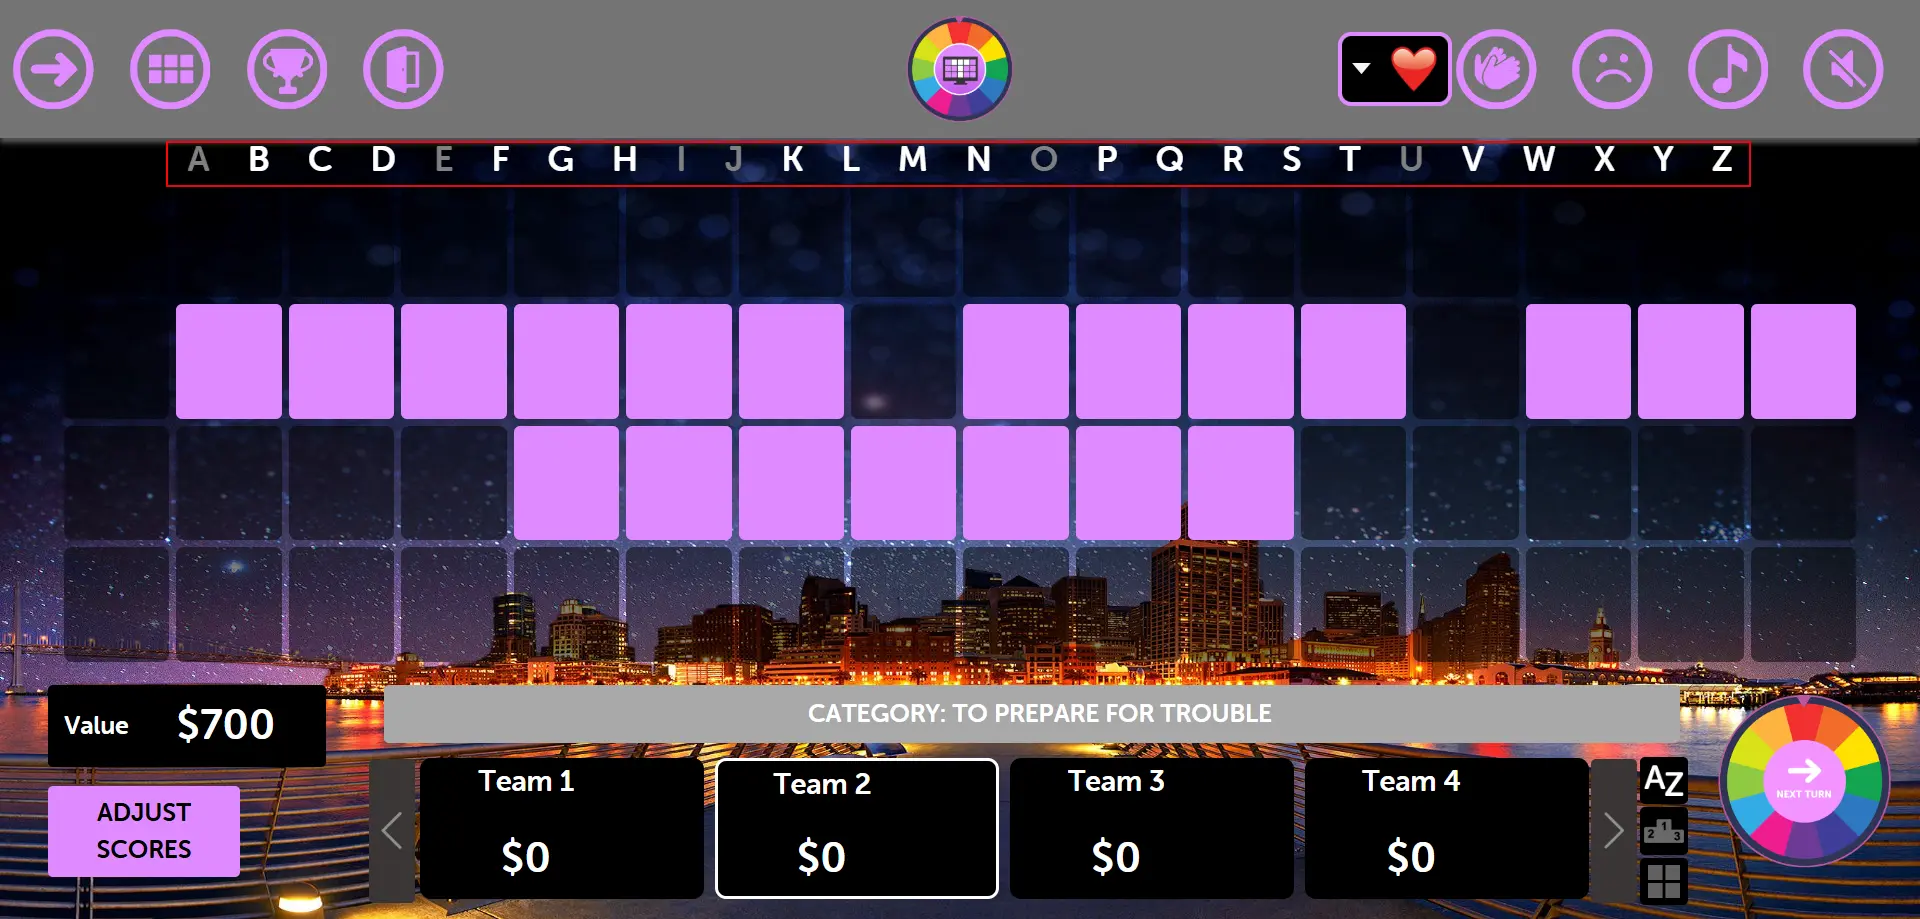
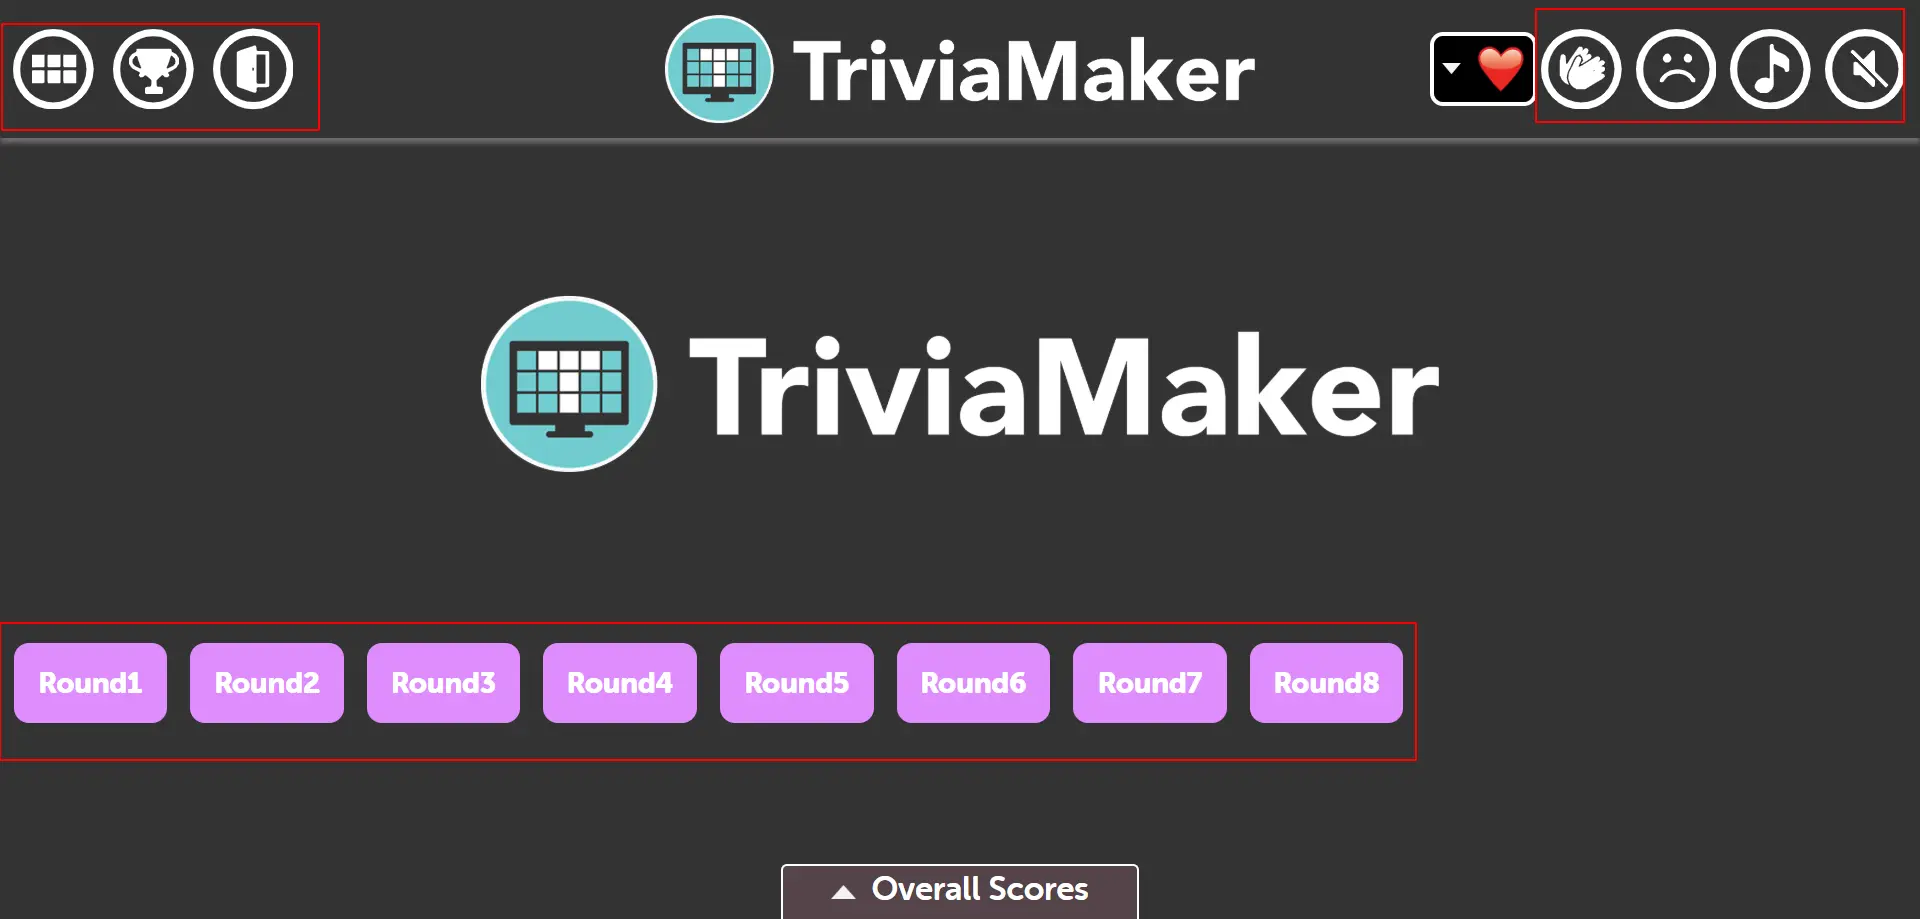
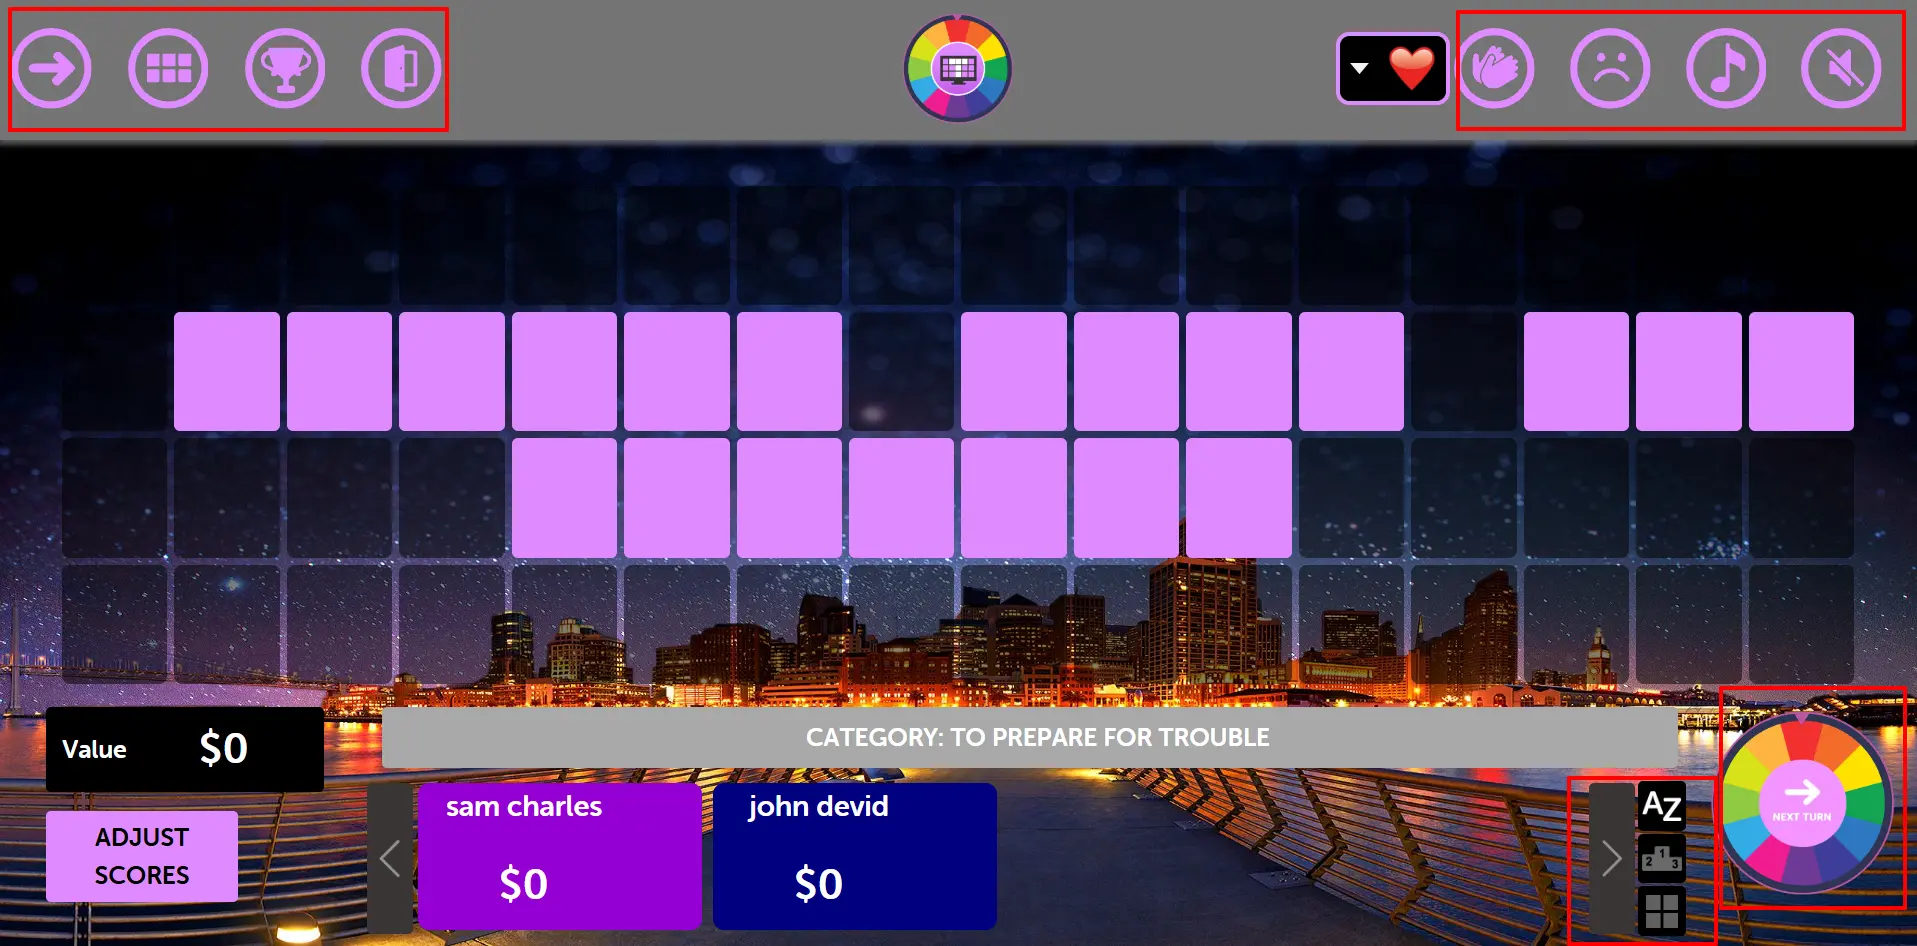
The welcome screen displays the colorful spinning wheel with all available rounds. Each round button represents a different question. Click on any round to spin the wheel and reveal the question. Here are the control icons:

Grid Icon
Click this icon to view all available rounds in a grid layout. This allows you to see all questions at a glance.

Winner Icon
Click this icon to skip directly to the winner screen and see the final results and scoreboard.

Exit Icon
Click this icon to exit the game and return to the main dashboard.

Play Music Icon
Click this icon to play or pause the background music during the game.
1
Round Buttons
Click on any round number (1, 2, 3, etc.) to start that specific round and proceed to the question screen.

Sad Face Icon
Click this icon to play a sad sound effect, typically used when a team answers incorrectly.

Clap Icon
Click this icon to play a clapping sound effect, perfect for celebrating correct answers or team achievements.
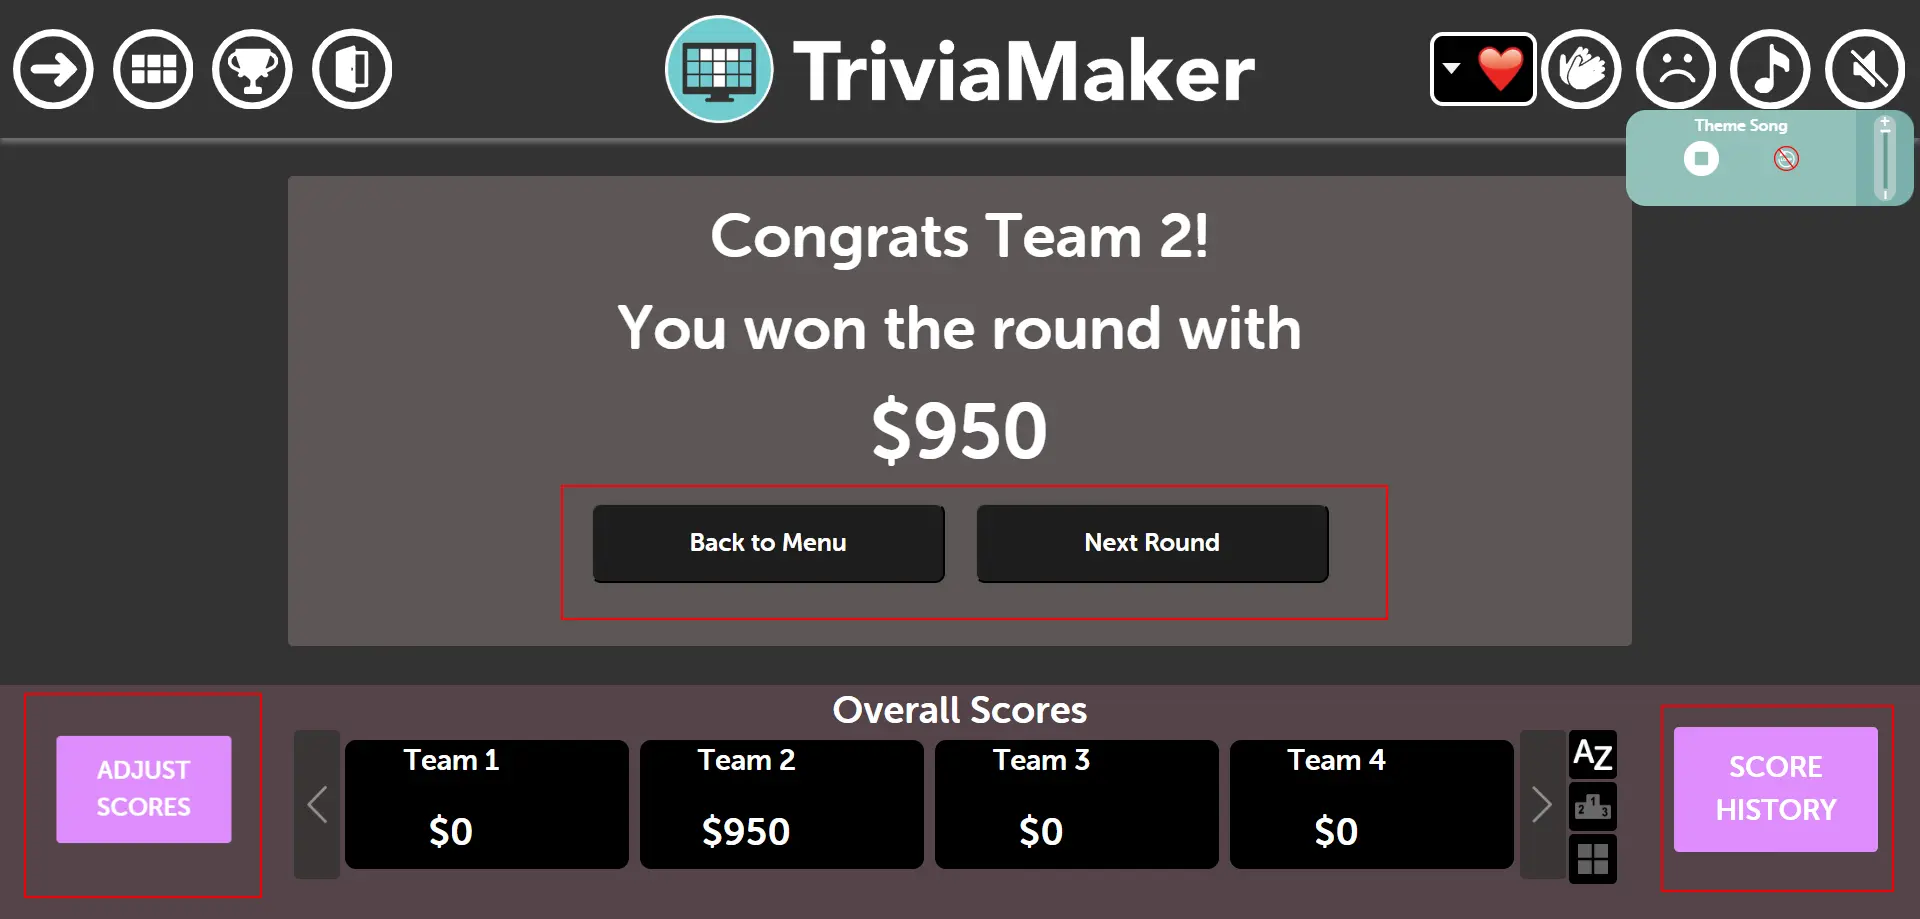
Overall Scores Button:
Click the "Overall Scores" button at the bottom of the screen to expand and view the current team names and their scores. You can also manually adjust scores if needed during gameplay by clicking on the score values.
Pro Tip: The wheel creates excitement and anticipation! Build suspense by having players count down "3, 2, 1, Spin!" before clicking a round. The colorful wheel segments make it visually engaging for all participants.
Step 2: Game Start Screen
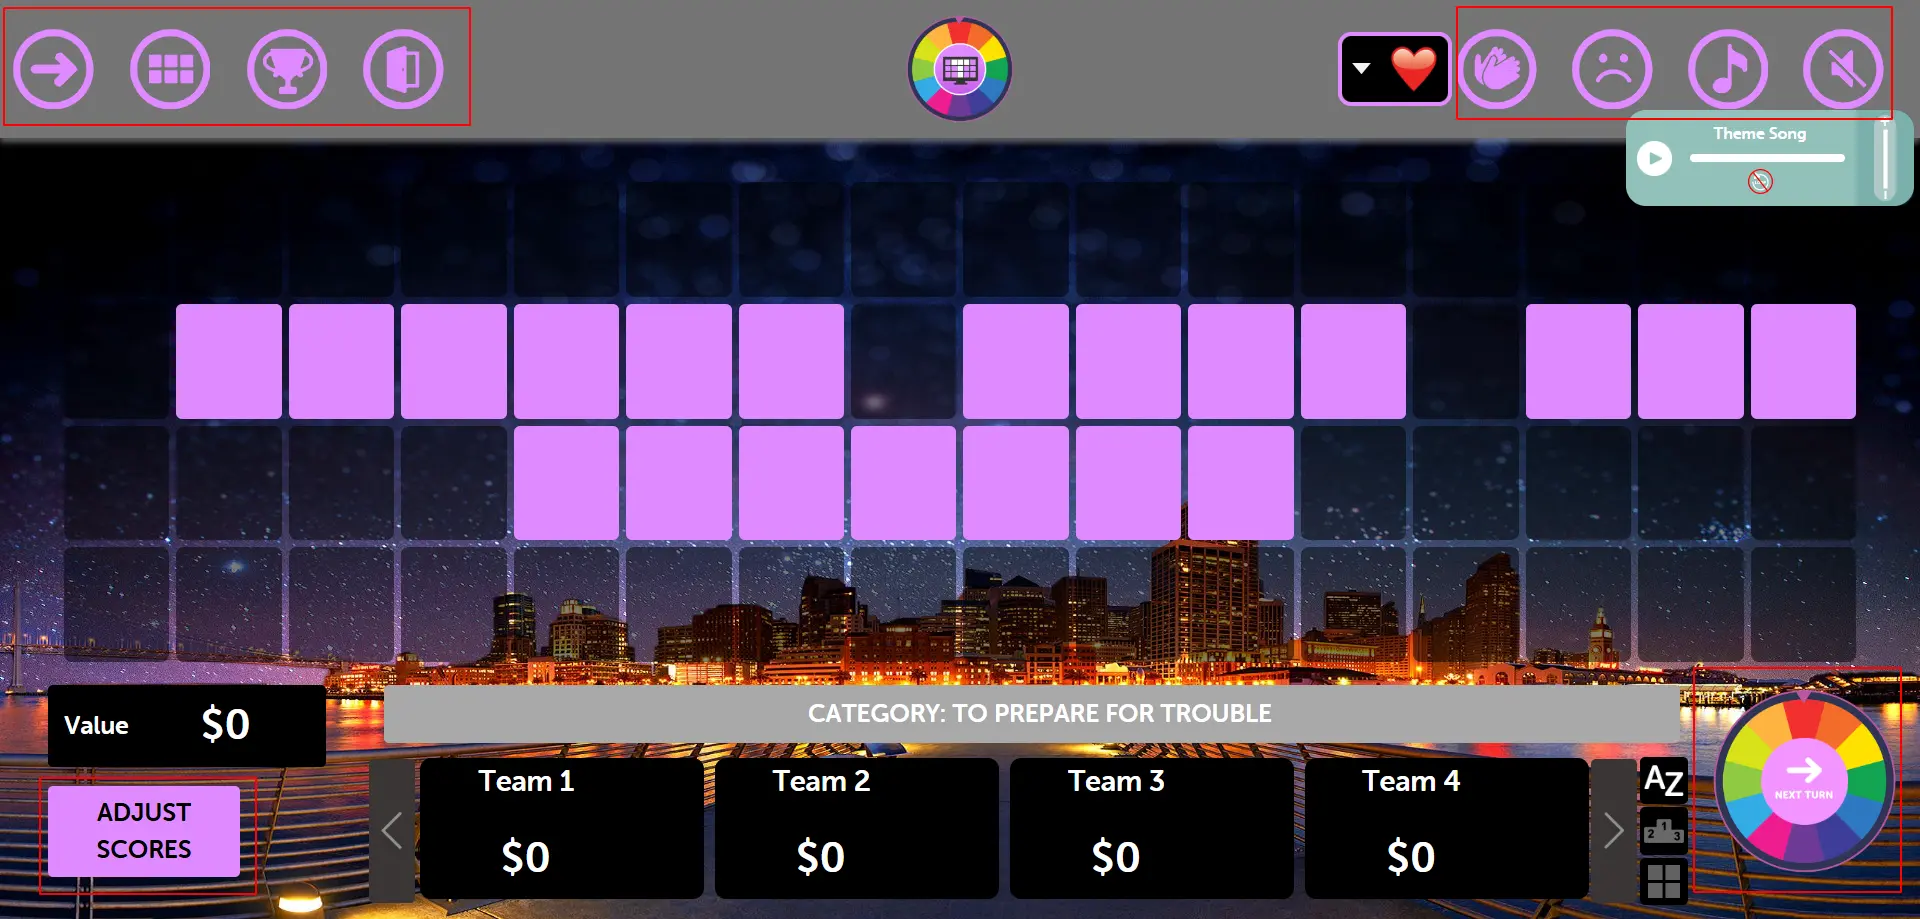
After the welcome screen loads, you'll see the wheel game's first screen:
Notice the "Start" button in the bottom right corner - this is your first step to begin the game
Click this button to proceed to the team selection screen and officially start your wheel game session
Pro Tip: The Start button is prominently displayed in the bottom right corner for easy access. Make sure all participants can see the screen clearly before clicking to begin!
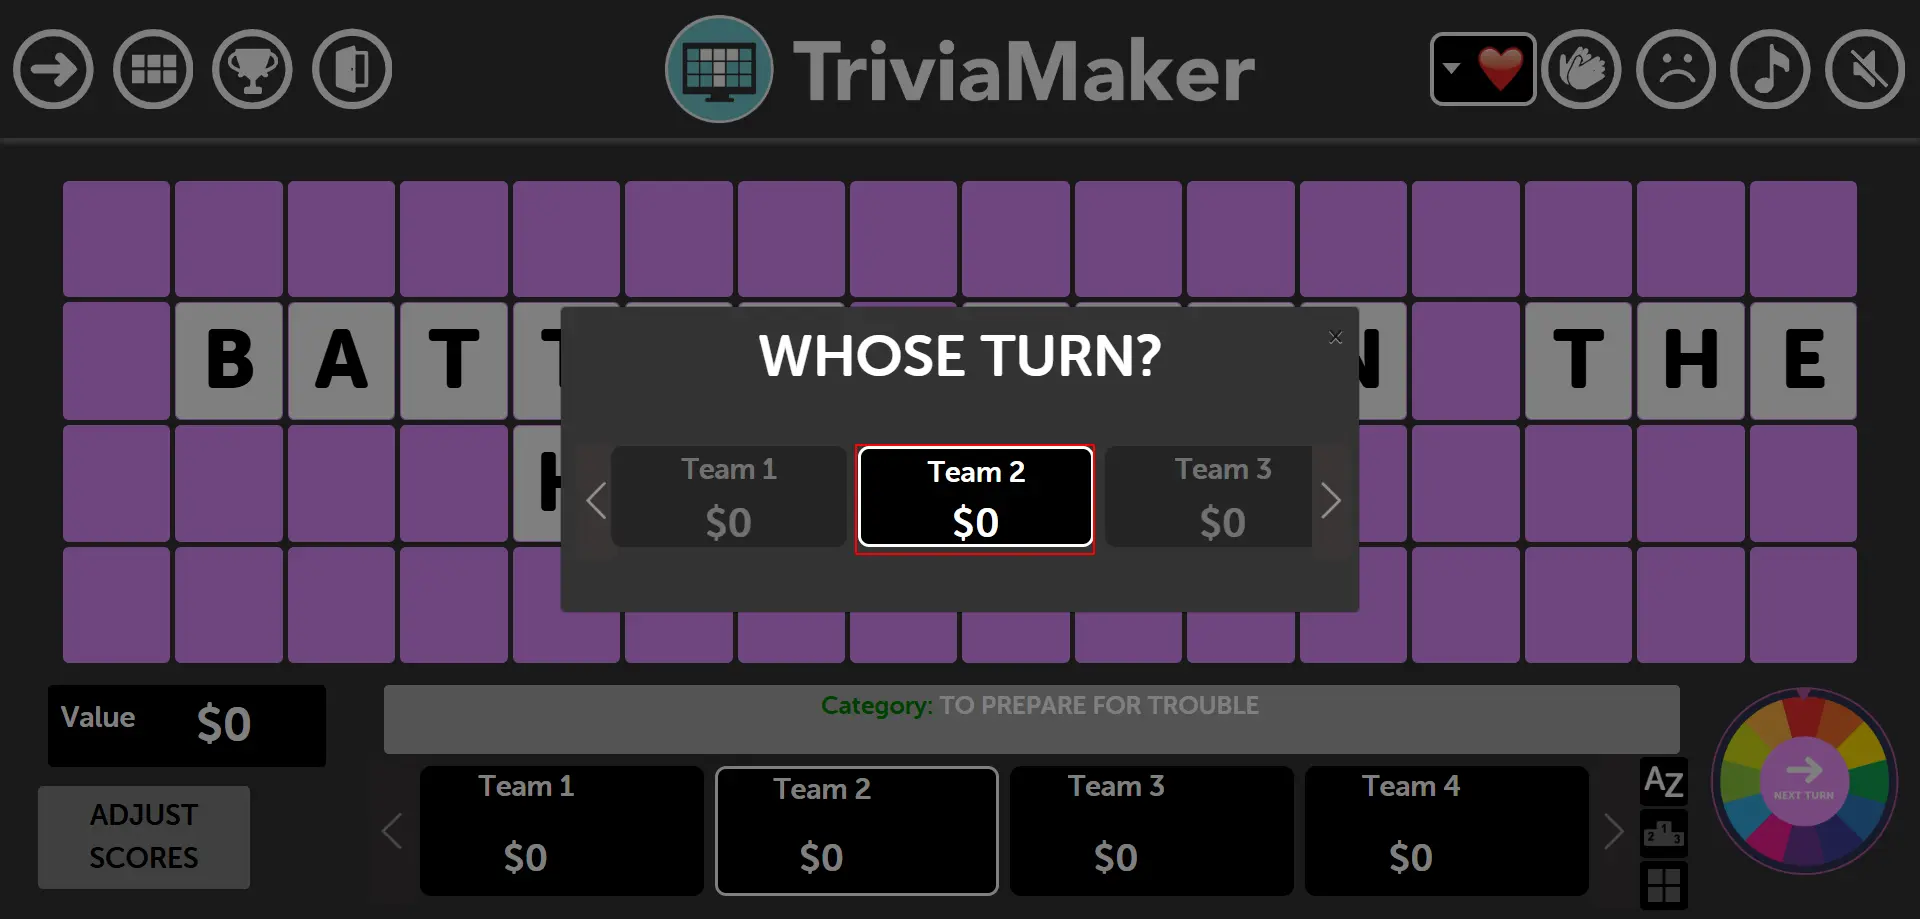
Step 3: Team Selection
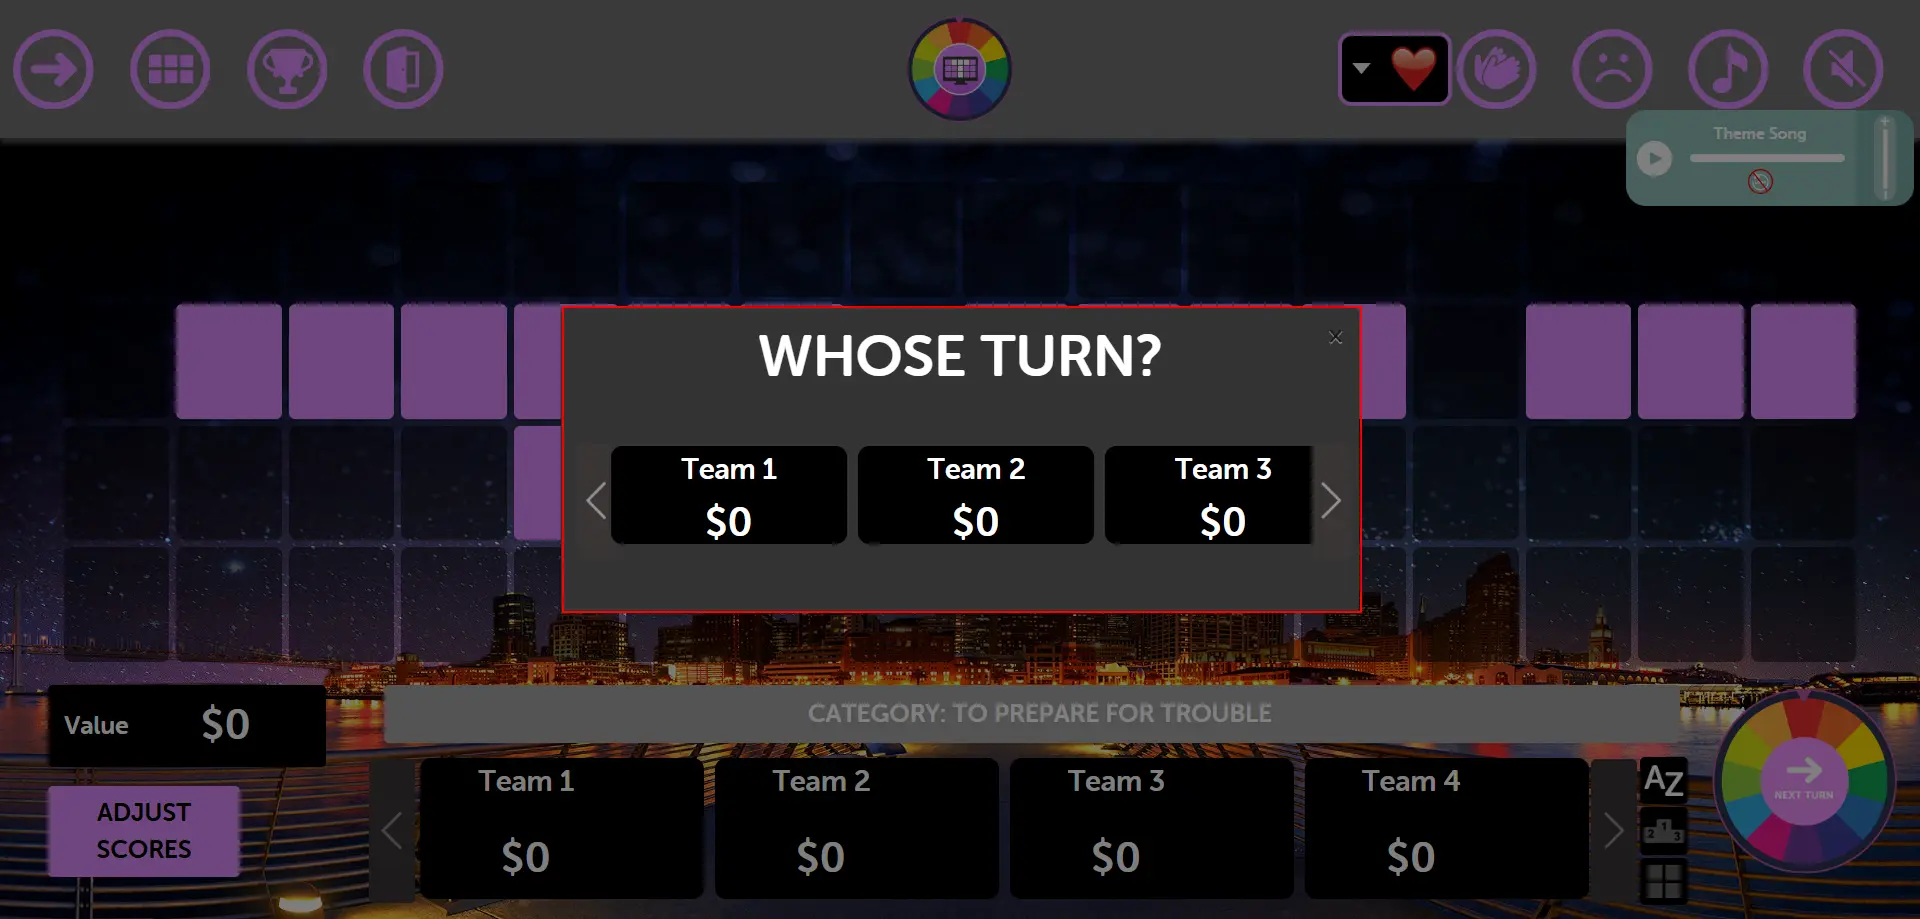
After clicking the Start button, this team selection modal opens. From here you can select which team will be going to solve the questions:
Choose from the available teams that you set up during the game configuration
Select the team that will attempt to answer the current question
Click on your chosen team to proceed with the question for that team
Pro Tip: This team selection modal appears each time you want to assign a question to a specific team. It helps maintain fair gameplay by allowing you to rotate between teams or strategically assign questions!
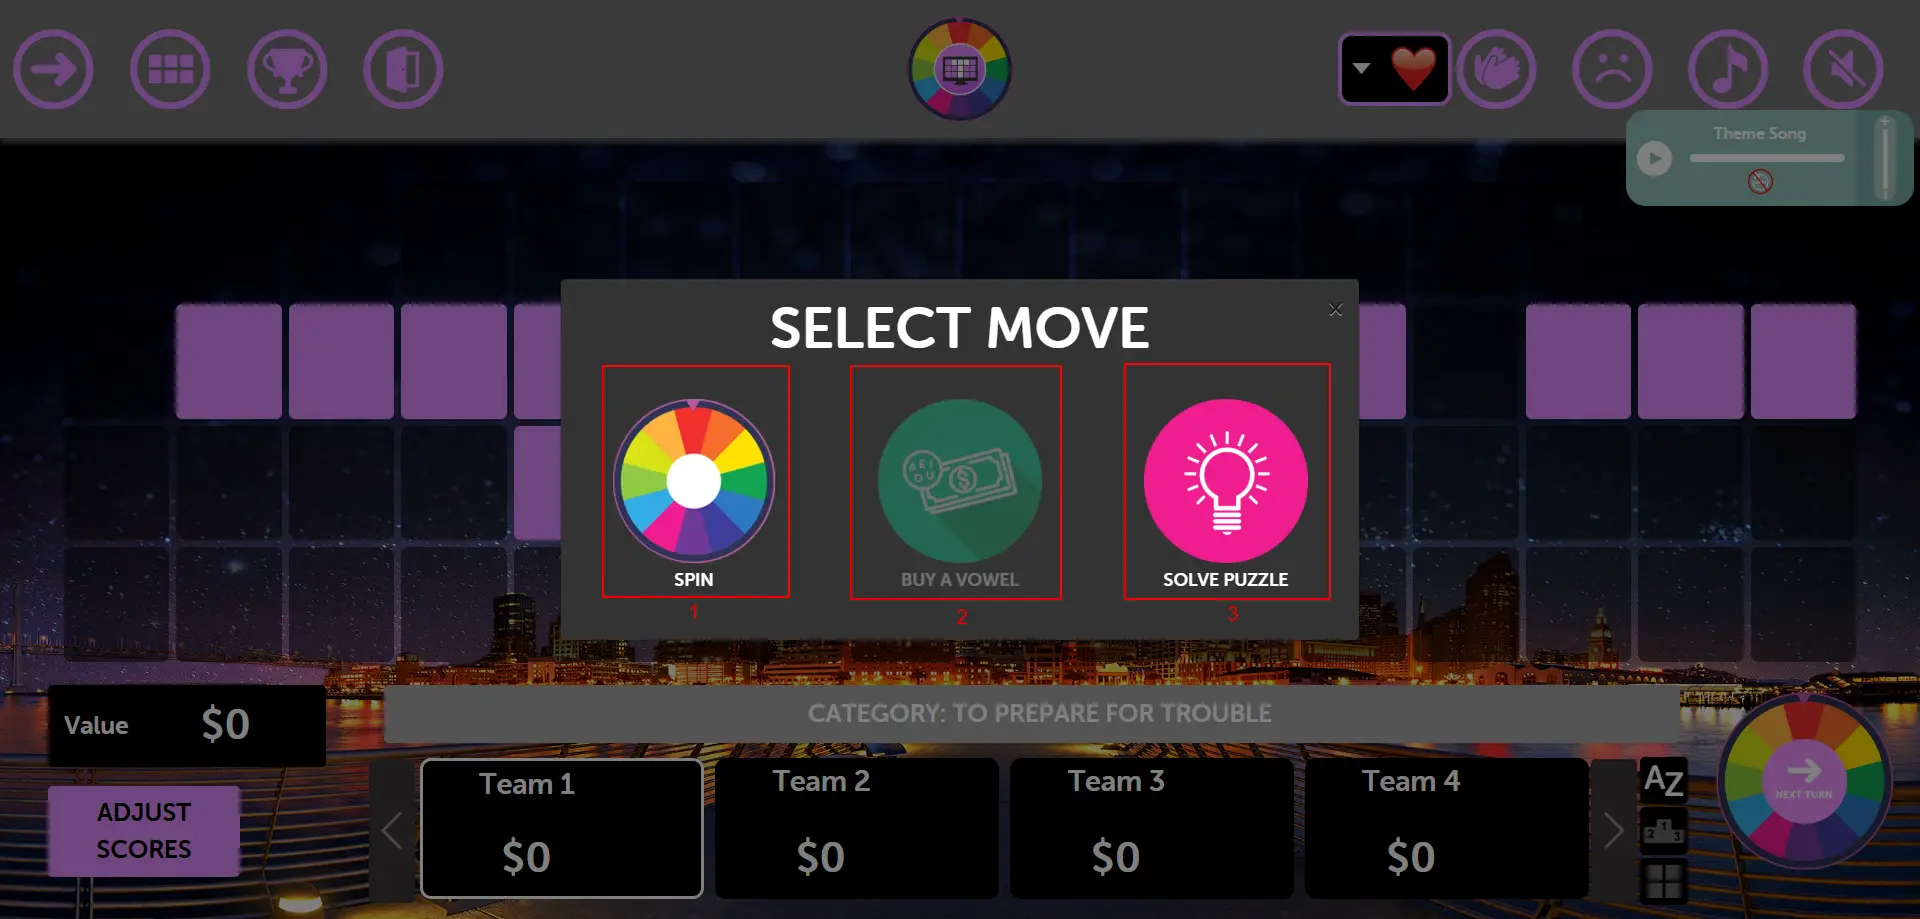
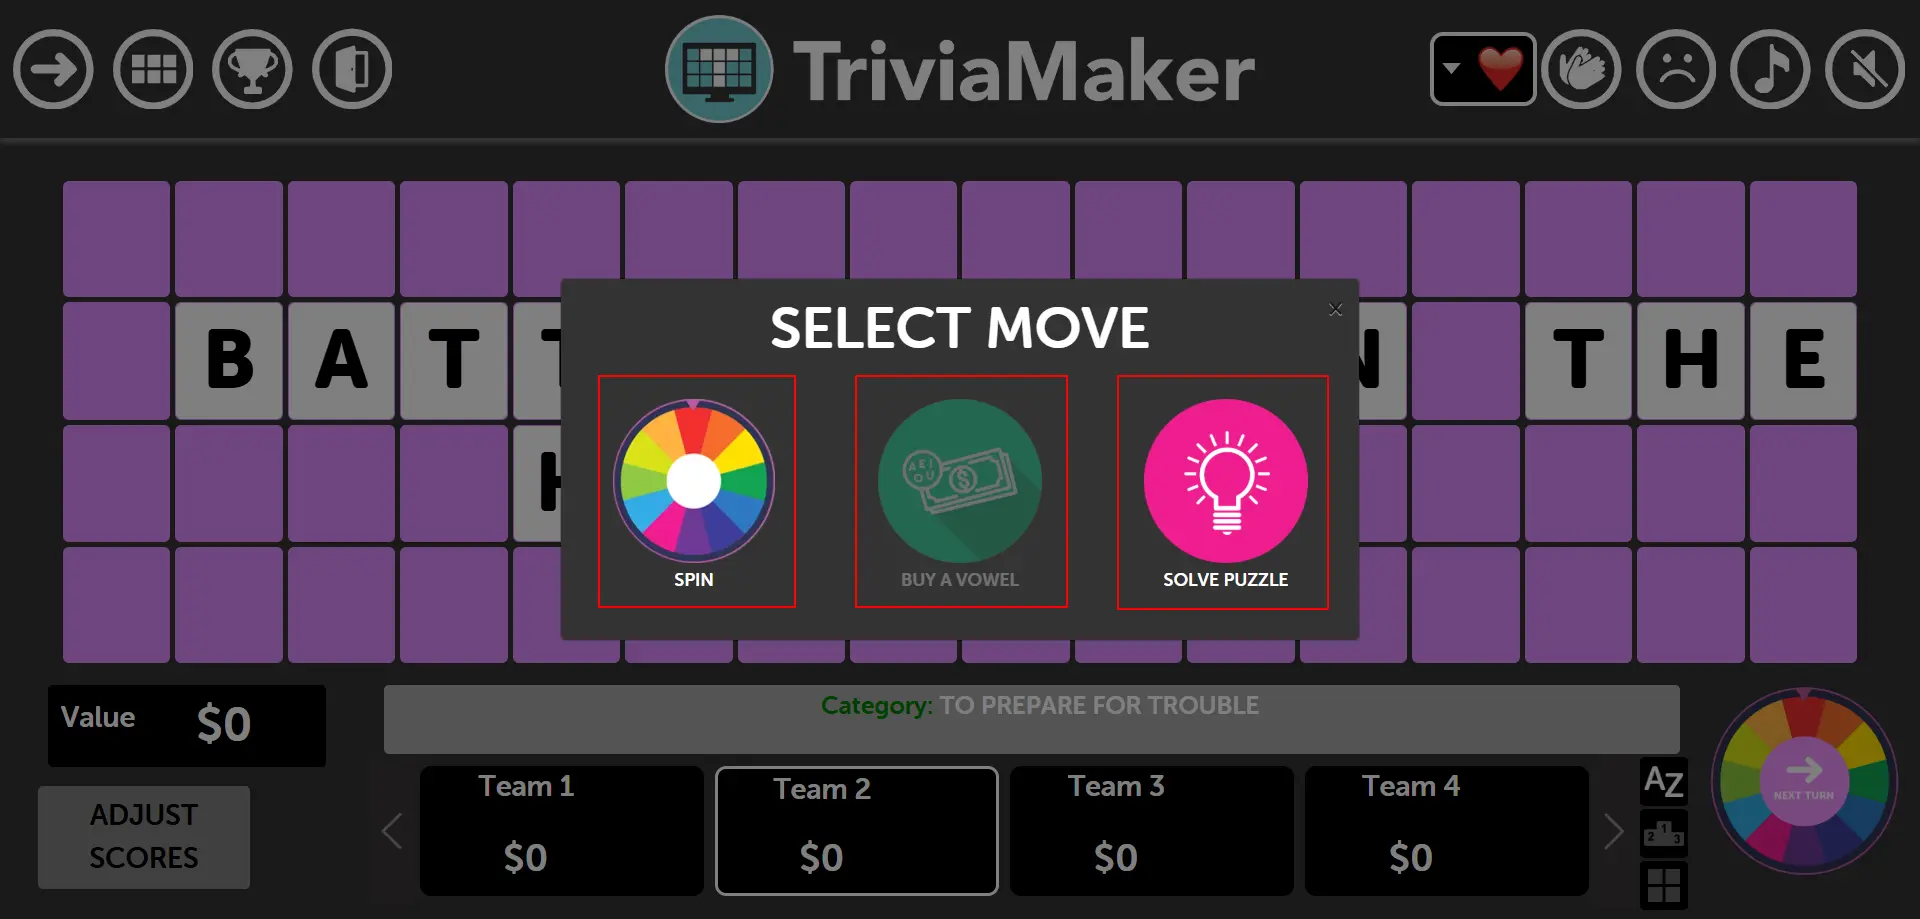
Step 4: Select Move Modal
After selecting a team, the "SELECT MOVE" modal appears with three main options for gameplay:
Spin
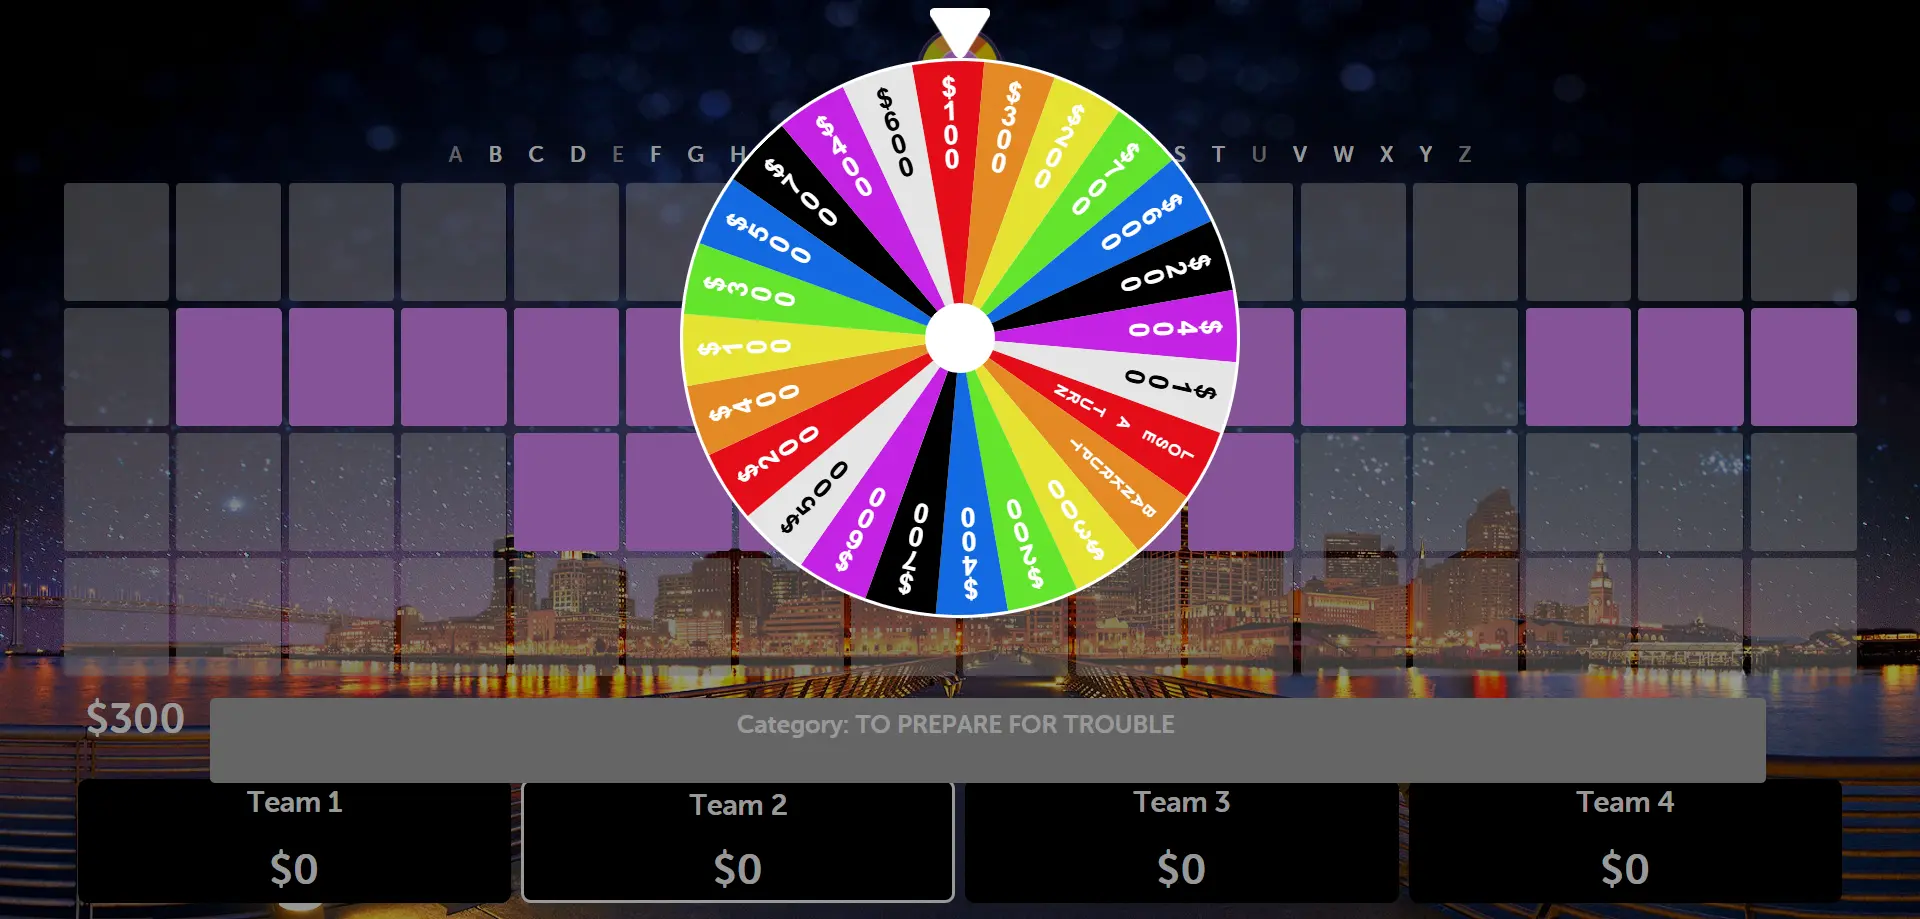
When user clicks on spin, it shows the main wheel with different random values including Bankrupt, Lose Turn, and different amounts which you added from game preview. The value assigned to you allows you to easily select any letter. If the letter is not right, you don't get the value and the next round starts again.
Buy a Vowel
If the user thinks there are vowels in the answer, they need to buy the vowel using points they earned from spinning the wheel.
Solve Puzzle
Use this for solving the puzzle. From here, the user can directly solve the puzzle without spinning or buying vowels.
Pro Tip: The SELECT MOVE modal is the core of wheel gameplay! Teams must strategically choose between spinning for more points, buying vowels to reveal letters, or attempting to solve the entire puzzle. This creates exciting decision-making moments!
Step 5: Guess the Letter
In this step, the user guesses the answer from the letter rectangle. Here's how it works:
Users can only select from the enabled letters in the rectangle
If the guessed letter is found in the puzzle, the user gets points and the letter is revealed
If the letter is not found, a red cross image is shown to indicate the incorrect guess
After each guess (correct or incorrect), the game returns to Step 2 to start the next turn
Pro Tip: The letter guessing creates suspense! Watch for the red cross to appear for wrong letters, and celebrate when letters are revealed correctly. The cycle continues until someone solves the puzzle completely!
Step 6: Buy a Vowel

If the user starts again and clicks on "Buy a Vowel", this modal opens. Here's how the vowel buying system works:
You can see all the vowels available: A, E, I, O, U
Cost: Each vowel costs exactly $250, which is deducted from your current score
If the selected vowel is found in the puzzle, all instances of that vowel are revealed
Turn Continuation: Regardless of whether the vowel is found or not, you get to continue your turn and can choose another action (Spin, Buy Vowel, or Solve Puzzle)
Pro Tip: Buying vowels is a strategic decision! Make sure you have enough points and think carefully about which vowels are most likely to be in the puzzle. It's a risk-reward choice that can either help reveal the answer or cost you valuable points!
Step 7: Solve the Puzzle
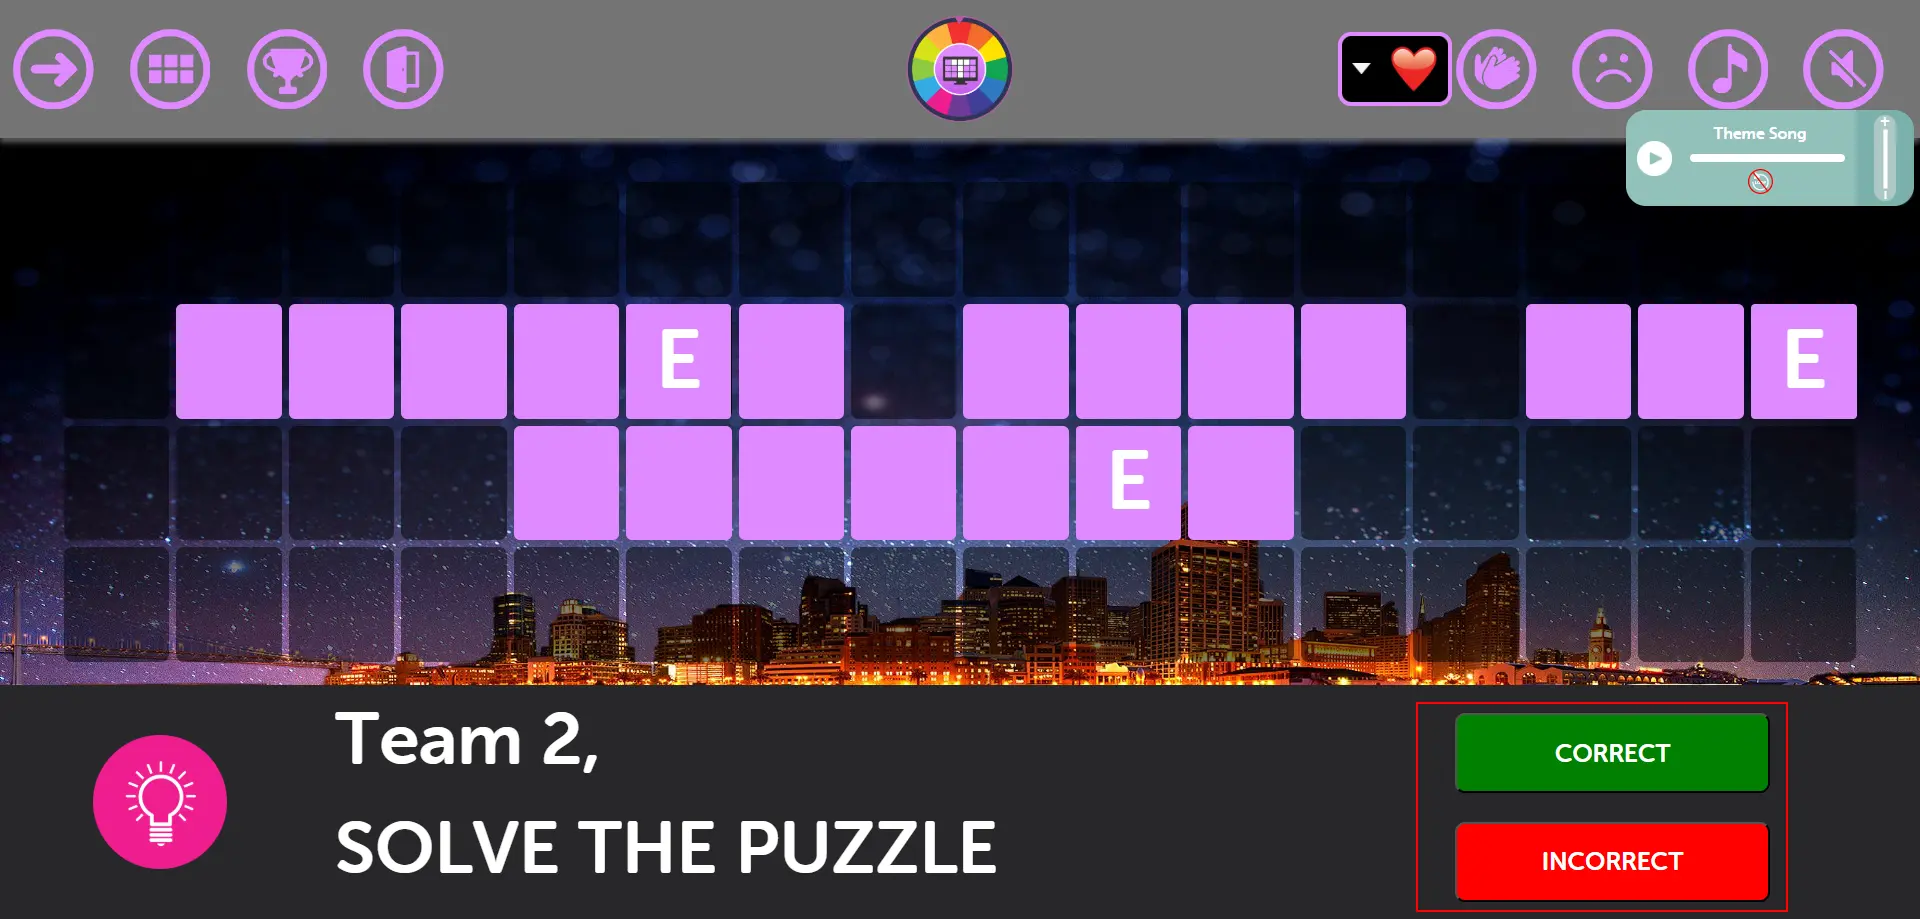
If the user clicks on "Solve Puzzle" instead of "Buy a Vowel" or "Spin the Wheel", they can see this kind of screen:
The screen shows "Correct" and "Incorrect" options in rectangles with red borders
You can see if the user's answer is right - then select "Correct"
If the answer is wrong, select "Incorrect"
Pro Tip: Solving the puzzle is the ultimate challenge! This is where teams can win big if they've figured out the answer, but it's also risky since an incorrect guess might end their turn or cost them points.
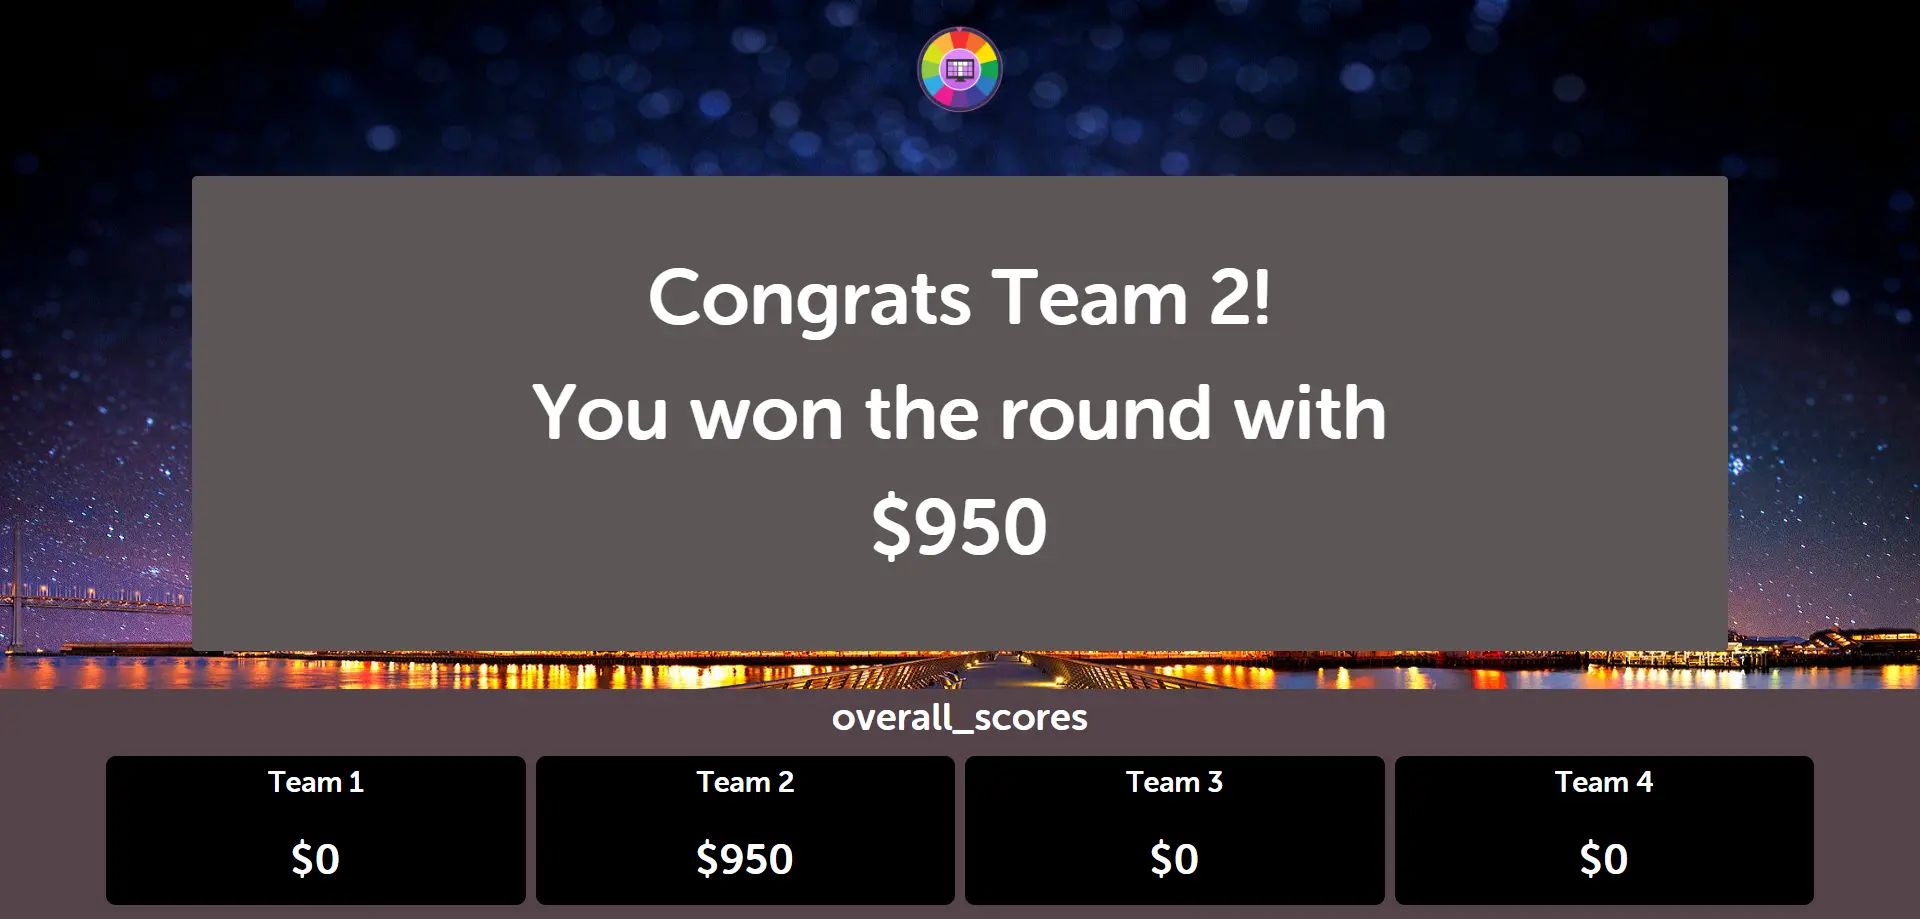
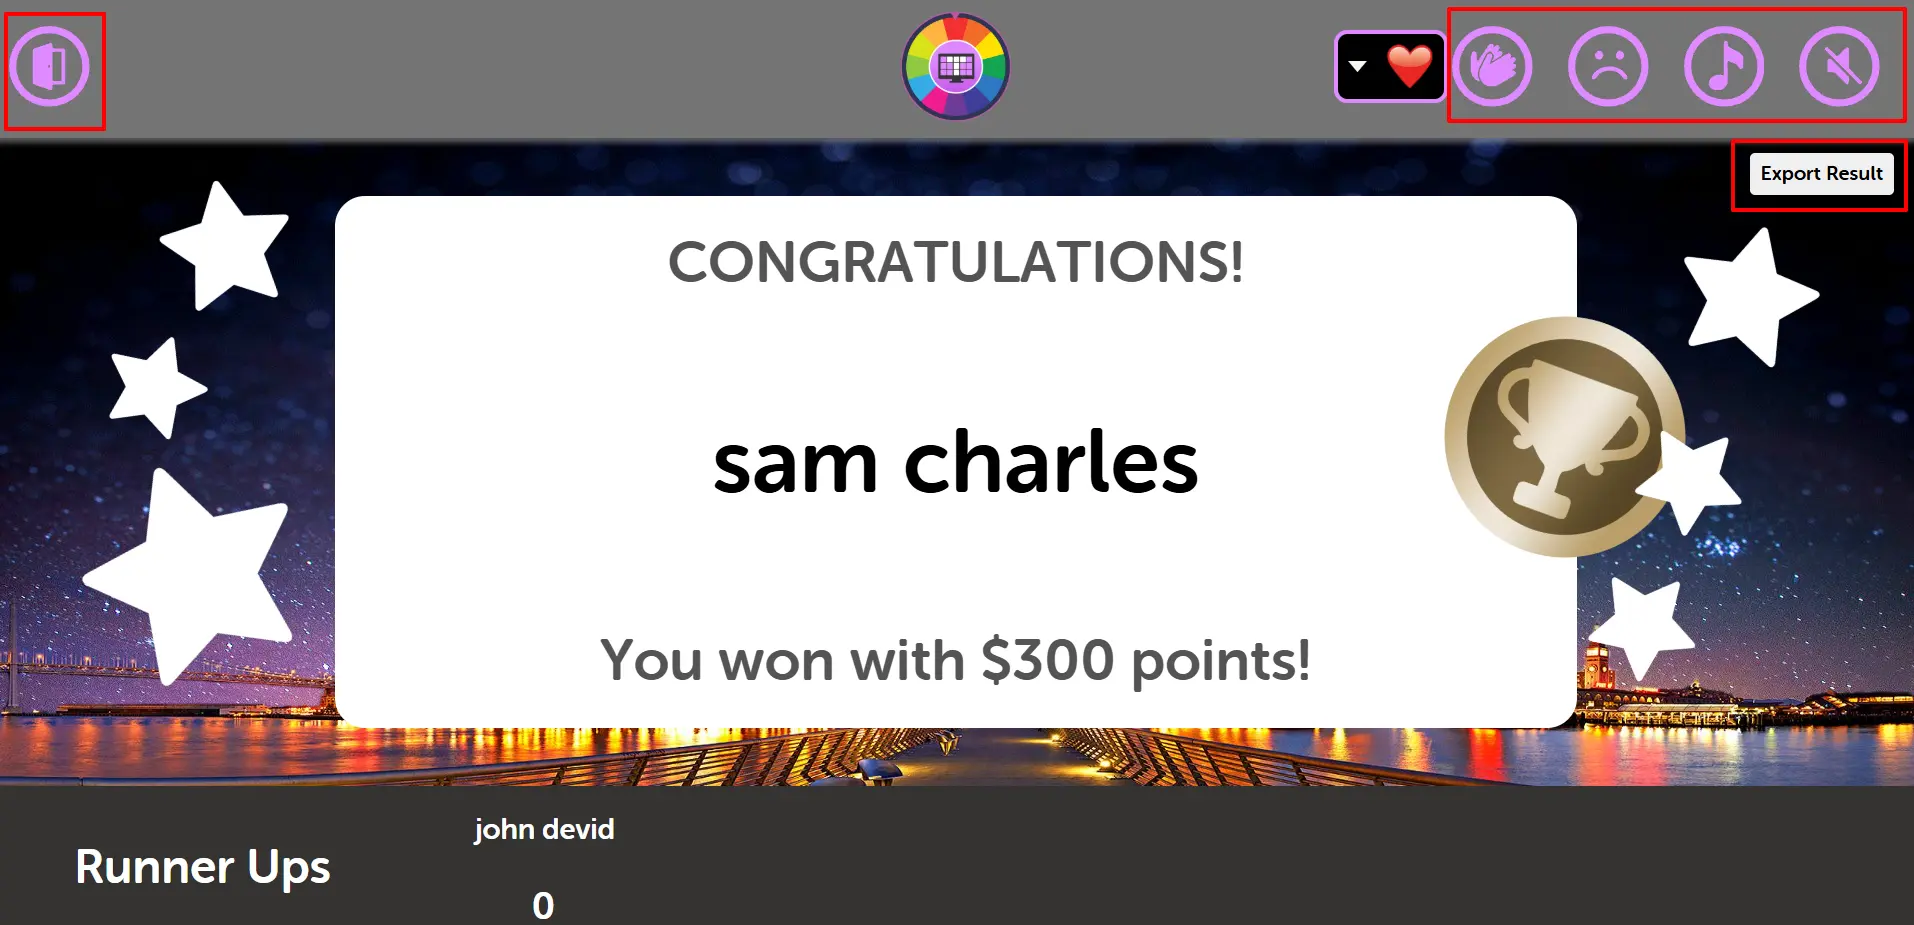
Step 8: Round Winner
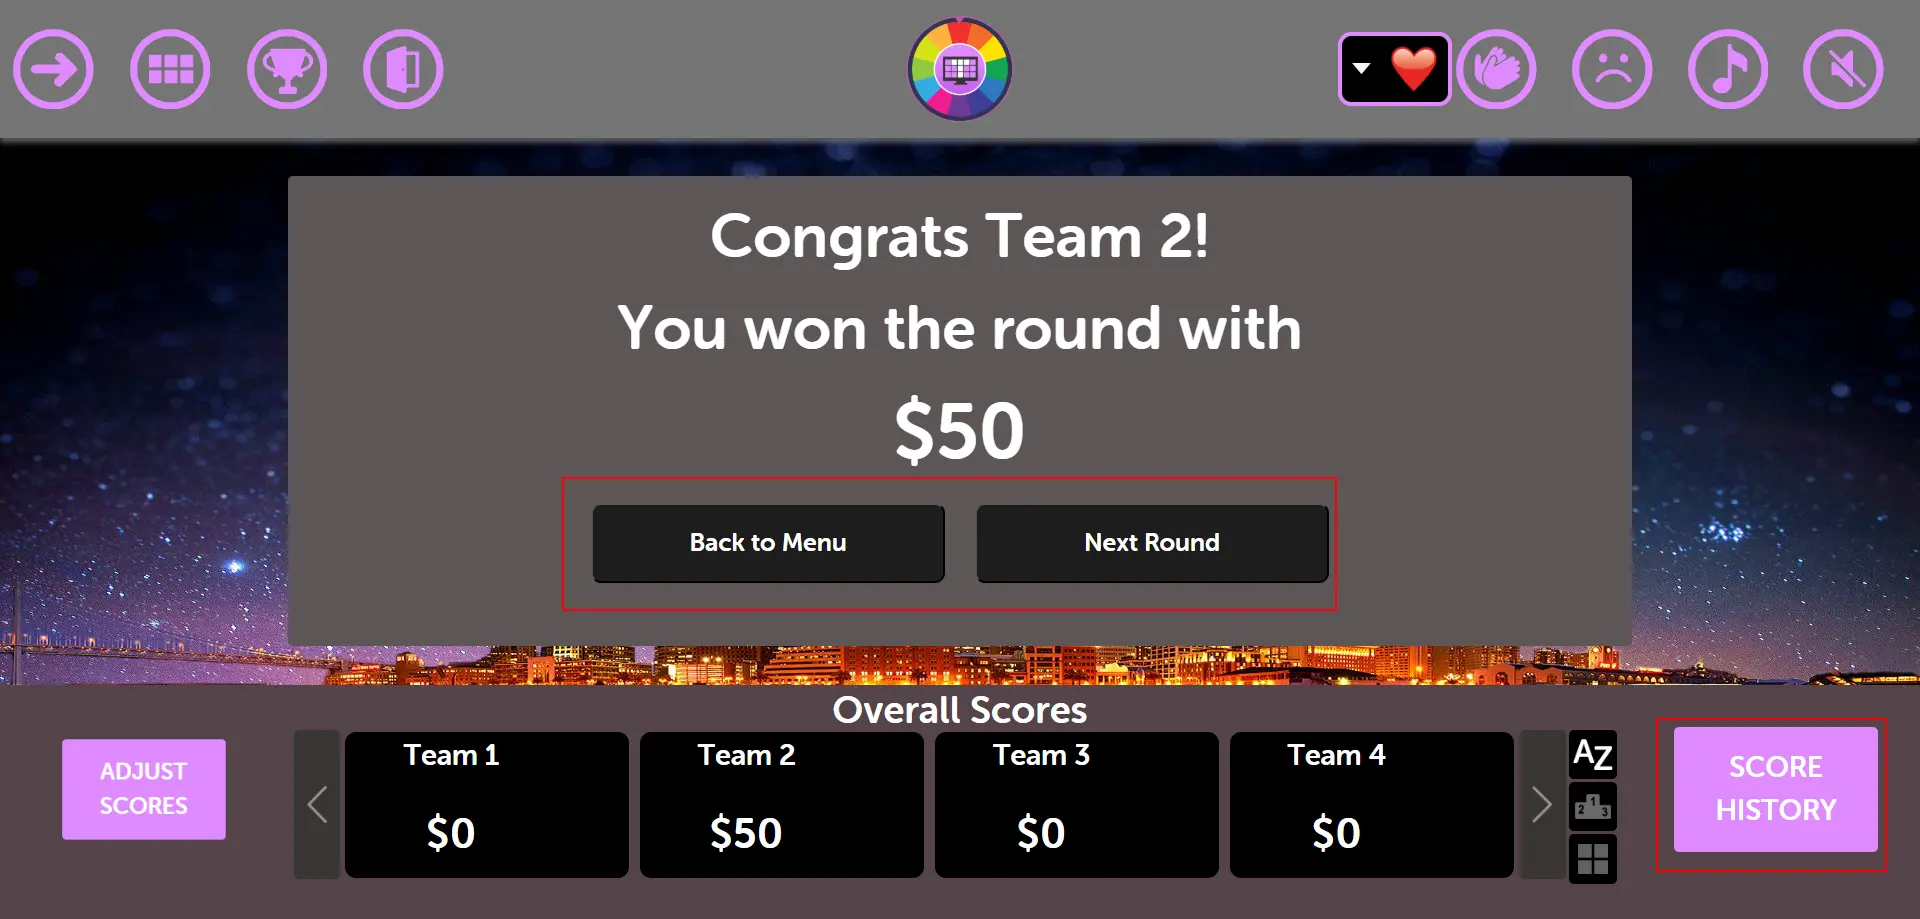
After a user successfully wins, this screen appears with navigation options:
"Next Round" button - Click to start the game with the next round
"Back to Main Menu" - Return to see the first round welcome screen
"History Round" button - Located in the bottom right side to view round history
Pro Tip: The round winner screen celebrates success and provides clear navigation options. Use "Next Round" to keep the momentum going, or "History Round" to review past performance and scores!
Step 9: Score History
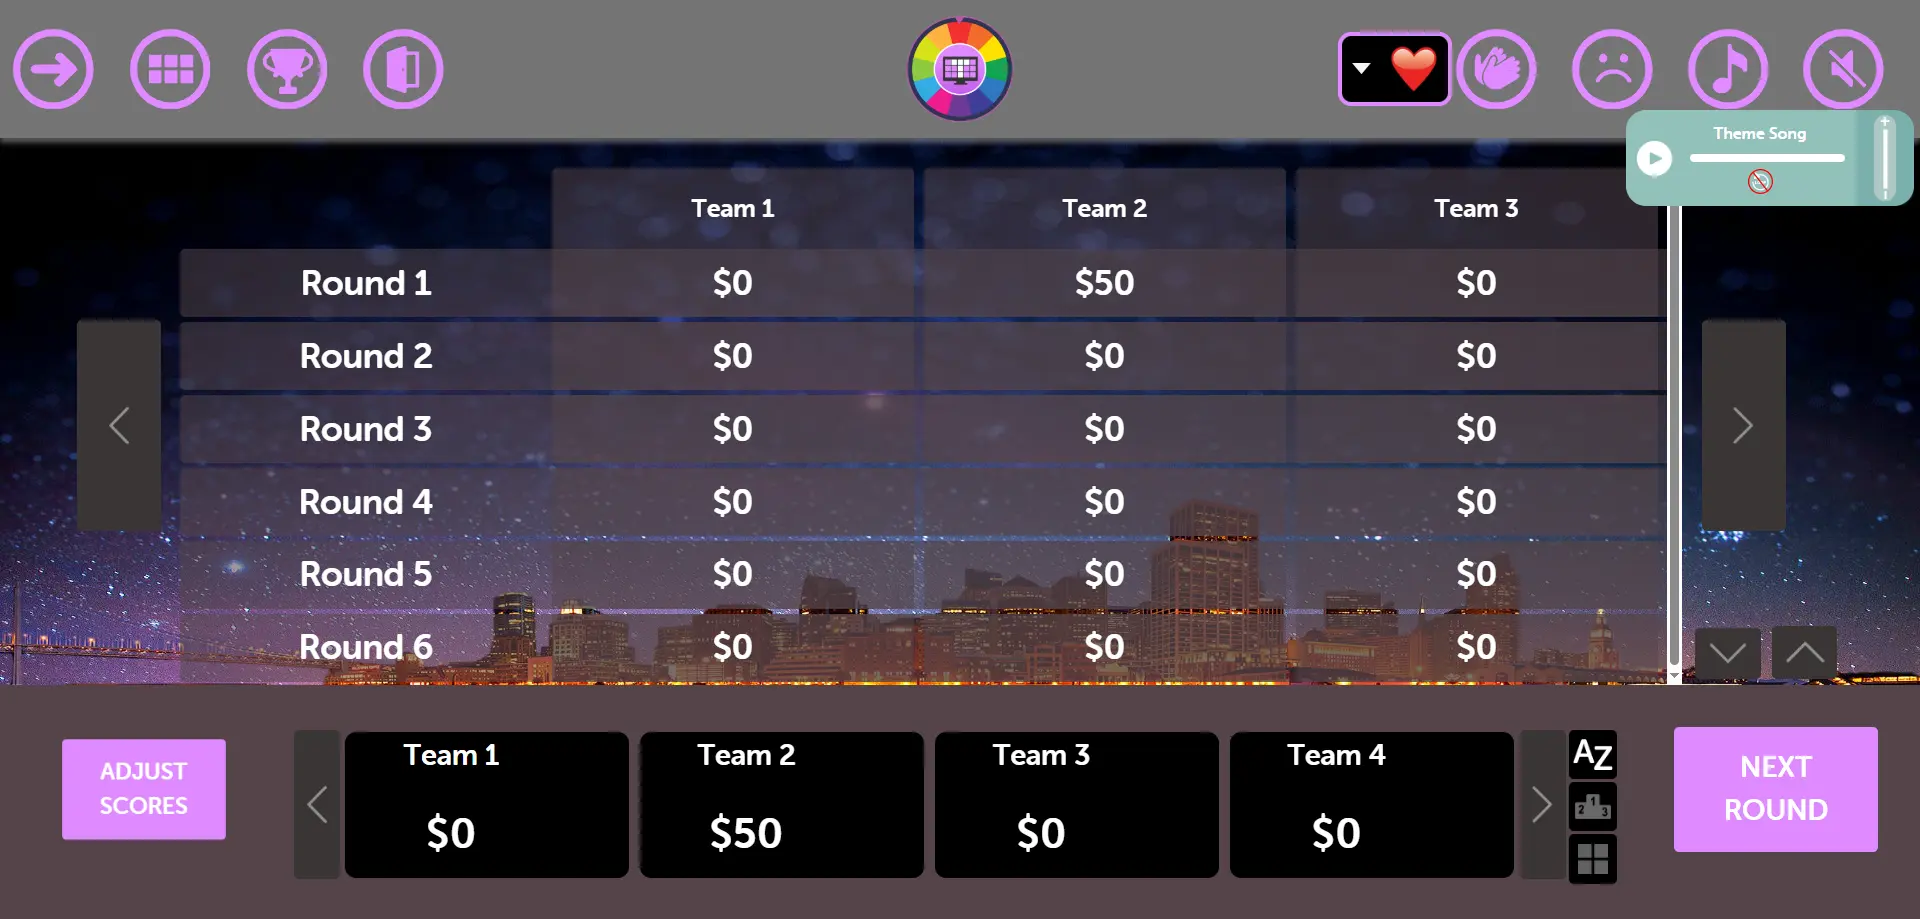
From the history screen, you can see detailed participant performance:
View participant score history organized by rounds
Track progress and performance across all completed rounds
Compare team performance and see who's leading in different rounds
Pro Tip: The score history is perfect for analyzing team performance and creating exciting competition! Use this data to celebrate achievements, identify trends, and make the game more engaging for all participants.
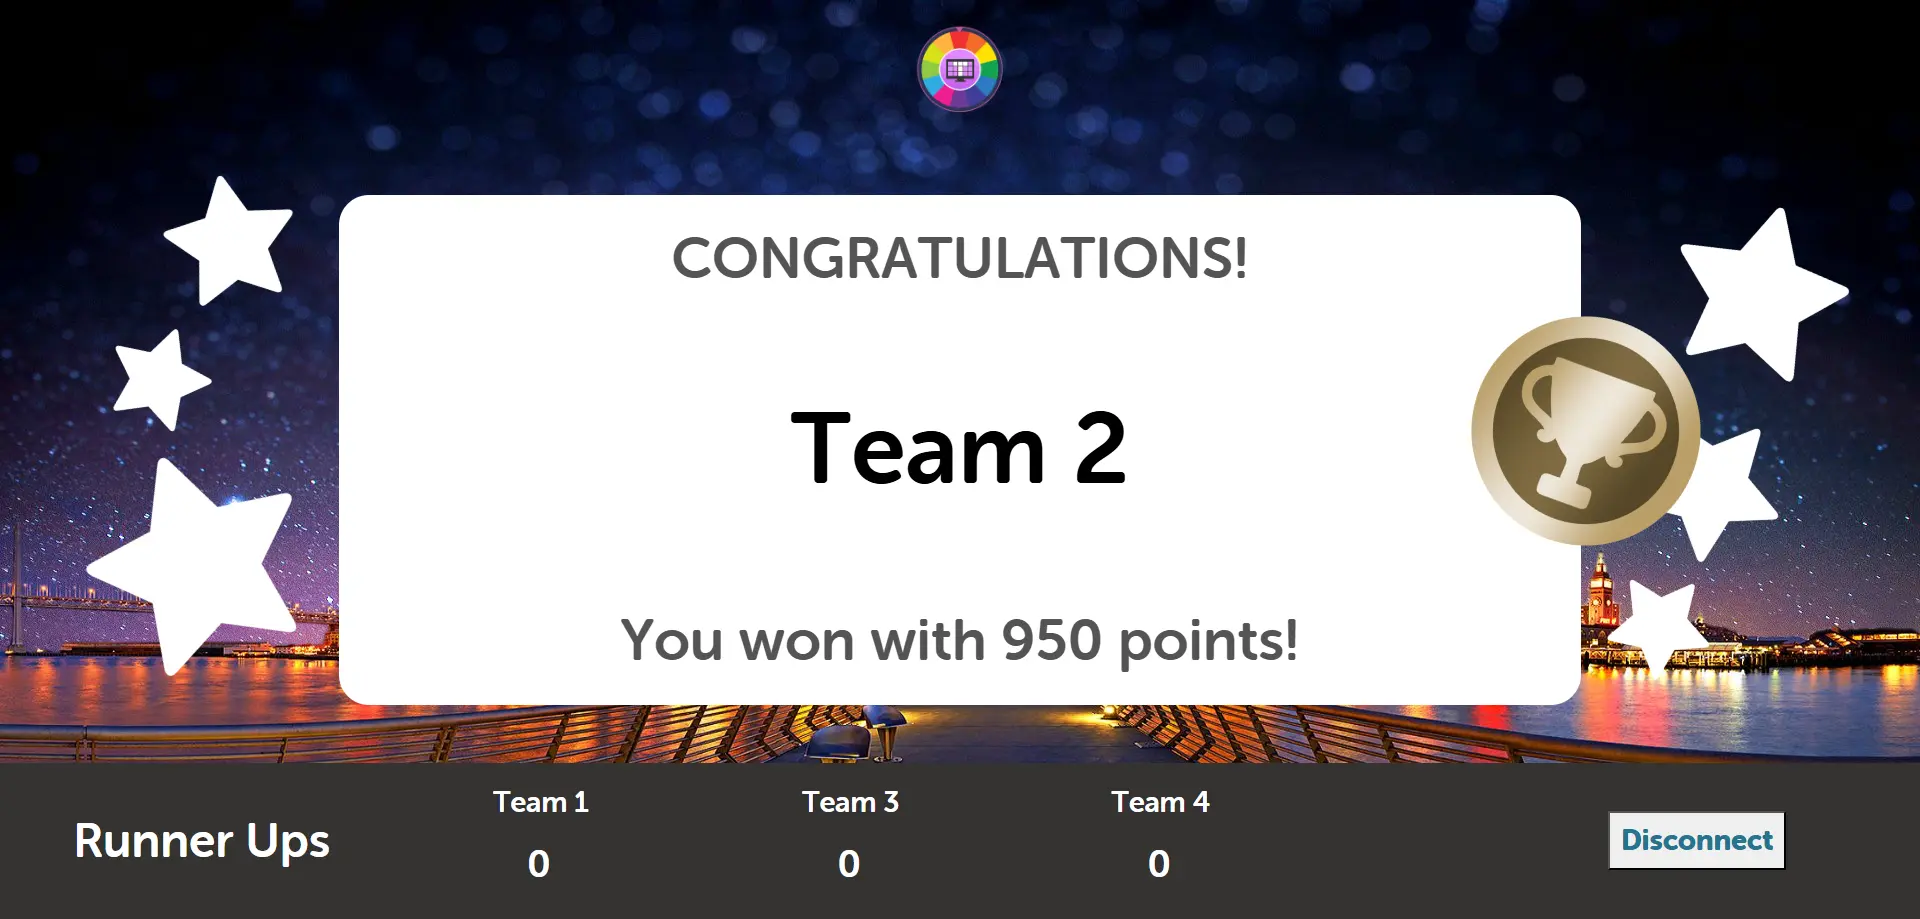
Step 10: Final Winner Screen
On clicking this or when all the rounds are completed, this screen opens. From here you can see the comprehensive results:
View the winner's total list with complete rankings and scores
See who came second, third, and runner-up positions
Complete final standings with all team performance data
Celebration screen showing the ultimate champion of the game
Pro Tip: The final winner screen is the climactic moment! Use this to celebrate achievements, recognize all participants, and create memorable endings. Take screenshots for future reference and team celebrations!
This option is perfect for hosts who want to manage the Wheel game from one screen while the audience views the game on a separate "Presenter" screen. Ideal for professional presentations and events.
Pro Tip: Use two devices or monitors—one for controlling the game privately and another for displaying the wheel to your audience. This gives you full control while keeping the experience seamless.
How it works: This mode requires you to open two separate browser windows or tabs:
Launch Presenter
This is the public screen for your audience (e.g., on a projector or shared screen). It displays the spinning wheel, questions, and results.
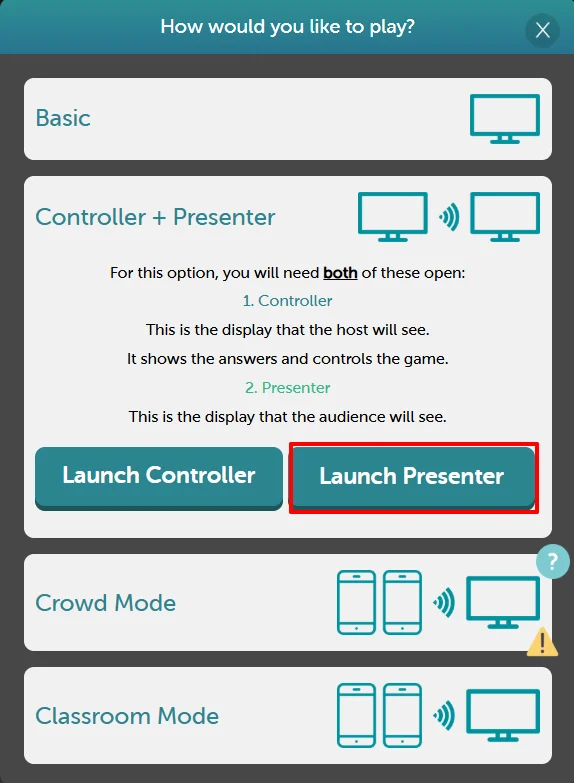
How to Set Up:
Click Play on your game dashboard
Select Controller Presenter Mode
Click Launch Controller - This opens your private host screen with game controls
Click Launch Presenter - This opens the public audience screen (display this on your projector/TV)
Use the Controller screen to spin the wheel and manage the game
The Presenter screen automatically updates to show the wheel spinning, questions, and results to your audience
Controller-Presenter Setup: Step-by-Step Walkthrough
Here's the complete process for setting up the controller-presenter mode, where the host (teacher) controls the game from one device while the audience sees the presenter screen on a projector:
Step 1: Presenter Screen Shows Code
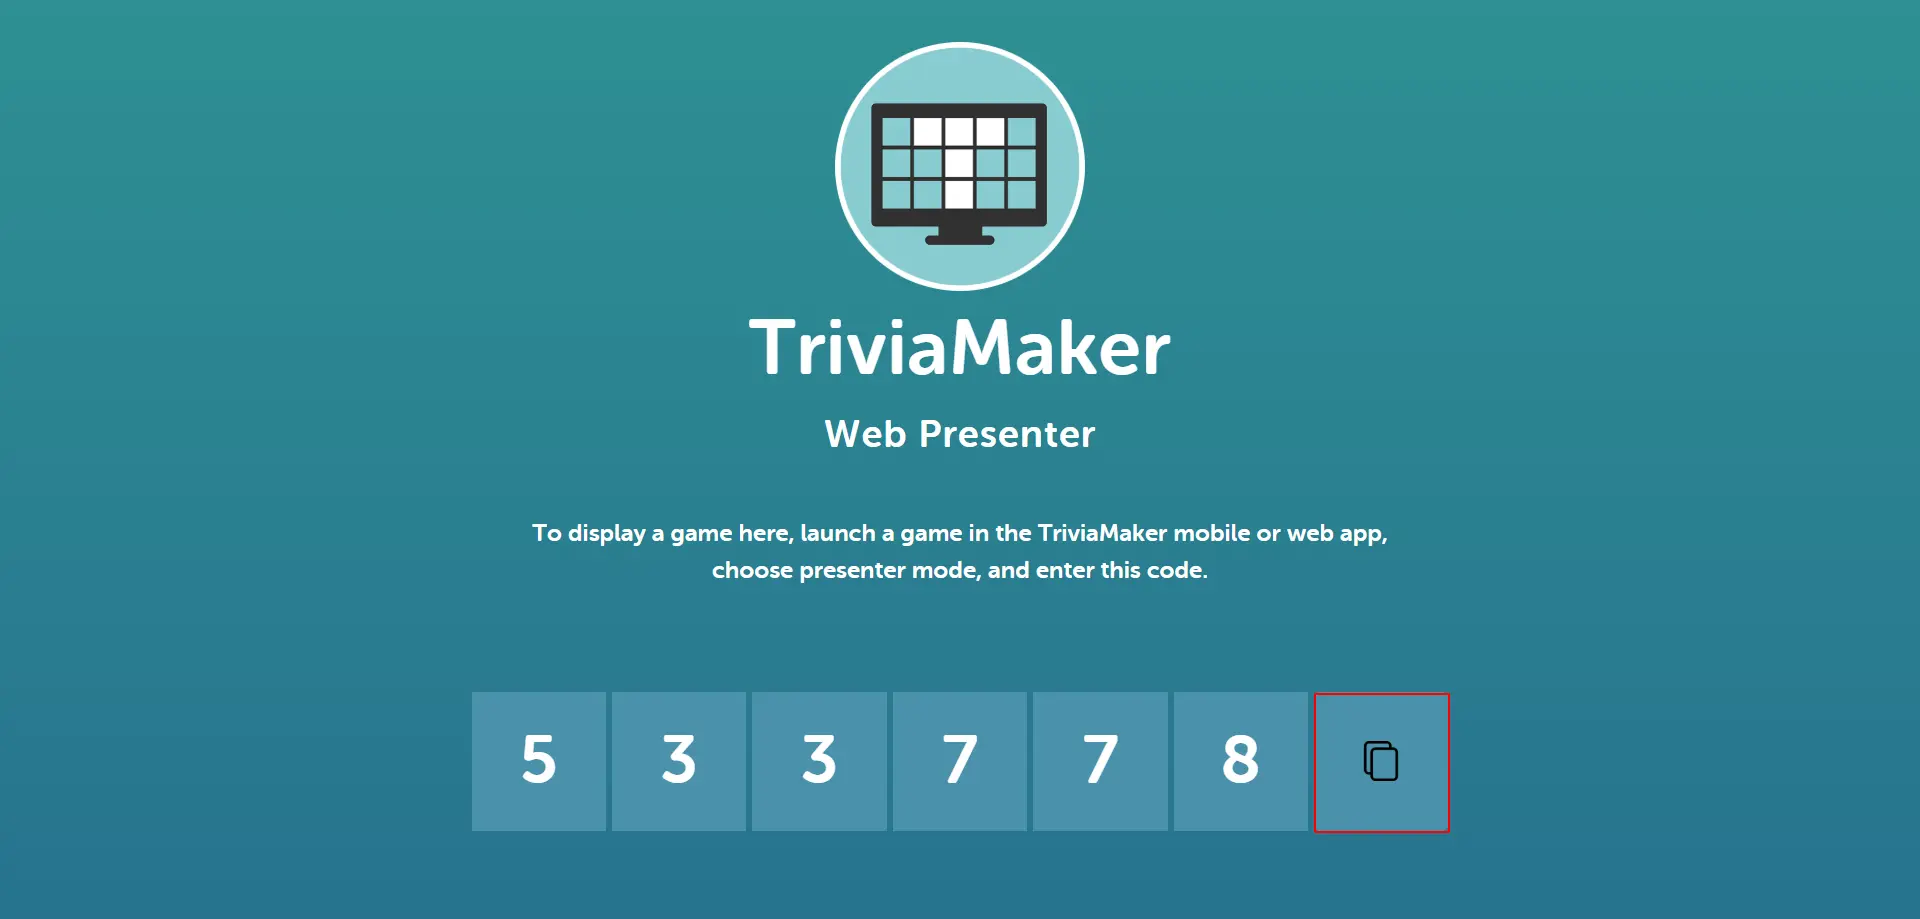
The presenter screen (displayed on the projector for the audience) shows a unique game code. This is what the participants will see:
The presenter screen displays a 6-digit game code prominently
This screen is visible to all participants via projector or shared display
The code allows the host to connect their controller device to this presenter session
Pro Tip: Make sure this presenter screen is clearly visible to your audience. The code changes for each session, so participants need to see the current code.
Step 2: Host Enters Code on Controller
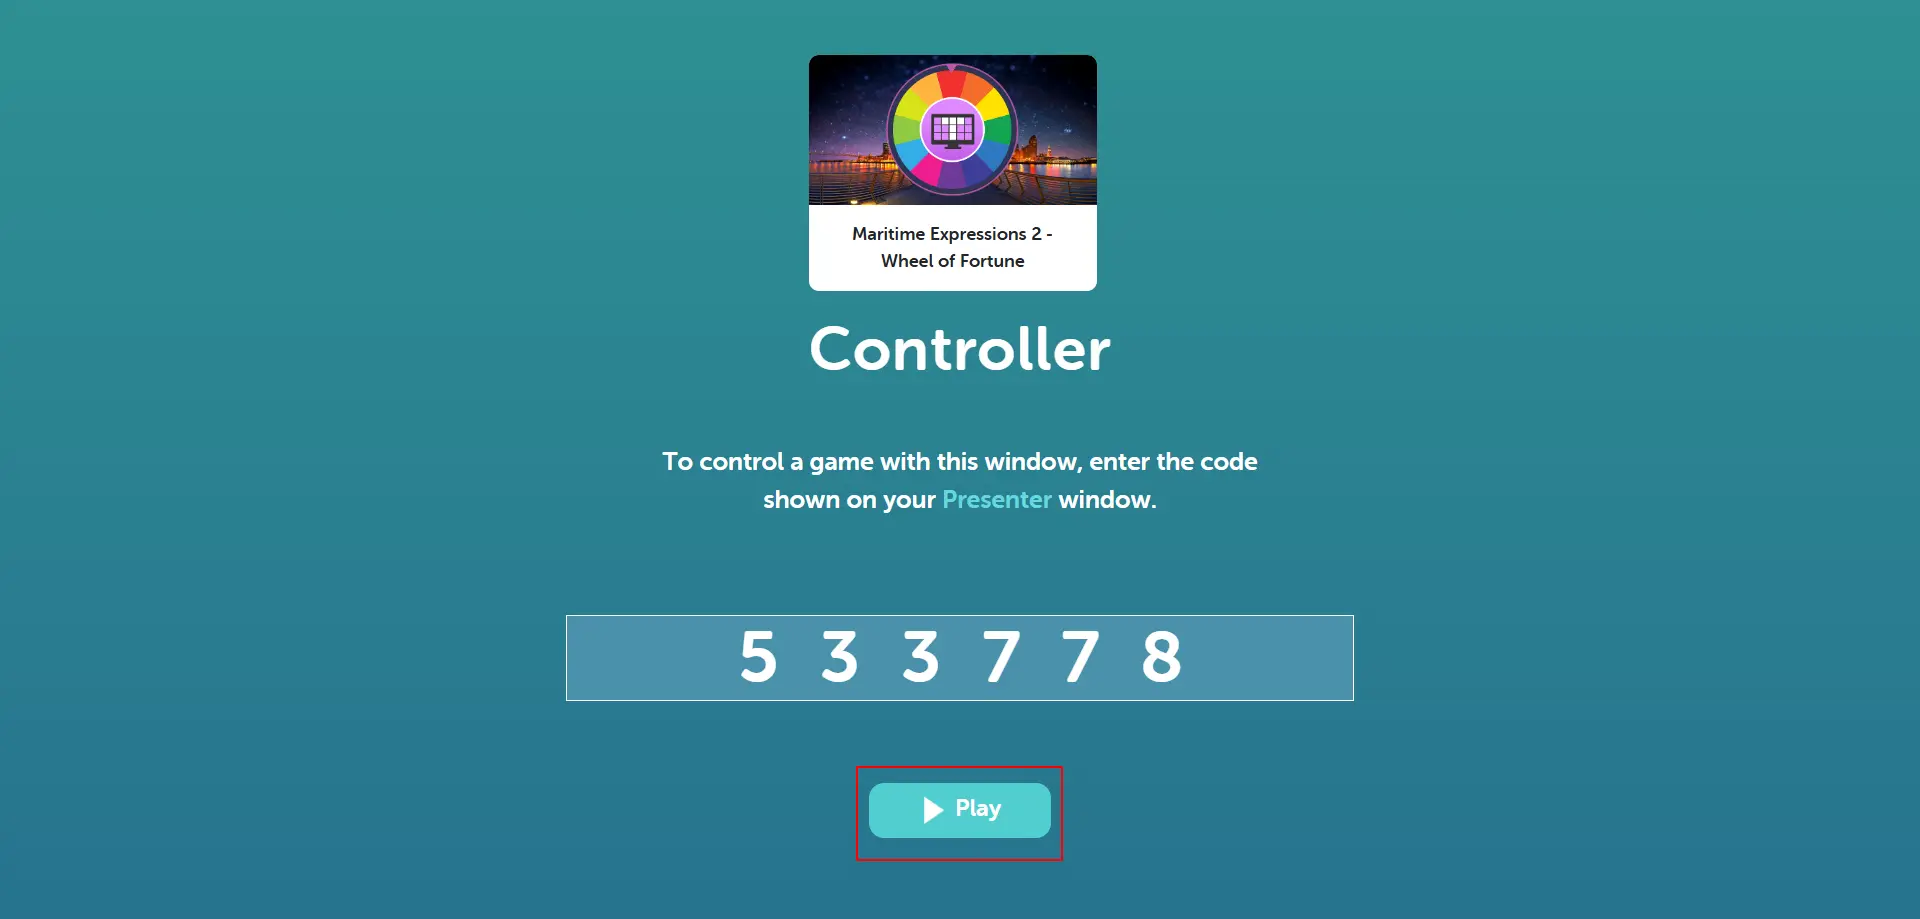
The host (teacher) uses their private controller screen to connect to the presenter session:
Host copies the 6-digit code from the presenter screen
Enters the code in the "Enter Code" field on their controller device
Clicks the "Join" or "Connect" button to link the devices
Pro Tip: Keep your controller device private. Only you as the host should see this screen - it contains all the game controls and answers.
Step 3: Connected Welcome Screens
Once connected successfully, both screens show the welcome interface, but with different purposes:
Presenter View:
Presenter Welcome Screen
The presenter screen shows the colorful wheel game interface with the logo and rounds. You can see all the available rounds displayed for the audience.
Controller Side Screen:
Controller Welcome Screen
The controller screen shows rounds and an overall score section where you can manage the game. Like in Basic Mode, you have control icons in the controller section:
Grid Icon
Click this icon to view all available rounds in a grid layout. This allows you to see all questions at a glance.
Winner Icon
Click this icon to skip directly to the winner screen and see the final results and scoreboard.
Exit Icon
Click this icon to exit the game and return to the main dashboard.
Play Music Icon
Click this icon to play or pause the background music during the game.
1
Round Buttons
Click on any round number (1, 2, 3, etc.) to start that specific round and proceed to the question screen.
Sad Face Icon
Click this icon to play a sad sound effect, typically used when a team answers incorrectly.
Clap Icon
Click this icon to play a clapping sound effect, perfect for celebrating correct answers or team achievements.
Pro Tip: Now you're ready to play! The presenter screen will show all the visual elements (wheel spinning, questions, results) while you control everything from your private controller screen.
Step 4: Starting the Game - Team Selection
From the controller screen, click on the "Next Turn" button in the bottom right corner to start the game. This will open the team selection modal:
Click the "Next Turn" button on the controller screen to open the team selection modal
The modal displays all available teams that were set up during game configuration
Select which team will take the current turn by clicking on their team name
The selected team will then be able to spin the wheel and answer questions
Pro Tip: As the host, you control which team goes next from your private controller screen. The audience only sees the presenter screen showing the wheel and game elements.
Step 5: Select Move - Game Actions
After selecting a team, the "Select Move" modal appears with three main gameplay options. The availability of some options depends on the team's current balance:
Buy a Vowel: If the selected team has enough balance (usually $250+), this option is enabled. Otherwise, it appears disabled/grayed out.
Spin the Wheel: Always available. When clicked, the wheel spins and can land on various outcomes like amounts ($500, $800), "Bankrupt", "Lose Turn", or other special spaces.
Solve the Puzzle: Available when the user wants to reveal the complete answer directly without spinning or buying vowels.
Wheel Spinning Mechanics:
When a team chooses "Spin the Wheel", the outcome determines their next action:
Amount (e.g., $500): Team must guess a consonant letter. If correct, they earn that amount and can continue their turn.
Bankrupt: Team loses all their current earnings and their turn ends.
Lose Turn: Team's turn ends immediately, and the next team gets to play.
If the team guesses correctly and knows the answer, they can choose "Solve the Puzzle" on their next turn to reveal the complete answer.
Pro Tip: Teams can strategically buy vowels when they have enough balance, spin for consonants to build earnings, or solve the puzzle when they're confident about the answer. The host controls all these actions from the controller screen.
Step 6: Wheel Spinning - Presenter Screen Display
When a team chooses "Spin the Wheel" from the controller, the presenter screen displays the spinning wheel animation for the audience to see:
The presenter screen shows the wheel spinning animation with colorful segments displaying different amounts and outcomes
The audience can see the wheel segments including dollar amounts ($500, $800, $1000), "Bankrupt", and "Lose Turn" spaces
The wheel spins and gradually slows down until it stops on a specific segment, revealing the outcome
The host can see the result on their controller screen and manage the next steps accordingly
Pro Tip: The wheel spinning creates excitement for the audience on the presenter screen while you maintain full control from your private controller device. The audience sees the dramatic wheel spin while you handle all game logic behind the scenes.
Step 7: Buy a Vowel - Cost and Turn Continuation
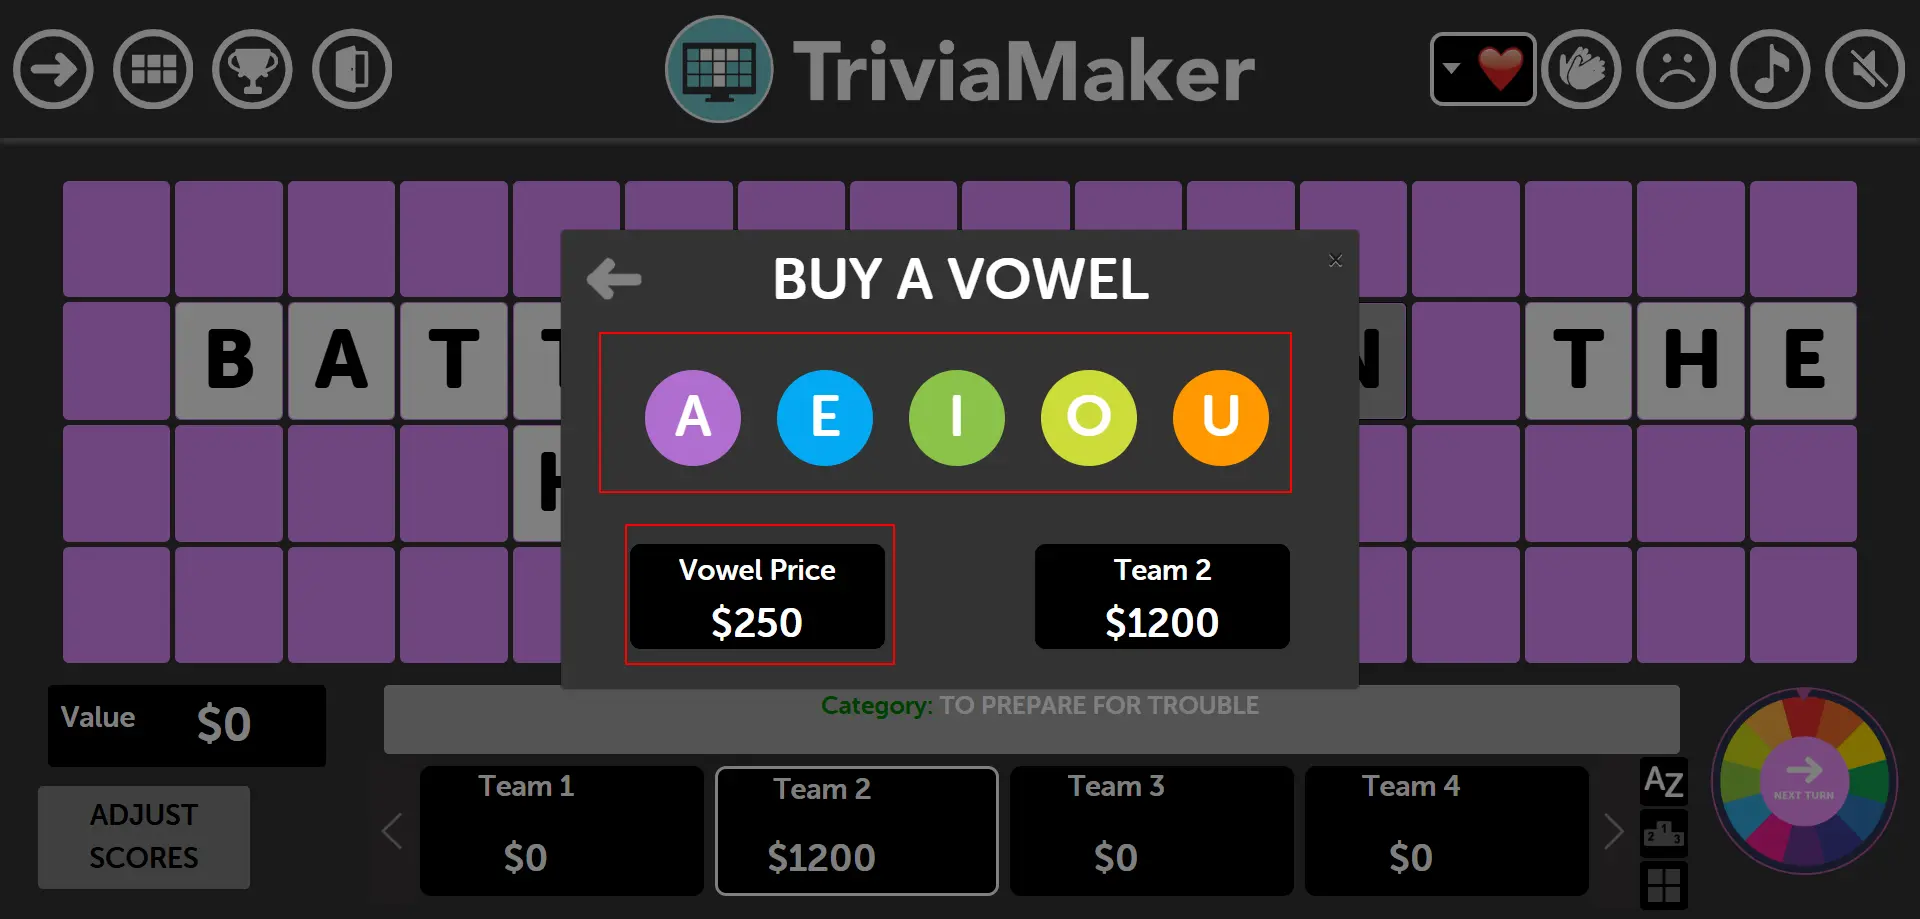
When a team has enough balance (at least $250), they can choose to "Buy a Vowel" instead of spinning the wheel. Here's how the vowel purchase system works:
Vowel Purchase Mechanics:
Cost: Each vowel purchase costs exactly $250, regardless of which vowel (A, E, I, O, U) is selected
Balance Deduction: The $250 is immediately deducted from the team's current balance
Letter Reveal: If the selected vowel appears in the puzzle, all instances of that vowel are revealed
Turn Continuation: Regardless of whether the vowel appears in the puzzle, the team gets to continue their turn and can choose another action
Strategic Advantage:
Guaranteed Turn: Unlike spinning the wheel (which could result in "Lose Turn" or "Bankrupt"), buying a vowel guarantees the team can continue playing
Puzzle Progress: Vowels often appear frequently in puzzles, so purchasing them can reveal significant portions of the answer
Risk Management: Teams with high balances can use vowel purchases to avoid the risk of landing on "Bankrupt"
Pro Tip: Buying vowels is a strategic move that costs $250 but ensures turn continuation. Teams can use this option when they have built up a good balance and want to avoid the risks of spinning the wheel while still making progress on the puzzle!
Step 8: Solve the Puzzle - Direct Answer Option
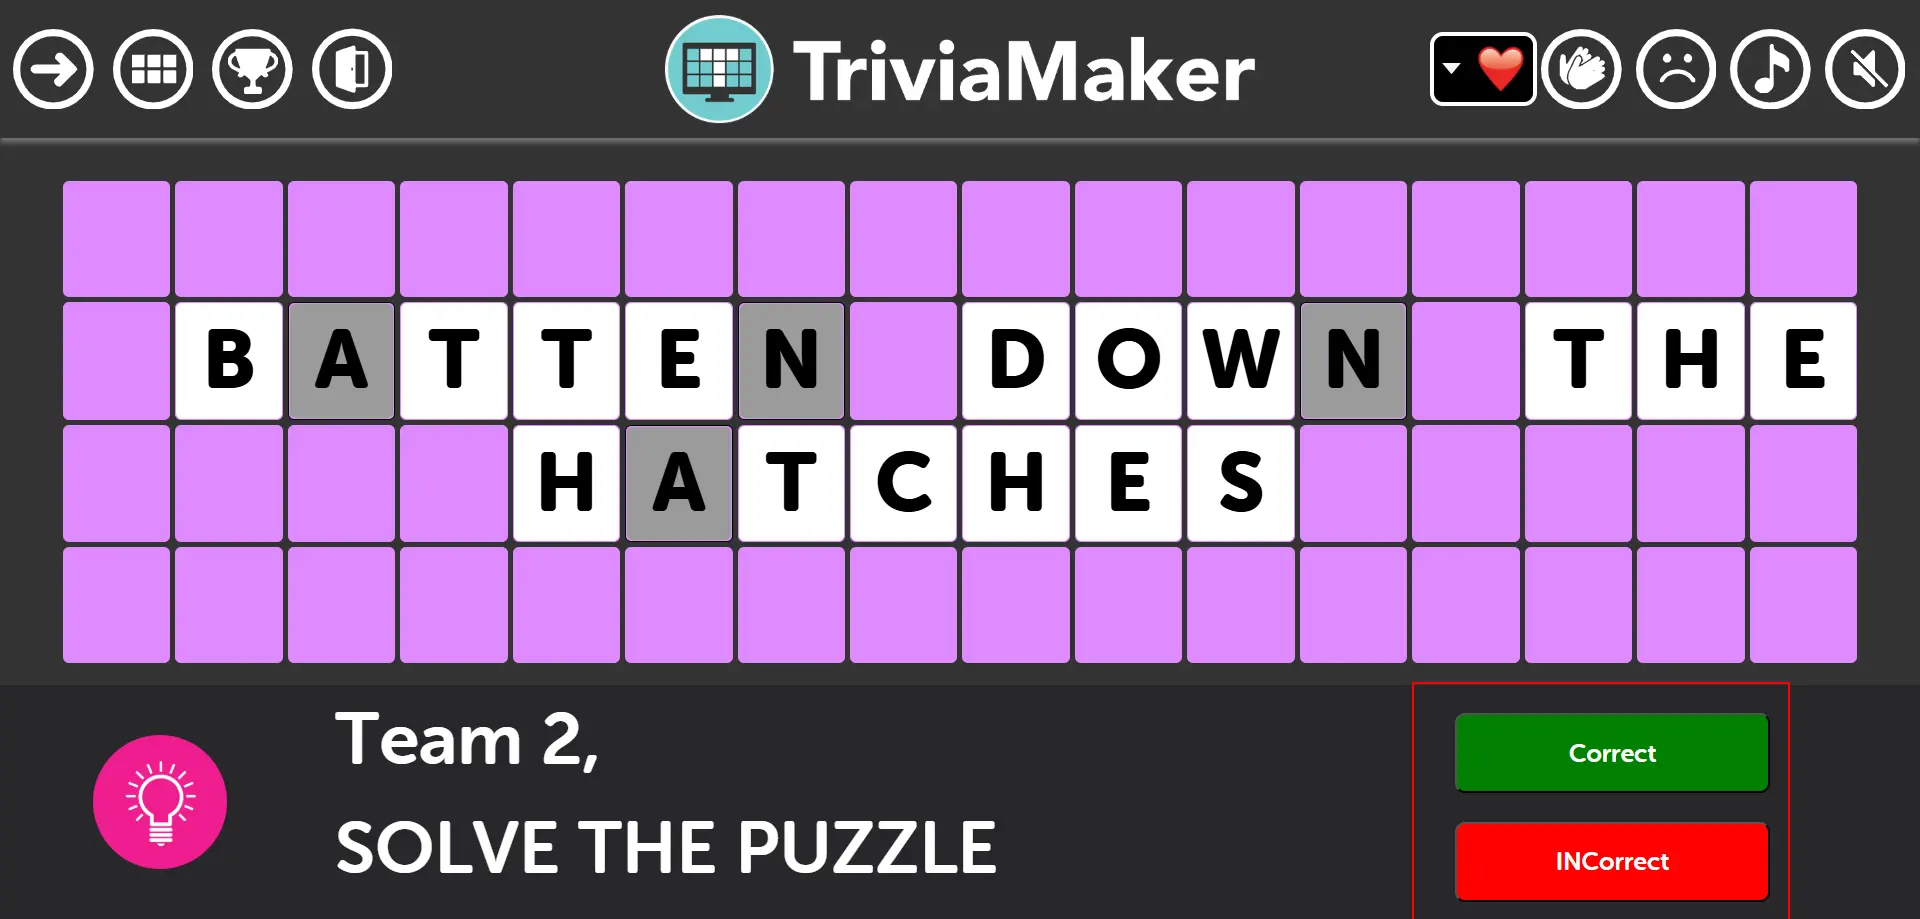
When a team chooses "Solve the Puzzle" from the Select Move modal, they can attempt to answer the complete question directly without spinning or buying vowels. Here's how this high-risk, high-reward option works:
How Solve the Puzzle Works:
Team Declares Answer: The team verbally states their complete answer to the puzzle
Controller Decision: The host (controller) determines if the answer is correct by comparing it to the actual solution
Correct Answer: If the team is right, the controller clicks "Correct" - the team wins the round and earns all accumulated points
Incorrect Answer: If the team is wrong, the controller clicks "Incorrect" - the team's turn ends and the game returns to the question screen for the next team
Controller Response Options:
"Correct" Button: Validates the team's answer as right, awards points, and moves to round completion or next round
"Incorrect" Button: Marks the answer as wrong, ends the team's turn, and redirects back to the question screen for continued gameplay
Game Continuation: After an incorrect solve attempt, the game returns to the same puzzle for other teams to continue spinning, buying vowels, or attempting their own solve
Strategic Considerations:
High Risk: Teams lose their turn if they guess incorrectly, potentially allowing other teams to solve and win
High Reward: Correctly solving the puzzle wins the round immediately and secures all earned points
Timing Strategy: Best used when teams are confident about the answer or want to prevent opponents from continuing to build points
Pro Tip: "Solve the Puzzle" is the ultimate gamble! Teams should use this option strategically when they're confident about the answer. As the host, listen carefully to ensure fair judgment of correct versus incorrect responses.
Step 9: Right Answer - Scoring and Letter Reveal
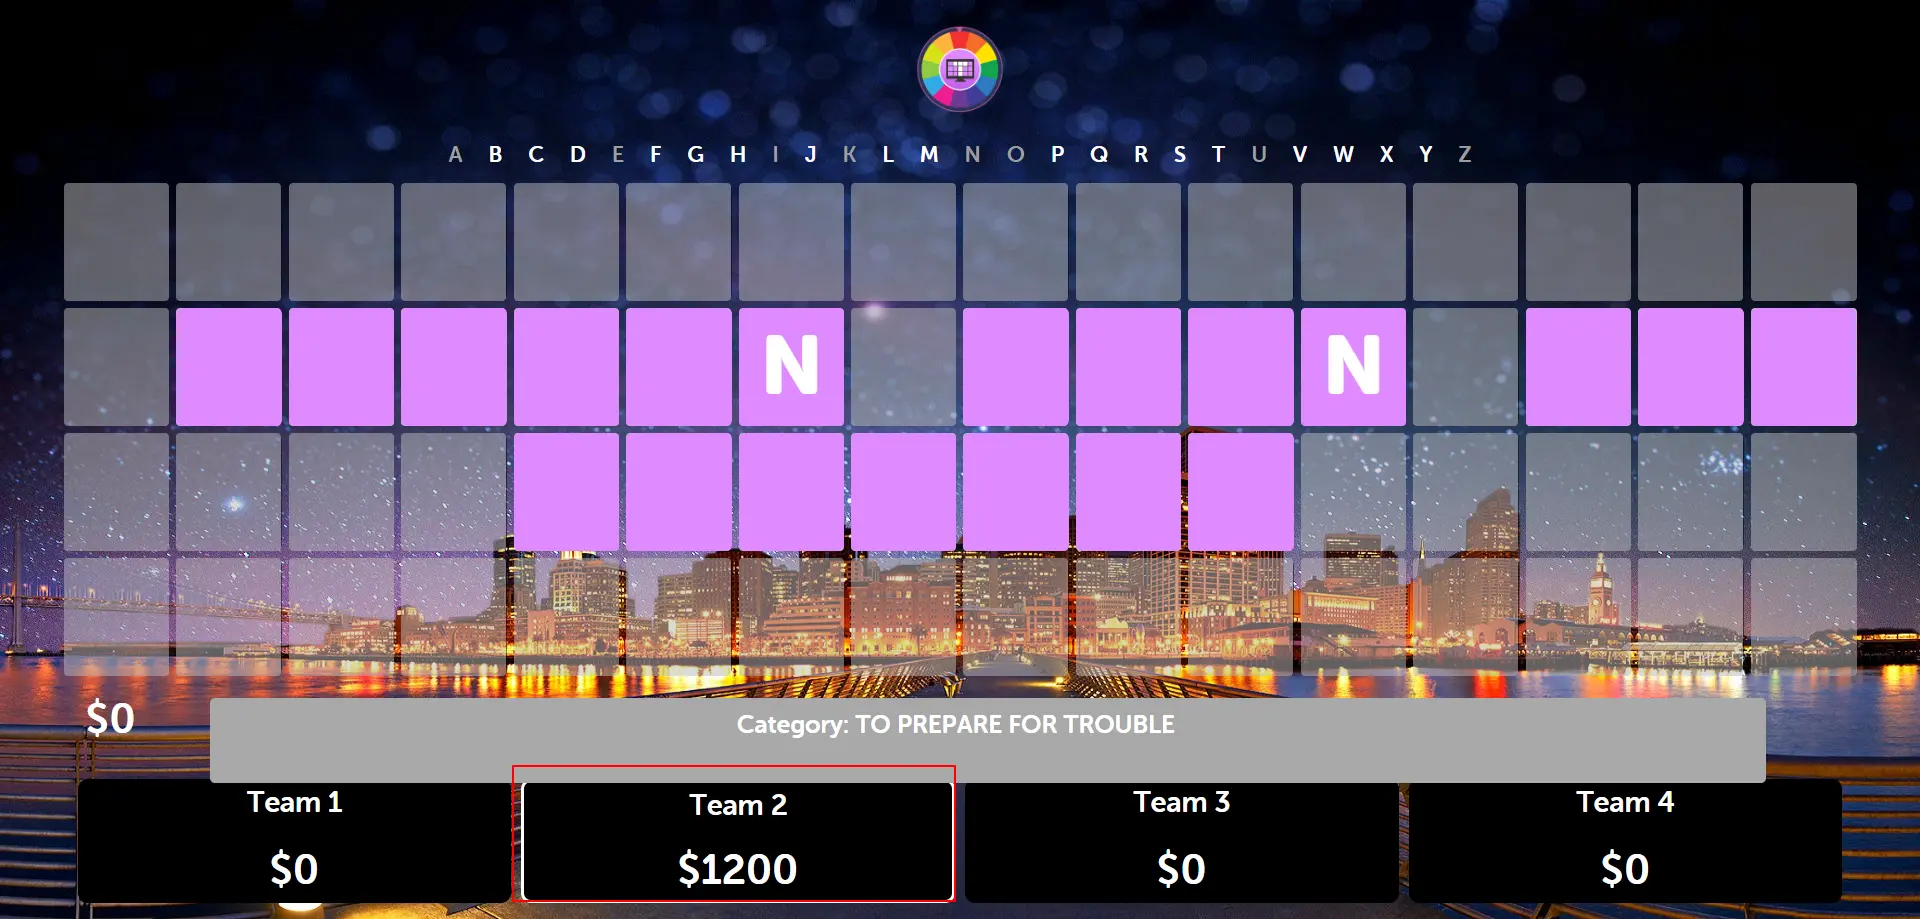
When the wheel stops on a dollar amount (e.g., $600) and the user gives the right answer, the presenter screen shows the letter reveal and scoring calculation:
Scoring Example:
Wheel Result: Stops on $600 per letter
User's Guess: The letter "N"
Letter Count: If there are 2 instances of "N" in the puzzle
Total Points: $600 × 2 letters = $1,200 added to team's score
What Happens on the Presenter Screen:
The presenter screen reveals all instances of the correctly guessed letter in the puzzle
The team's score updates automatically to show the new total ($1,200 in this example)
A success animation or sound effect may play to celebrate the correct guess
The team can choose to continue their turn (spin again, buy vowel, or solve puzzle)
Pro Tip: The scoring system multiplies the wheel value by the number of times the letter appears in the puzzle. This encourages strategic letter guessing - common letters like "N", "T", "S" can yield high points if they appear multiple times!
Step 10: Round Winner - Controller and Presenter Views
After a team successfully solves the puzzle or wins the round, both the controller and presenter screens display winner information with different functionalities:
Presenter Screen - Winner Display:
The presenter screen shows a celebratory winner display visible to the entire audience:
Winner Announcement: Displays the winning team name prominently
Round Score: Shows the points earned in this specific round
Visual Celebration: Features celebratory graphics and animations for the audience
Round Progress: May show which round was completed and total progress
Controller Screen - Score Management:
The controller screen provides host management features while showing the same winner information:
Score Adjustment Features:
Manual Score Editing: Host can click on any team's score to manually adjust points if needed
Correction Capability: Allows fixing scoring errors or adding bonus points for exceptional performance
Real-time Updates: Score changes immediately reflect on both controller and presenter screens
Round History Access:
History Button: Click the "History" or "Round History" button to view detailed performance data
All Rounds Overview: See scores and winners for each completed round
Performance Tracking: Monitor team progress across the entire game session
Navigation Options: Choose to continue to the next round or review previous results
Pro Tip: Use the controller's score adjustment feature to correct any errors or award bonus points. The round history feature is perfect for reviewing team performance and maintaining fairness throughout the game. Both screens work together to celebrate winners while giving you full control!
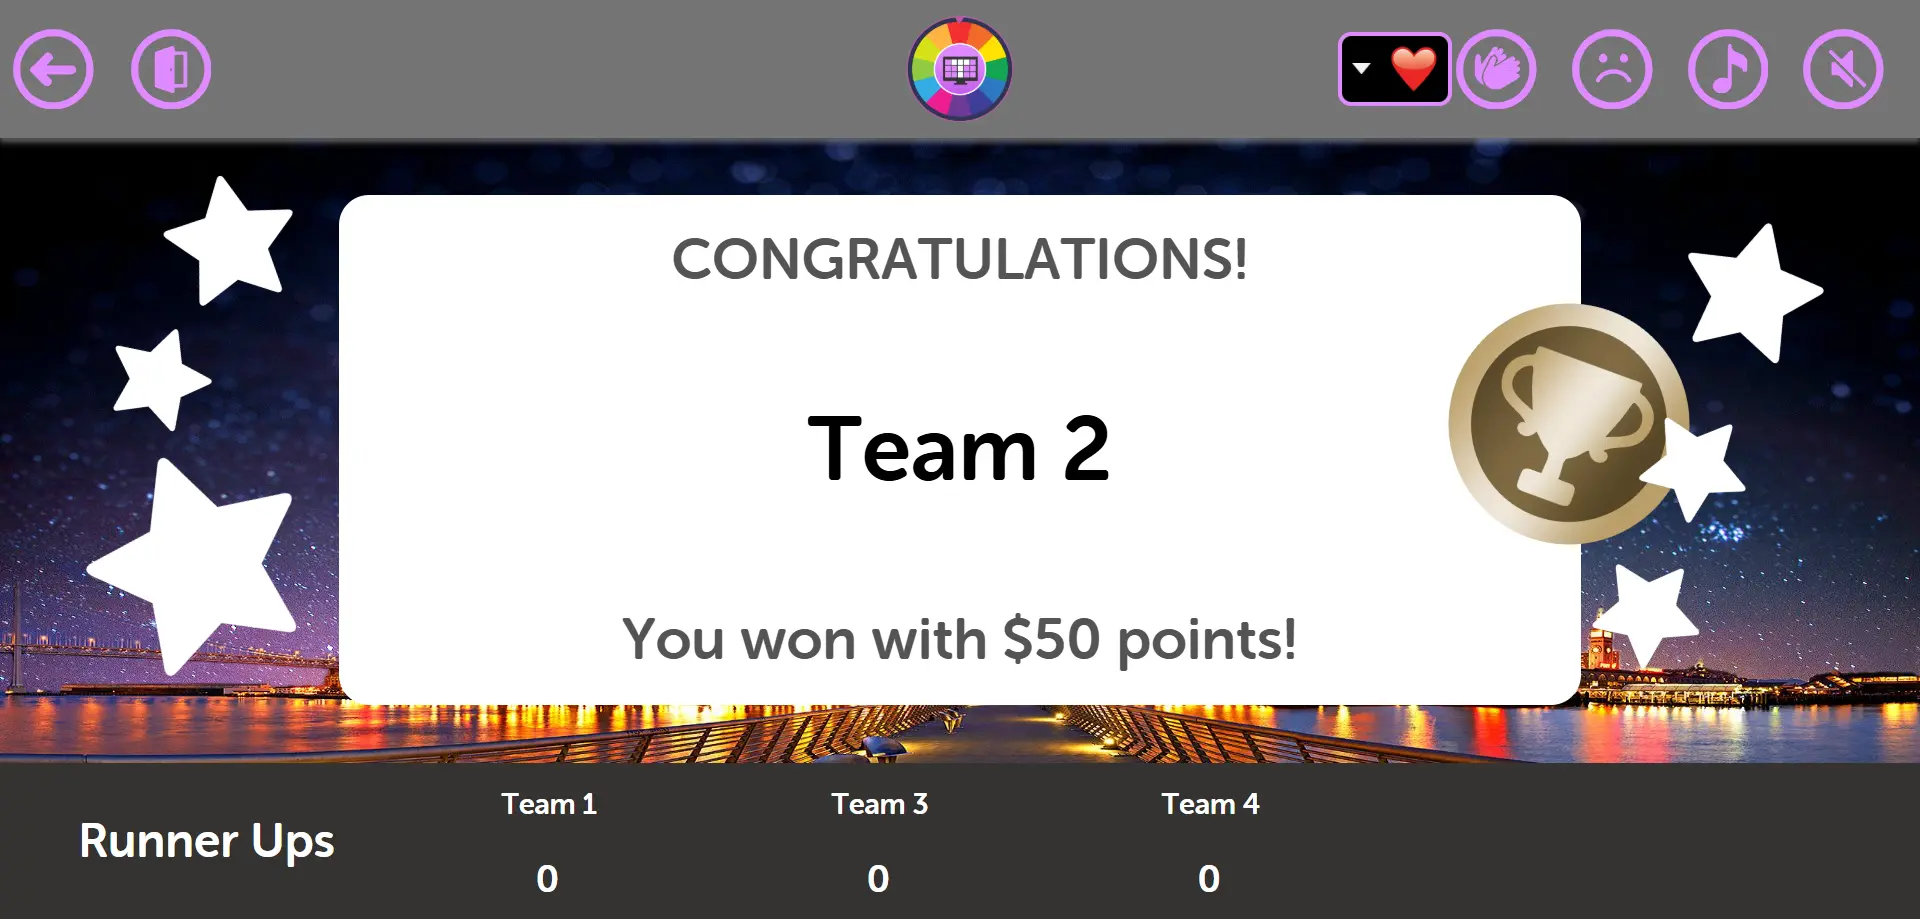
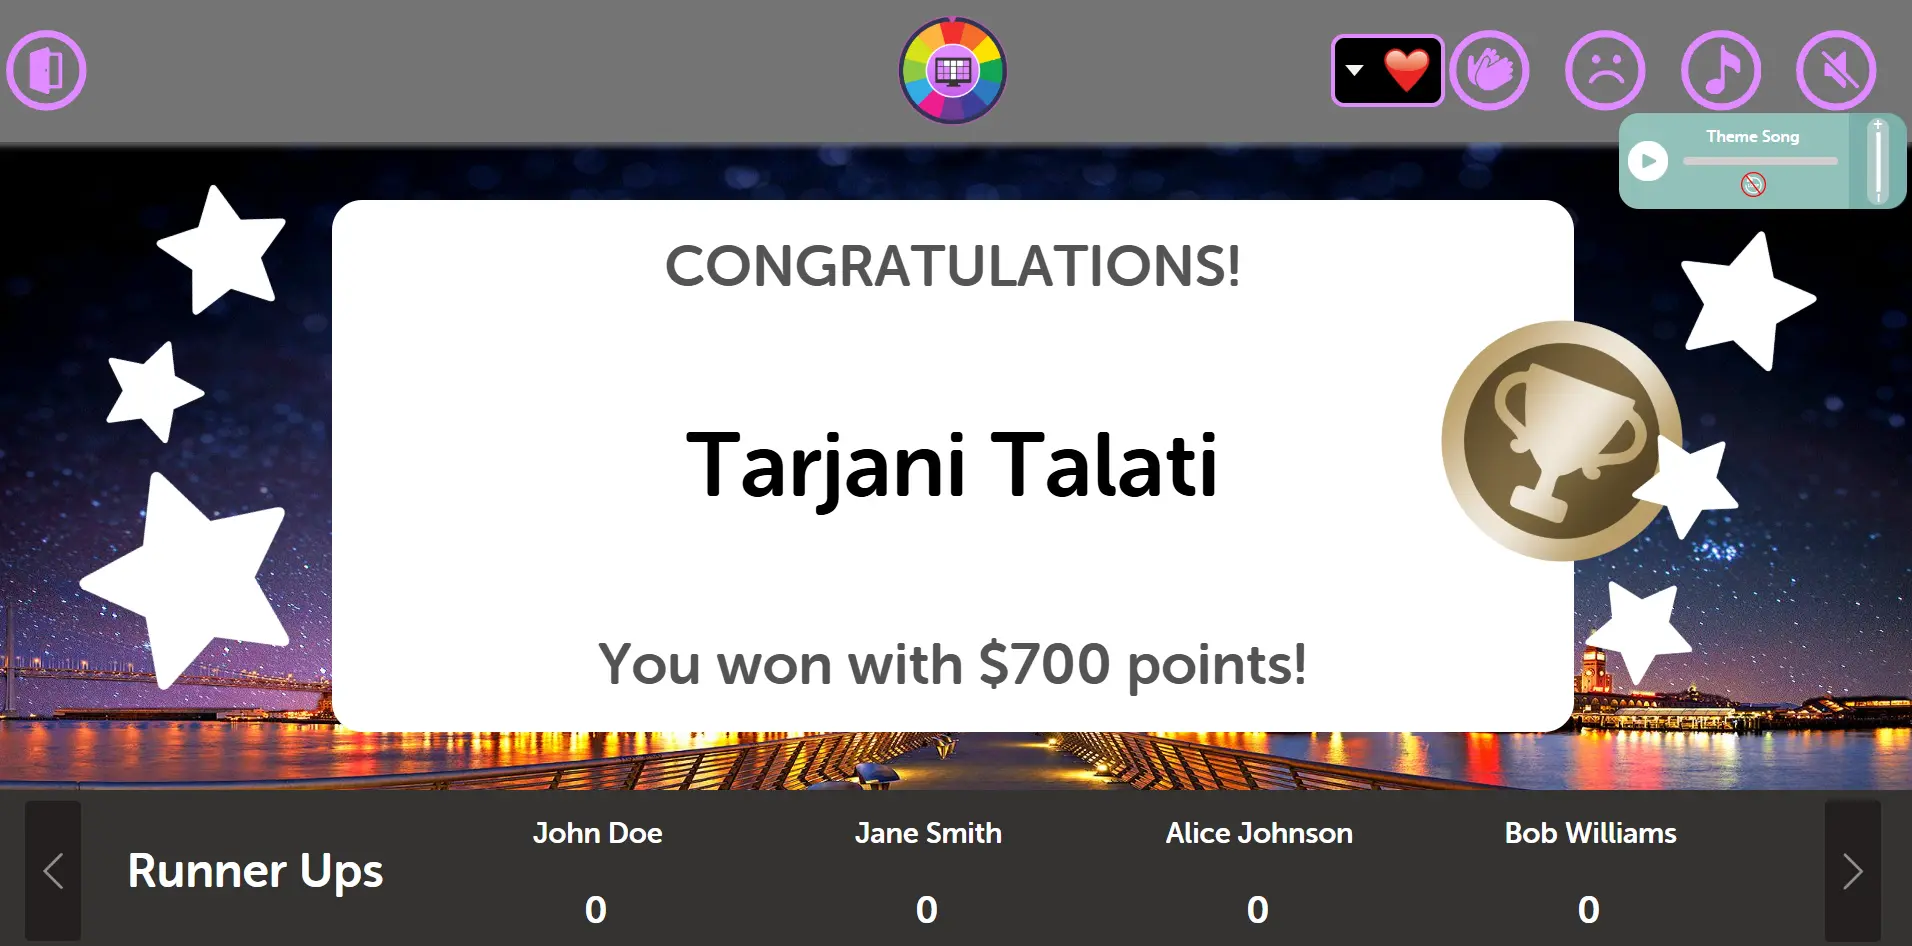
Step 11: Final Winner - Complete Game Results
After all rounds are completed or when the host chooses to end the game, both screens display the comprehensive final results showing winners and runner-ups:
Presenter Screen - Winner Celebration:
The presenter screen showcases the ultimate celebration display for your audience:
Grand Winner Display: Features the champion team with their final total score prominently shown
Complete Rankings: Shows all participating teams in order from winner to runner-ups
Final Scores: Displays each team's cumulative points across all rounds
Celebration Graphics: Includes confetti, winner badges, and visual celebrations for the audience
Controller Screen - Final Management:

The controller screen provides comprehensive game management and results overview:
Winner and Runner-Up Display:
1st Place Winner: Highlighted prominently with the highest score and champion status
2nd Place Runner-Up: Clearly marked second position with total points earned
3rd Place and Beyond: Complete ranking of all participating teams in descending score order
Final Score Totals: Shows cumulative points from all completed rounds for each team
Host Control Features:
Final Score Adjustments: Host can still click and edit final scores if last-minute corrections are needed
Complete Game History: Access to review all rounds, individual performances, and game progression
Game Conclusion: Options to restart, return to dashboard, or set up a new game session
Pro Tip: The final winner screen is the perfect opportunity to celebrate all participants! Use this moment to congratulate the winners, acknowledge the runner-ups, and thank everyone for participating. The dual-screen setup ensures the audience sees a spectacular celebration while you have complete control over the final results and game conclusion.
Crowd Mode allows multiple players to join from their own devices using a game code. Perfect for large audiences, events, or remote participation where everyone can see the wheel spin and participate together.
How to Play:
Click Play and select Crowd Mode
Share the game code displayed on screen with your audience
Players join by visiting the URL and entering the game code on their devices
Control the wheel from the host screen while all players watch and participate in real-time
Players can see the wheel spin on their own devices, creating an engaging shared experience
Pro Tip: Crowd Mode is perfect for large events, classrooms, or remote sessions. Each participant gets their own view of the game while you maintain control of the wheel and game flow from the host screen.
Crowd Mode Setup: Step-by-Step Walkthrough
Here's how to set up and manage Crowd Mode where multiple participants join from their own devices while you control the game:
Step 1: Participants Join the Game
Participants can join the Crowd Mode game in two convenient ways:
Join Methods:
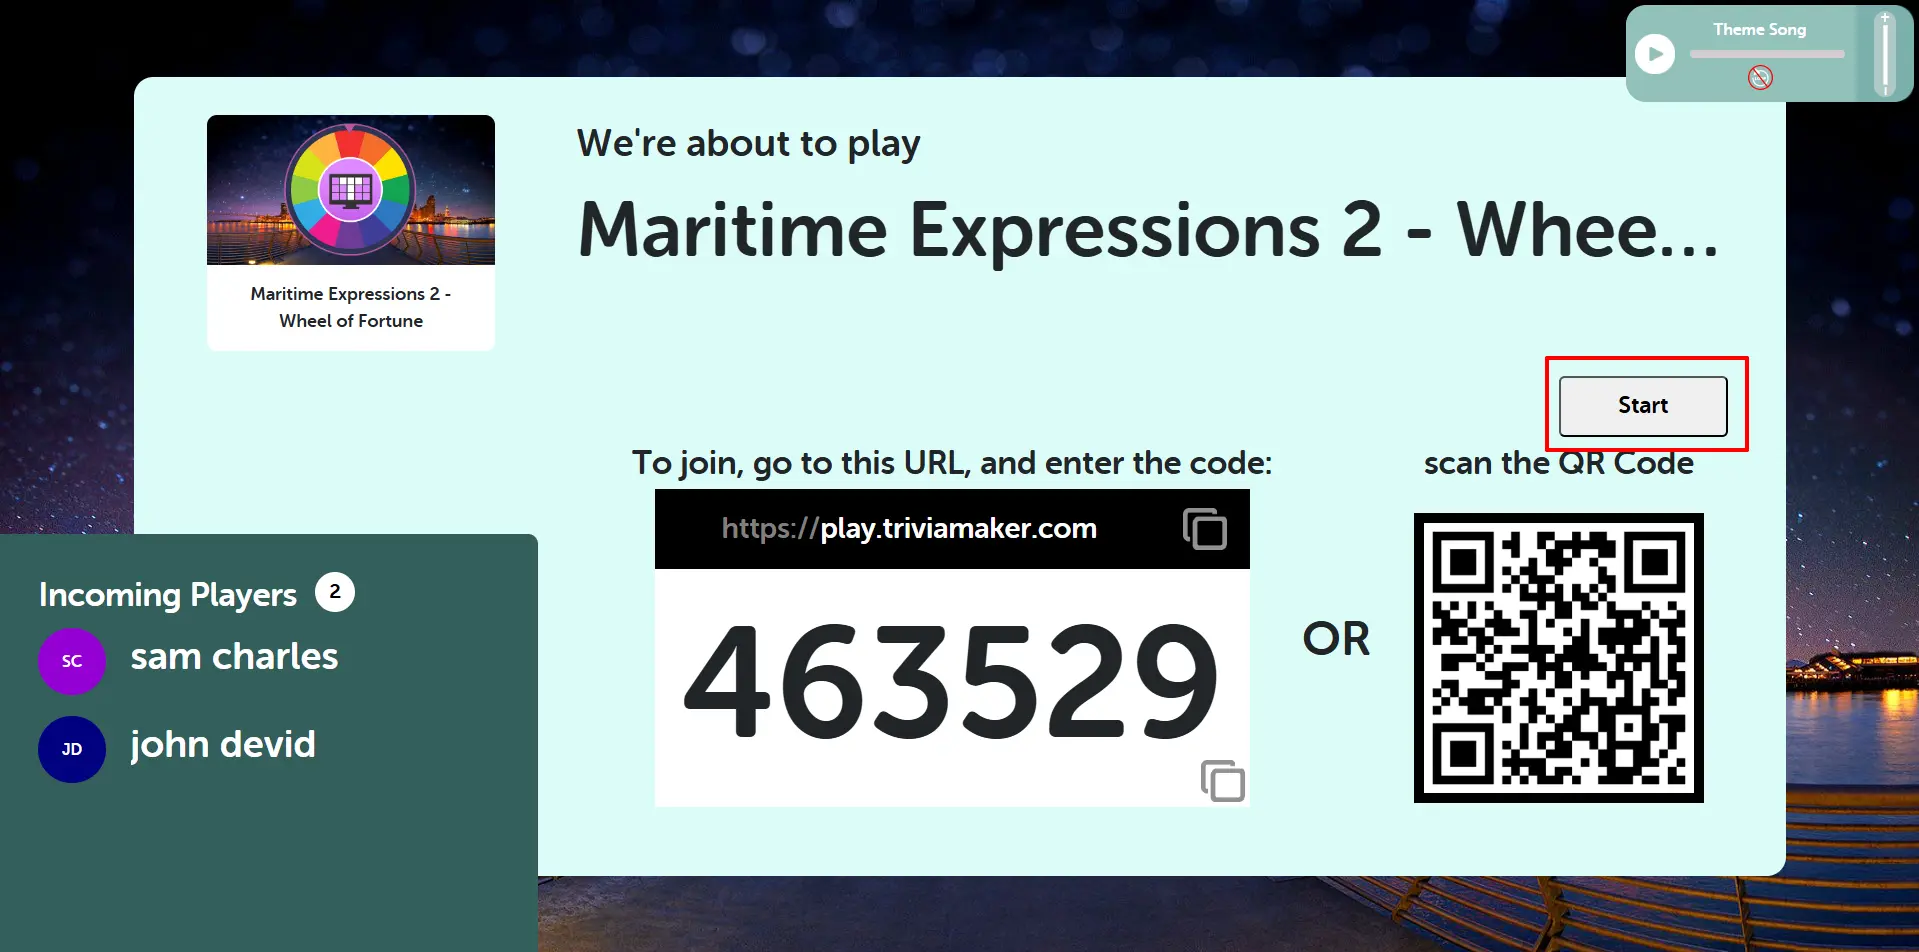
Direct URL Entry: Participants go to https://play.triviamaker.com/crowd/ and manually enter the game code
QR Code Scanner: Participants can scan the QR code displayed on the host screen using their mobile device camera
Player Status Display:
Income Counter: The bottom left corner shows the number of participants who have joined the game in real-time
Minimum Players Required: At least 2 players must join before the game can be started
Real-time Updates: The host can see participants joining live as the counter increases
Start Game Control: Once the minimum players have joined, the host can begin the game
Pro Tip: Share both the direct URL and QR code with your audience. The QR code is especially convenient for mobile users, while the direct URL works well for desktop participants. Watch the player counter to ensure everyone has joined before starting!
Step 2: Crowd Mode Welcome Screen
Once the game starts, both the host and all participants see the Crowd Mode welcome screen featuring:
Grid Icon
Click this icon to view all available rounds in a grid layout. This allows you to see all questions at a glance.
Winner Icon
Click this icon to skip directly to the winner screen and see the final results and scoreboard.
Exit Icon
Click this icon to exit the game and return to the main dashboard.
Play Music Icon
Click this icon to play or pause the background music during the game.
1
Round Buttons
Click on any round number (1, 2, 3, etc.) to start that specific round and proceed to the question screen.
Sad Face Icon
Click this icon to play a sad sound effect, typically used when a team answers incorrectly.
Clap Icon
Click this icon to play a clapping sound effect, perfect for celebrating correct answers or team achievements.
Welcome Screen Elements:
Center Logo: The TriviaMAker logo prominently displayed in the center of the screen for brand recognition
Round Display: Shows all available rounds in the game, giving participants an overview of what to expect
Total Rounds Counter: Indicates the complete number of rounds that will be played in this game session
Synchronized Experience: All participants see the same interface simultaneously, creating a unified game experience
Host Control Features:
Game Initiation: Host can start the wheel game when ready, and all participants will see the action simultaneously
Round Selection: Host controls which round to play, and participants follow along in real-time
Wheel Control: Only the host can spin the wheel, while all participants watch the wheel spin on their devices
Shared Viewing: All game actions (wheel spins, questions, results) appear on every participant's device simultaneously
Pro Tip: Crowd Mode creates an exciting shared experience where everyone sees the wheel spinning on their own device while you maintain full control as the host. It's perfect for engaging large audiences while ensuring everyone has a clear view of the action!
Step 3: Question Screen and Participant Management
During active gameplay, both participants and the host have access to comprehensive game management features. The question screen provides multiple participation modes and extensive host controls:
Participant Interaction Options:
Team-wise Participation: Users can participate and be organized by team names, allowing for collaborative gameplay
Individual Name-wise Participation: Users can also participate individually using their own names for personal scoring
Flexible Organization: The host can switch between team-based and individual modes depending on the event type
Real-time Participation: All participants see the same question screen and can interact simultaneously
Host Control Panel Features:
Leaderboard Management:
Open Second Leaderboard: Host can open and display a secondary leaderboard for additional scoring or comparison
Real-time Rankings: View current standings of all participants or teams during active gameplay
Multiple Leaderboard Views: Switch between different leaderboard formats depending on participation mode
Left Bottom Control Panel:
Score Adjustment Tools: Host can manually adjust scores for participants or teams as needed
Participant Management: Add or remove participants, modify team assignments, or correct participant information
Scoring Corrections: Fix any scoring errors that may occur during gameplay
Right Bottom Control Panel:
Next Round Button: Host can advance to the next round when ready to continue the game
Round Navigation: Control game flow and progression through different rounds
Game Continuation: Seamlessly move between rounds while maintaining participant engagement
Timing Control: Host decides when to proceed, allowing time for discussion or explanation between rounds
Pro Tip: Use the dual participation modes (team-wise and individual) to match your event's format. The comprehensive host controls give you complete flexibility to manage scoring, participants, and game flow in real-time. Keep an eye on the leaderboards to maintain engagement and excitement!
Step 4: Winner Screen and Final Results
At the conclusion of all rounds, the winner screen displays comprehensive final results visible to all participants:
Winner Display Features:
Grand Champion Display: The top winner is prominently featured with their final score and achievement recognition
Team vs Individual Results: Results display matches the participation mode used (team-based or individual)
Synchronized Celebration: All participants see the same winner announcement simultaneously
Pro Tip: The winner screen creates a perfect conclusion to your Crowd Mode event. All participants can see the final results on their own devices, making it ideal for taking screenshots, sharing results, or celebrating achievements together!
Classroom Mode is designed for educational settings where teachers can manage student participation, track progress, and create an engaging learning environment with the Wheel game.
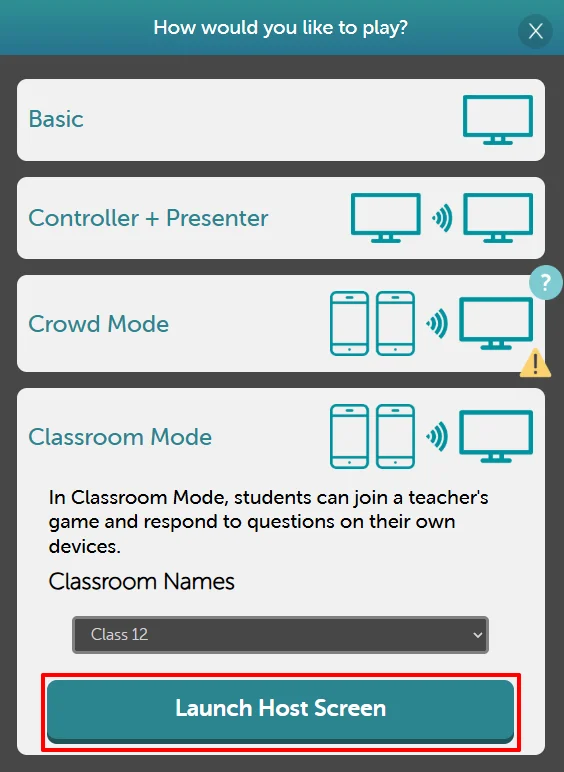
How to Play:
Select Classroom Mode when launching your game
Students join using their devices with the provided game code
Monitor student participation and engagement in real-time
Use the wheel to randomly select students or topics for discussion
Track individual student progress and performance throughout the game
Pro Tip: Classroom Mode is ideal for educational environments where teachers need to manage student participation, track individual progress, and create an engaging learning experience with the interactive wheel game.
Classroom Mode Setup: Step-by-Step Walkthrough
Here's how to set up and manage Classroom Mode for educational settings where the teacher controls the game and students participate from their devices:
Step 1: Teacher Host Setup Screen
This is the first screen the teacher (host) sees when setting up Classroom Mode. From this interface, the host can open the joining screen for students:
Host Control Features:
Open Join Screen: Teacher can activate the student joining process from this host interface
Game Management: Full control over game settings, student access, and classroom session management
Educational Controls: Specialized features designed for classroom environments and learning objectives
Student Monitoring: Ready to track and monitor student participation once the session begins
Pro Tip: Use this initial setup screen to prepare your classroom session. Ensure you're ready to open the join screen when your students are ready to participate. The host interface gives you complete control over the learning experience!
Step 2: Student Joining Process
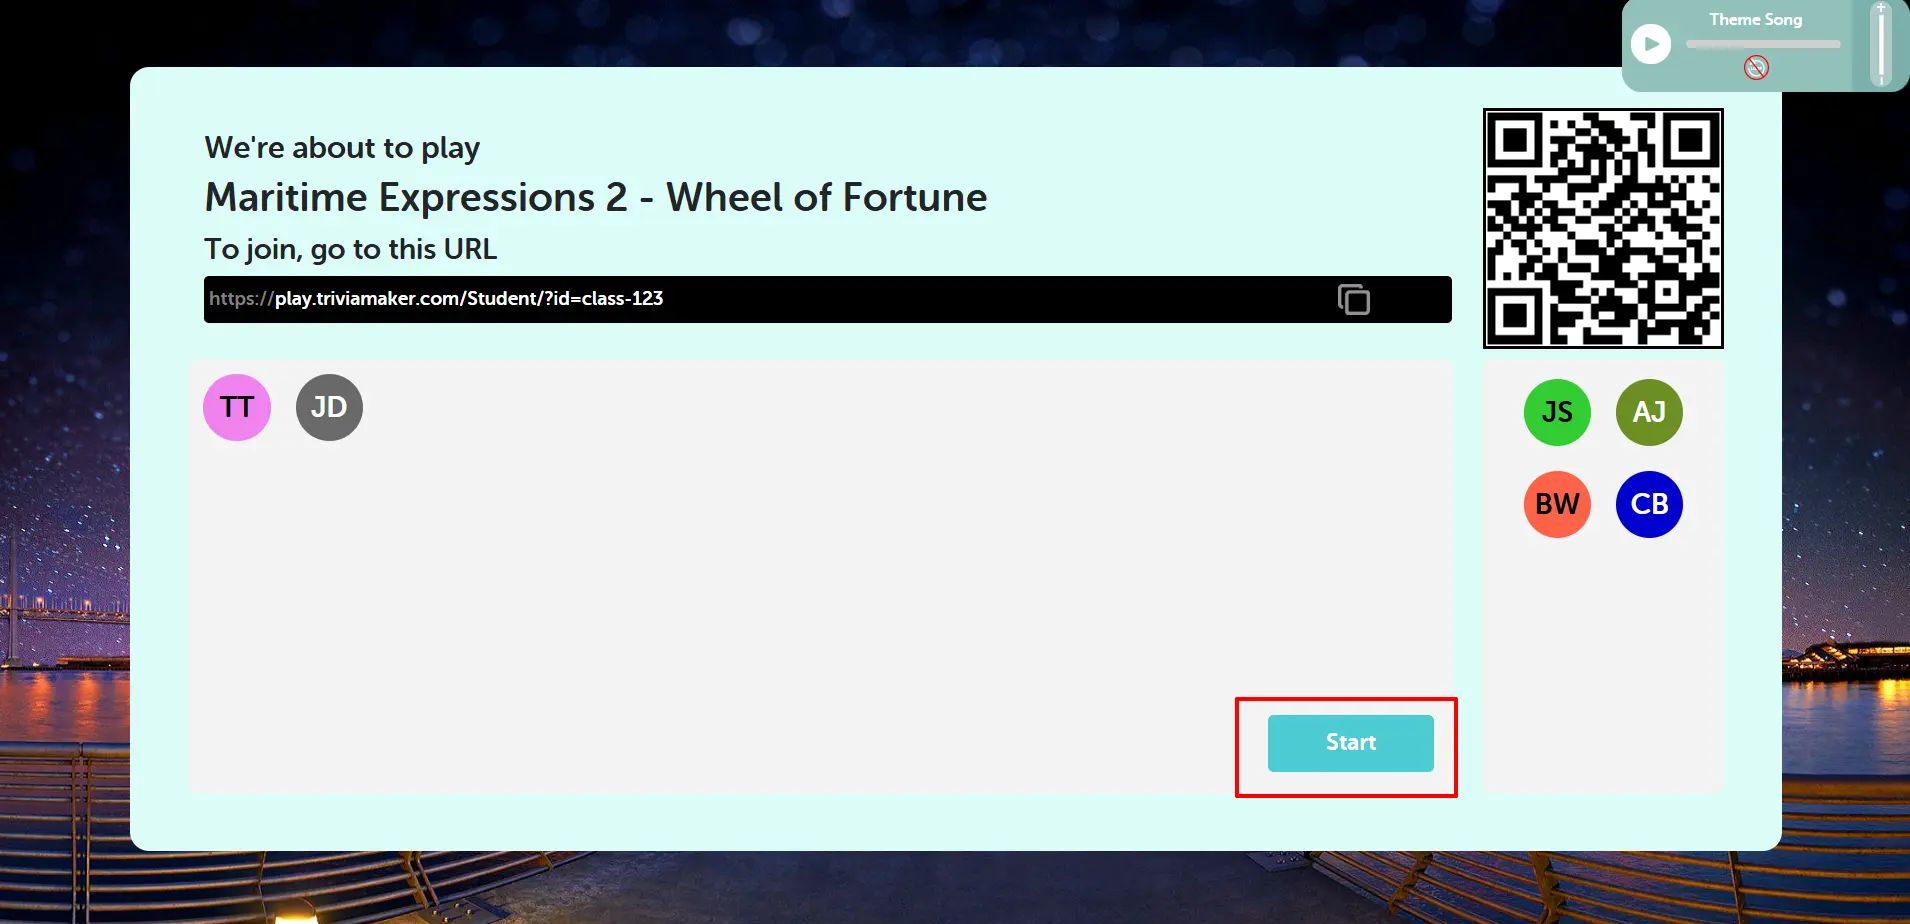
This is the second screen showing how students can join the classroom session. Students have multiple convenient ways to participate:
Student Joining Methods:
Direct Link Access: Students can visit the provided URL link to join the classroom session directly
QR Code Scanning: Students can scan the QR code using their mobile device camera for quick access
Game Code Entry: Students can manually enter the displayed game code on the joining platform
Student Access Features:
Easy Access: Multiple joining methods ensure all students can participate regardless of their device type
Quick Connection: QR code provides instant access for mobile users in the classroom
Real-time Joining: Students can join the session as soon as the teacher opens the joining screen
Student Identification: Each student joins with their own identity for individual tracking
Pro Tip: Display this joining screen prominently in your classroom so all students can easily see the QR code and joining instructions. The multiple access methods ensure every student can participate successfully!
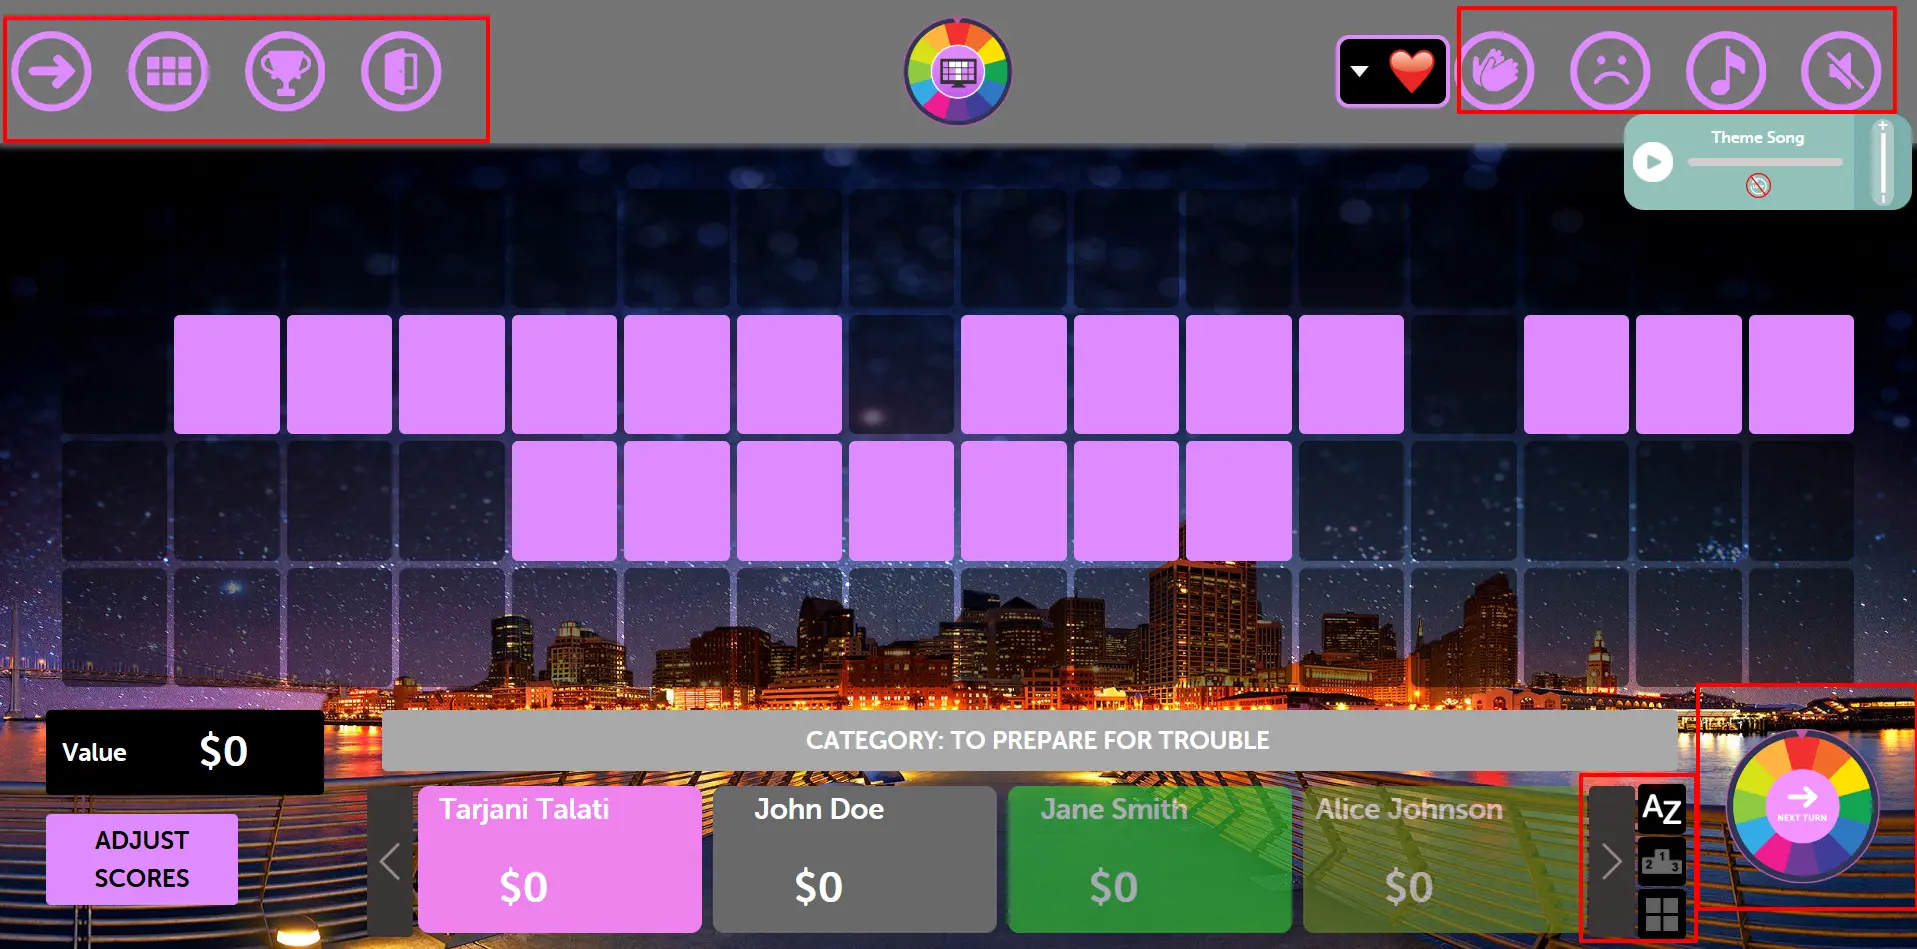
Step 3: Classroom Welcome Screen with Rounds
This is the third welcome screen that both the teacher and students see once the classroom session begins. Here, everyone can see the available rounds and prepare for the learning activity:
Grid Icon
Click this icon to view all available rounds in a grid layout. This allows you to see all questions at a glance.
Winner Icon
Click this icon to skip directly to the winner screen and see the final results and scoreboard.
Exit Icon
Click this icon to exit the game and return to the main dashboard.
Play Music Icon
Click this icon to play or pause the background music during the game.
1
Round Buttons
Click on any round number (1, 2, 3, etc.) to start that specific round and proceed to the question screen.
Sad Face Icon
Click this icon to play a sad sound effect, typically used when a team answers incorrectly.
Clap Icon
Click this icon to play a clapping sound effect, perfect for celebrating correct answers or team achievements.
Welcome Screen Elements:
Round Overview: Students can see all the rounds available in the classroom session for better preparation
Learning Structure: Clear visual representation of the lesson structure and learning objectives
Session Organization: Both teacher and students see the same organized view of the educational content
Progress Tracking: Visual indication of which rounds have been completed and which are upcoming
Educational Features:
Synchronized Learning: All students see the same content simultaneously, ensuring unified classroom experience
Teacher Control: Teacher maintains full control over which rounds to play and when to advance
Student Engagement: Interactive wheel format keeps students engaged and participating actively
Educational Assessment: Teachers can use rounds for assessment, review, or interactive learning activities
Pro Tip: Use this welcome screen to introduce the lesson structure to your students. The round display helps students understand what topics will be covered and creates anticipation for the learning activities ahead!
Step 4: Question Screen and Student Management
During active classroom gameplay, the question screen provides comprehensive educational management features. Both students and teachers have access to enhanced learning tools and controls:
Student Participation Features:
Individual Student Tracking: Students participate with their unique identities for personalized learning assessment
Team-based Learning: Students can be organized into teams for collaborative educational activities
Real-time Engagement: All students see the same question content simultaneously for unified learning experience
Educational Interaction: Interactive wheel format promotes active learning and student engagement
Teacher Control Panel Features:
Student Progress Monitoring:
Educational Leaderboard: Teacher can display student rankings and progress for academic motivation
Individual Performance Tracking: Monitor each student's participation and learning progress in real-time
Classroom Analytics: Access comprehensive data on student engagement and understanding
Left Bottom Educational Controls:
Score Adjustment for Learning: Teacher can adjust scores to reflect learning progress and provide fair assessment
Student Management: Add, remove, or modify student information and team assignments during the session
Educational Corrections: Make real-time adjustments to support learning objectives and student needs
Right Bottom Lesson Controls:
Next Round Progression: Teacher controls when to advance to the next educational topic or lesson segment
Lesson Pacing: Control the speed and flow of the lesson based on student understanding and engagement
Educational Continuity: Seamlessly move between topics while maintaining student focus and participation
Teaching Flexibility: Teacher decides when to proceed, allowing time for discussion, questions, or explanation
Pro Tip: Use the comprehensive teacher controls to create an engaging educational experience. The individual and team tracking features help you monitor student progress while the flexible pacing controls ensure all students can follow along and participate successfully!
Step 5: Winner Screen and Educational Assessment
At the conclusion of the classroom session, the winner screen provides comprehensive educational assessment results visible to all students and the teacher:
Educational Results Display:
Top Performer Recognition: The highest achieving student or team is prominently celebrated for their learning success
Complete Academic Rankings: All students are ranked with their final scores for comprehensive assessment review
Individual vs Team Results: Results display matches the learning format used (individual assessment or team collaboration)
Synchronized Educational Celebration: All students see the same achievement recognition simultaneously
Educational Assessment Features:
Learning Progress Documentation: Teacher can use results for academic records and progress tracking
Student Motivation: Positive reinforcement and achievement recognition encourage continued learning
Classroom Analytics: Comprehensive data on student performance for educational planning and improvement
Educational Closure: Provides a satisfying conclusion to the learning session with clear achievement outcomes
Pro Tip: Use the educational results screen for positive reinforcement and learning assessment. The winner display creates a perfect conclusion to your classroom session and provides valuable data for tracking student progress and engagement!