How to Create a Trivia Game
Welcome to TriviaMaker! TriviaMaker is a powerful platform that lets you create engaging trivia games for education, entertainment, team building, and more. This tutorial will guide you through everything you need to know to create and share your first trivia game.
There are two simple ways to create a Trivia game in TriviaMaker
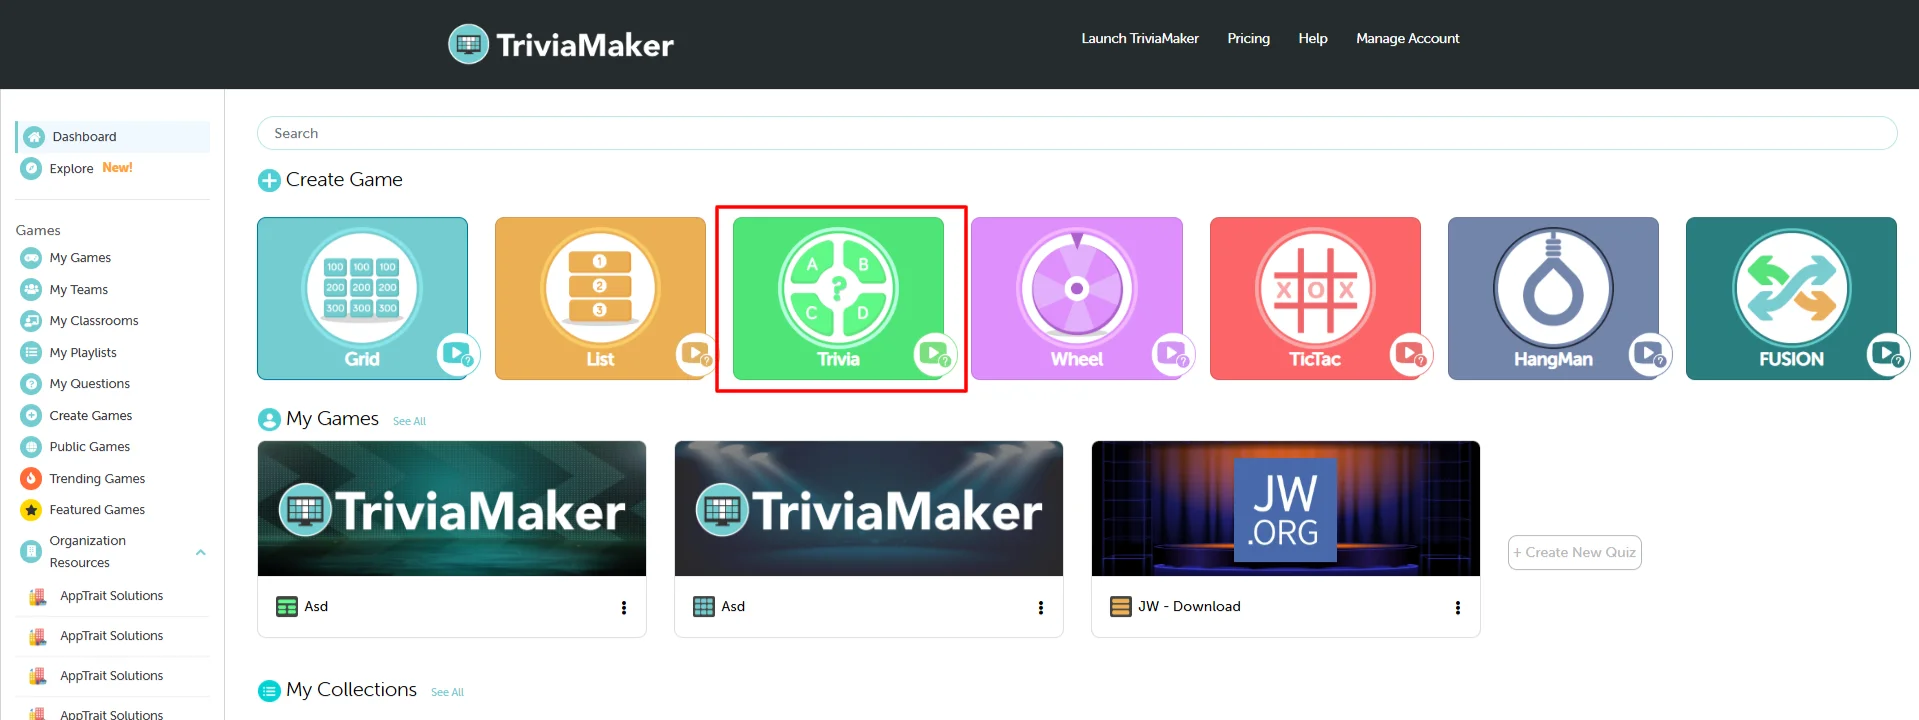
Option 1: Create from the Dashboard
Go to your Dashboard. Under the Create Game section, you'll see multiple game styles. Click on the Trivia game style.
Option 2: Create from the Sidebar Menu
From the left-hand sidebar, click on Create Games. Clicking this link will navigate you to https://triviamaker.com/app/create/.
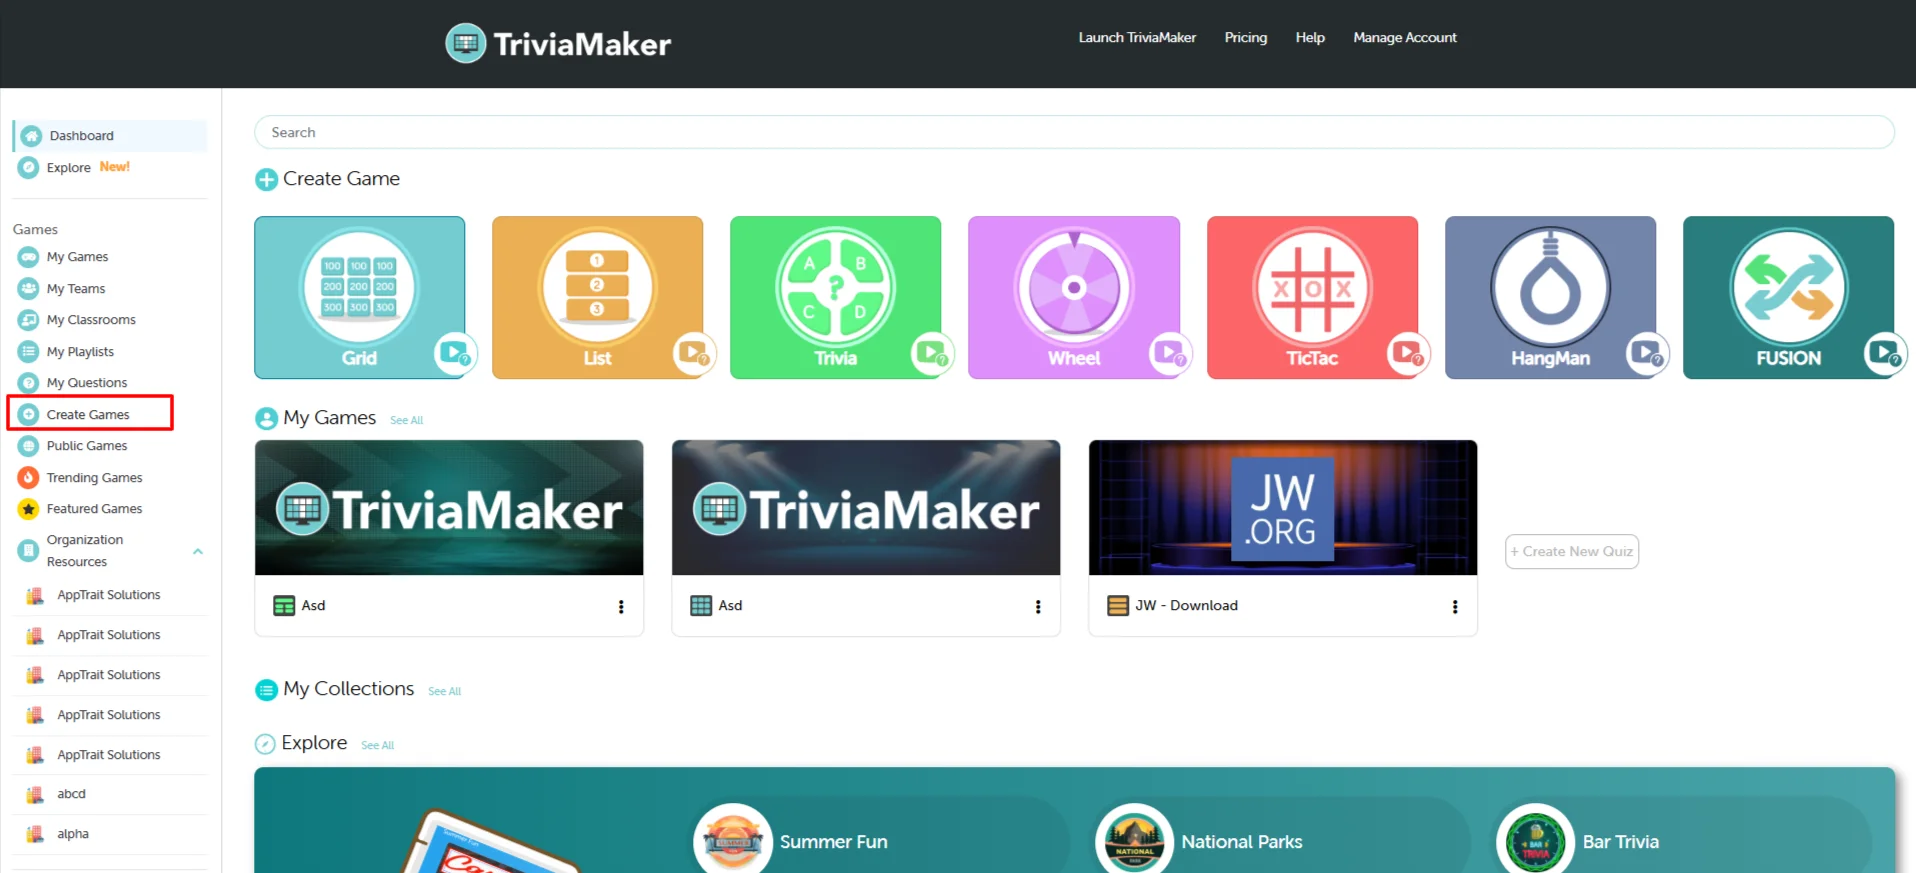
You'll see a list of available game styles — select Trivia from the options.
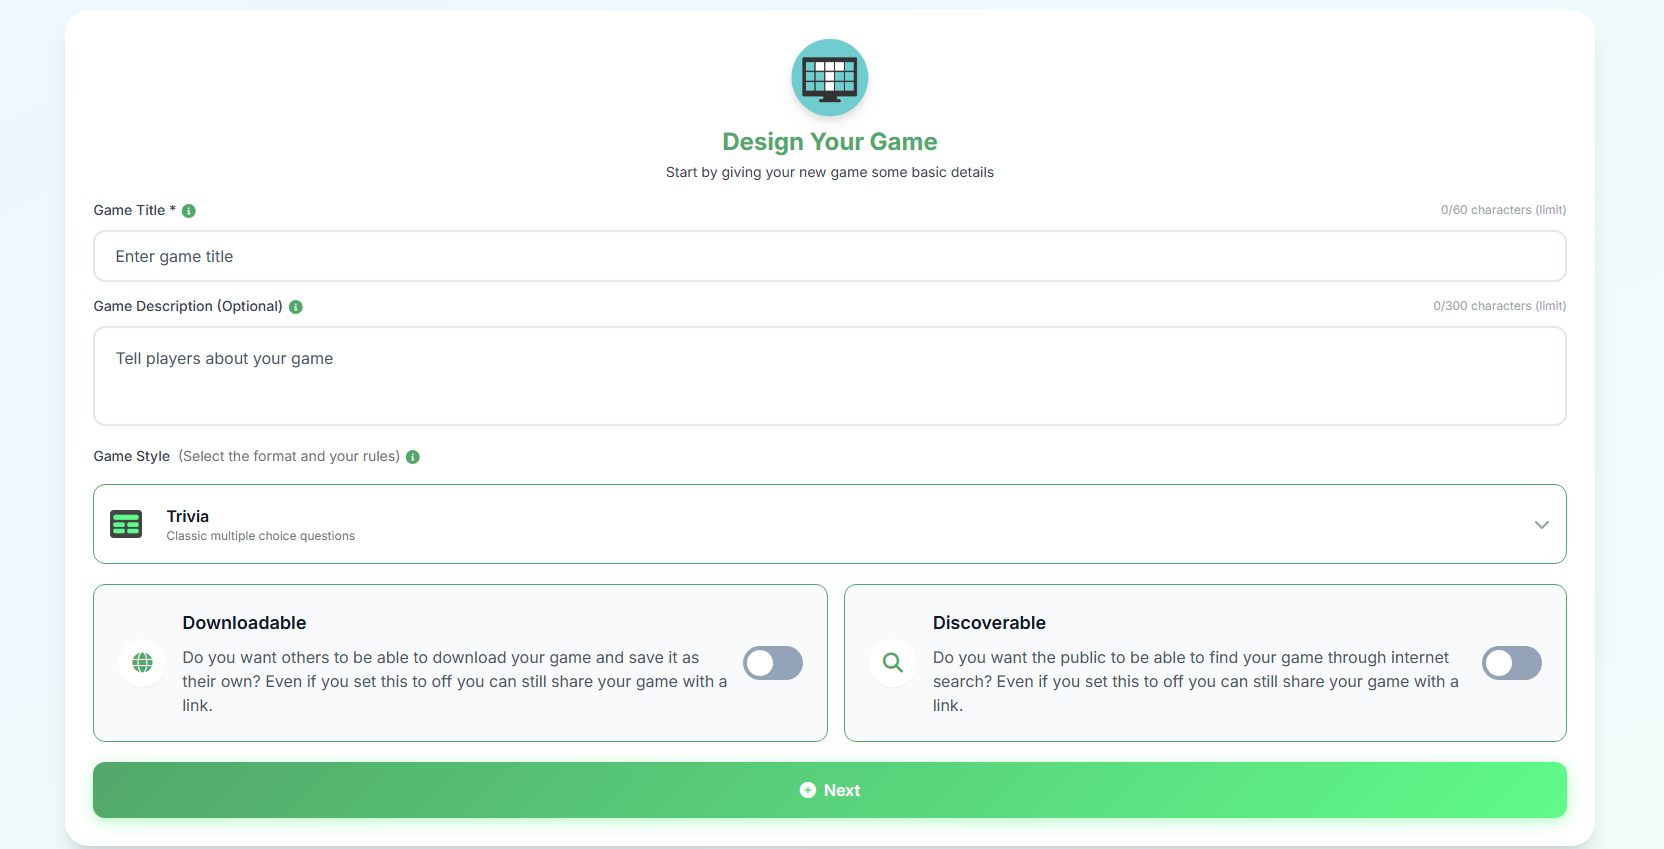
Enter Your Game Name
Give your game a unique and recognizable name. This name will help you identify your game easily within your dashboard and when sharing it with others.
Add a Game Description (Optional)
You can optionally add a short description for your game. Use this space to describe the purpose, theme, or any special notes about your game — it helps you and others remember why you created it.
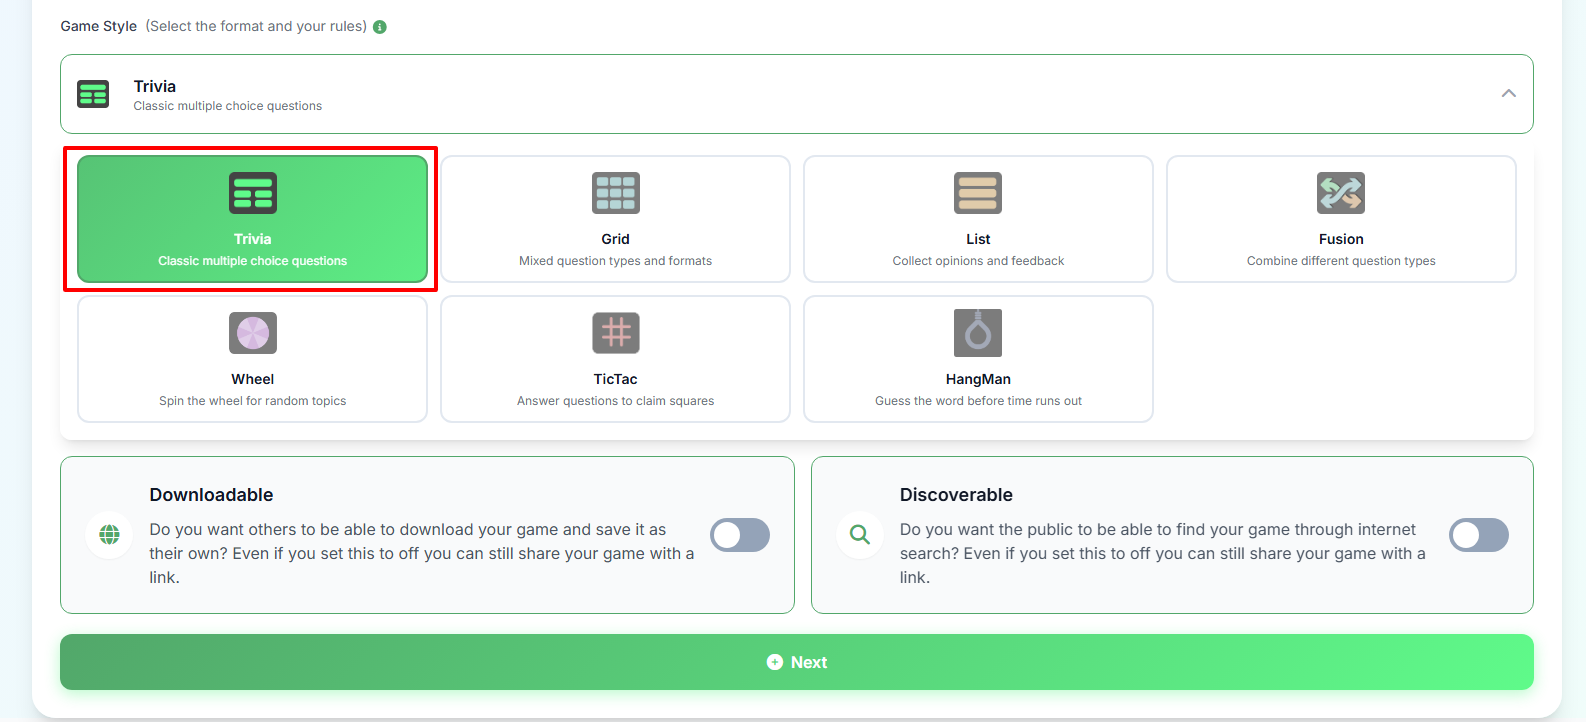
Select the Trivia Game Style
From the Game Style dropdown, select Trivia — Classic multiple choice questions. This sets the format and rules for your game.
4.
Allow Others to Copy (Downloadable)
Toggle this switch if you want others to download your game and save it as their own.
💡 Why use this? This is great for educators who want to share a template quiz with other teachers, or for content creators who want their games to be reused by the community.
5.
Publicly Searchable (Discoverable)
Toggle this switch to make your game visible to the public.
💡 Why use this? Turn this on if you've created a fun, general-knowledge quiz that you want the whole TriviaMaker community to find and play. Keep it off for private games for your class or team.
6.
Click "Next" to Create Your Game
Once you've entered the details and selected your preferences, click on the Next button to proceed with creating your game.
How to Add Questions to Your Quiz
Pro Tip: Start by generating questions with our AI tool to quickly build a foundation. Then, manually add a few custom questions to personalize the quiz and cover specific topics.
Five Ways to Add Questions to Your Quiz
Choose the method that best suits your needs, whether you're starting from scratch, leveraging existing content, or using AI to speed up the process.
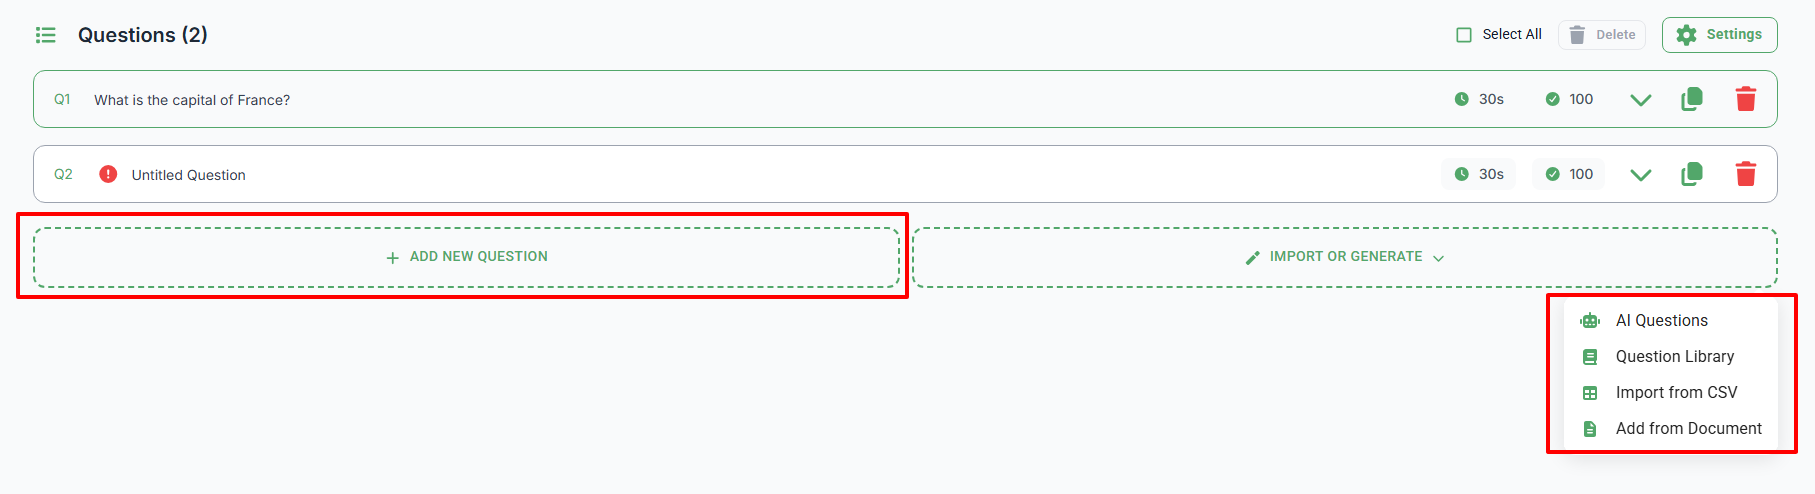
Use our AI Question Generator to instantly create relevant questions based on any topic.
Pro Tip: Start by generating questions with our AI tool to quickly build a foundation. Then, manually add a few custom questions to personalize the quiz and cover specific topics.
Click on the AI Questions button
In the text field, enter the topic or keyword.
Click Generate Trivia questions.
Review the list of generated questions and click Add Selected.
Reuse questions you've previously created and saved in your my questions.
Click the Question Library button.
Browse or Search for Questions in your My Questions library.
Click ADD SELECTED.
Convert existing text or documents into quiz questions instantly.
Click on Create questions from the document.
In the pop-up window, you have two options:
Upload Document: Upload a file from your computer.
Paste Text: Copy and paste up to 4,000 words directly into the text area.
Once the content is in place, click Generate Questions. The platform will analyze the text and suggest questions you can add.
For spreadsheet power users or bulk uploads, add questions by importing a CSV file.
Click the Prefer to edit with a spreadsheet? link at the top of the Set Up Your Questions section.
In the pop-up, you can Download Template to see the required format, or click Upload CSV File to import your prepared spreadsheet.
Important: Ensure your CSV file follows the specified column format for successful import.
Download CSV Template
Create a custom question from scratch using the full editor, now with rich multimedia options.
Click the central Add Question button.
The Question Editor window will appear, providing a comprehensive interface for content creation.
Enrich Your Question:
Use the icons on the top-right of the question box to add media:
Upload an Image to accompany the question.
Upload an Audio file.
Link a YouTube Video as part of the question.
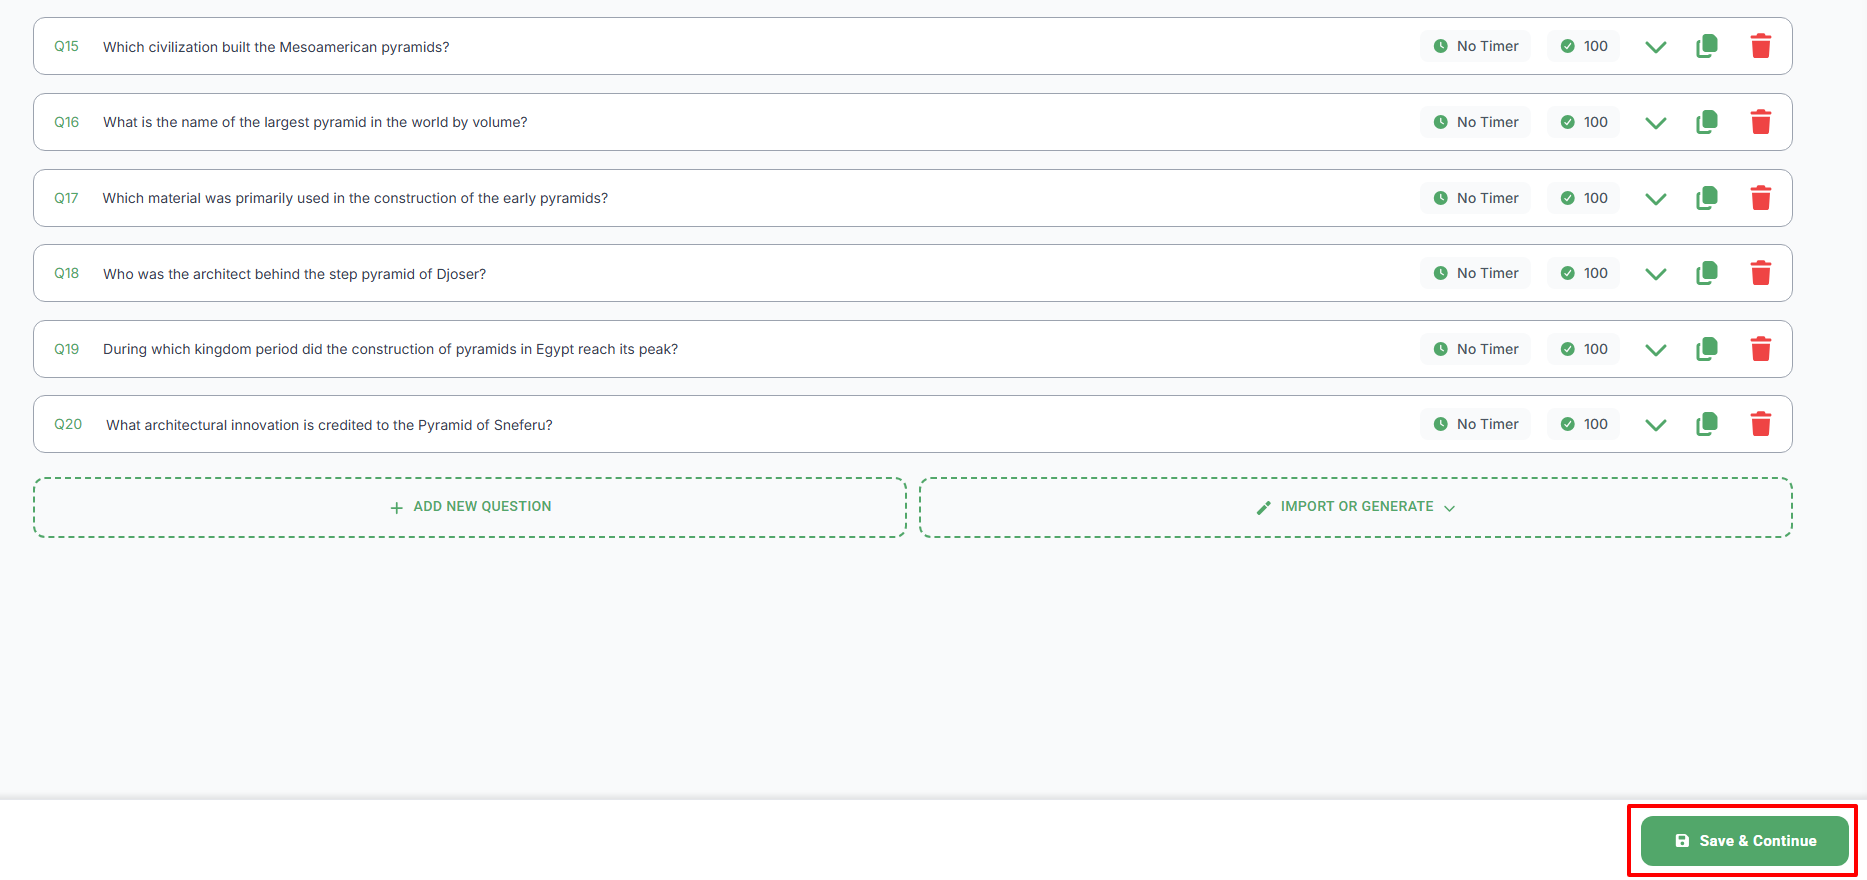
Click Save Question to finalize and add the question to your quiz.
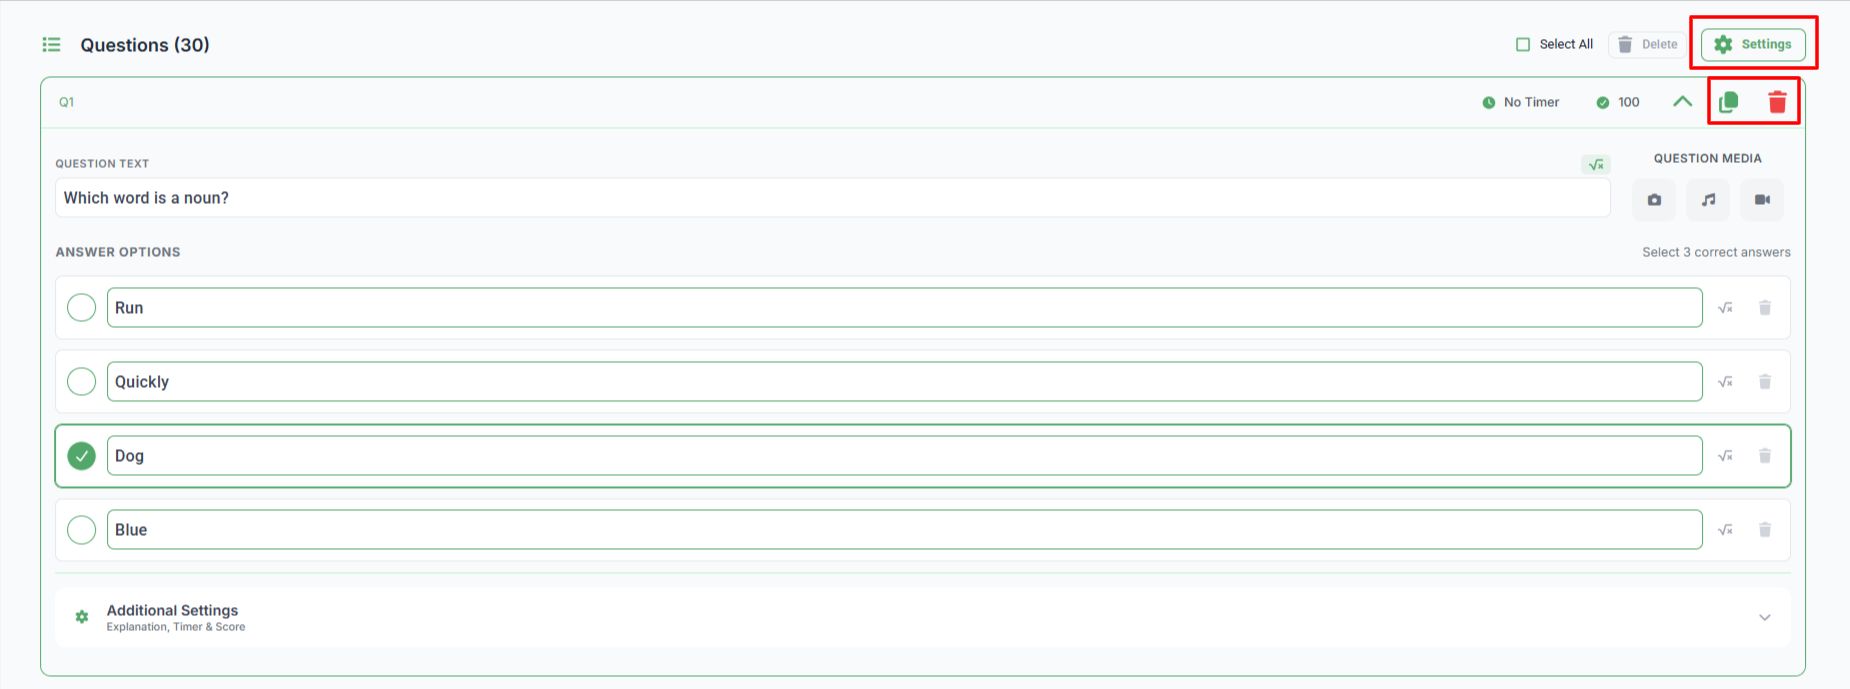
Additional Question Management Tools
| Tool / Feature | Description |
|---|---|
| Clone Question | Click on the Clone (copy icon) to instantly copy the question to the My Questions (question library) on your account. |
| Delete Question | Click on the Delete (trash icon) to permanently remove the question from the quiz. |
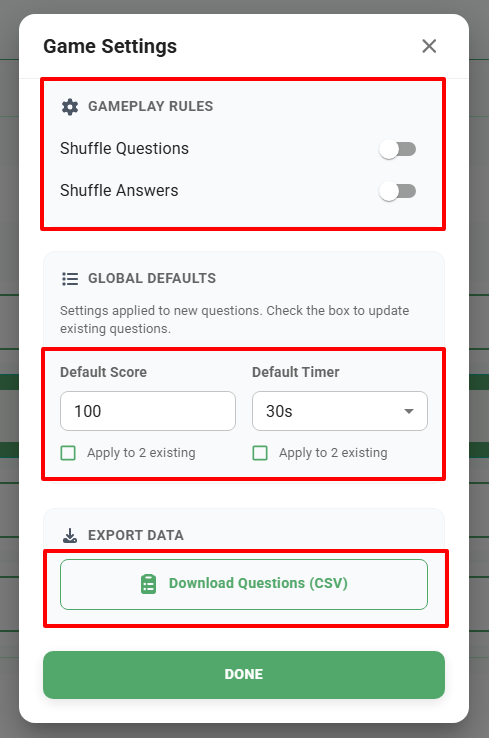
| Shuffle Questions | Toggle ON to randomize the order of questions within the quiz. |
| Shuffle Answers | Toggle ON to randomize the order of answer choices for each question. |
| Score/Timer | Use the Apply All option to set a default Score and/or Timer for every question in the quiz simultaneously. |
| Download Questions (CSV) | Clicking on Download Questions (CSV) under the EXPORT DATA section will immediately download all the questions from your quiz into a CSV spreadsheet file. |
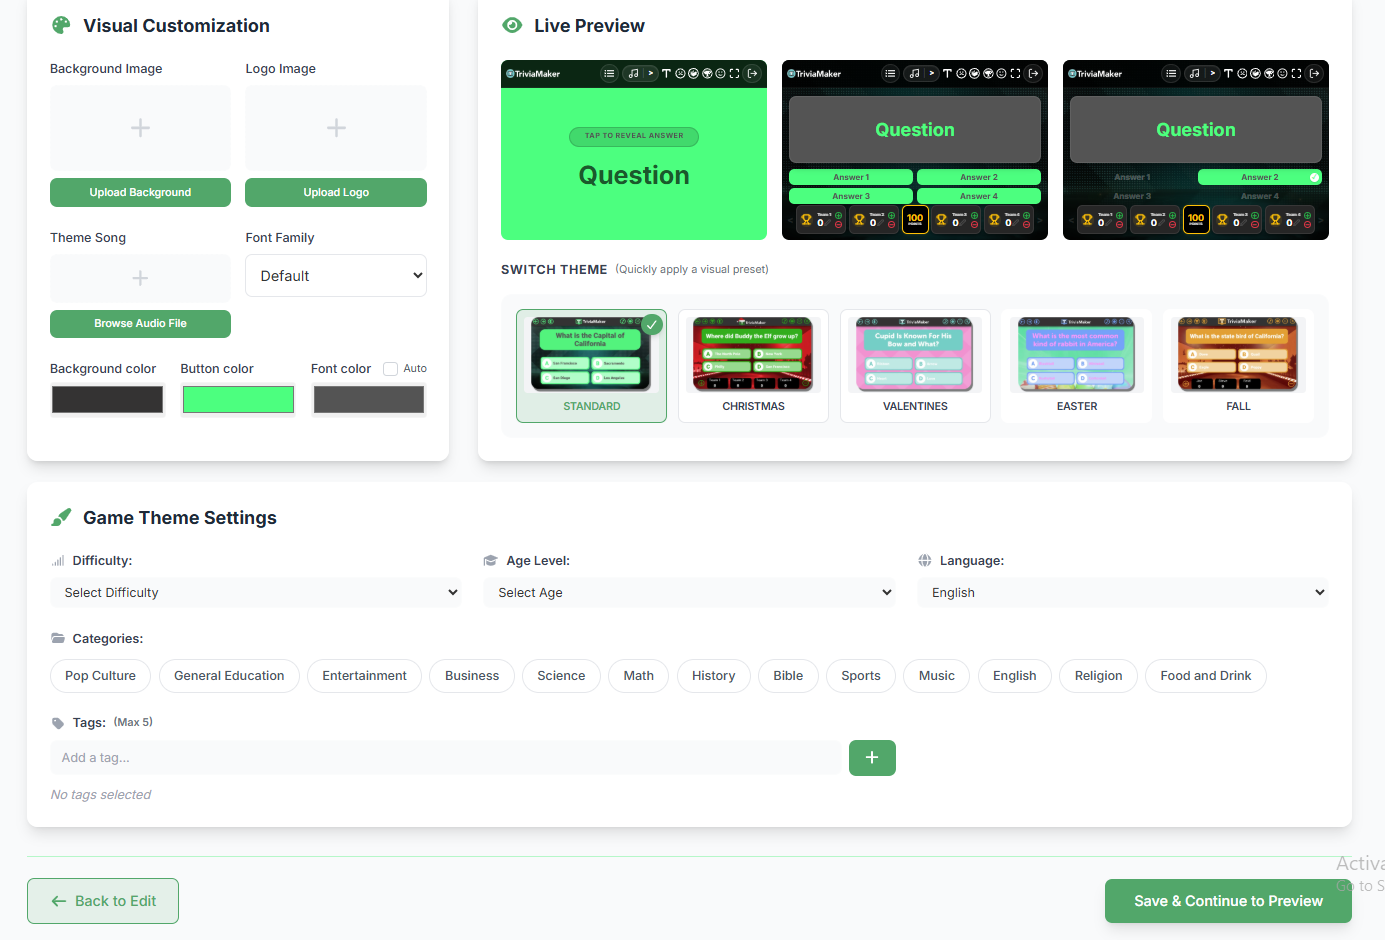
Branding Your Quiz
Pro Tip: For the best visual results, use a high-contrast color combination. If you upload a background image, choose a font color that stands out clearly against it.
| Option / Setting | Description |
|---|---|
| Font Color | Click the color swatch next to "Font color" to select a new text color for your quiz. |
| Button Color | Click the color swatch next to "Button color" to change the color of interactive elements. |
| Background Color | Click the color swatch next to "Background color" to set the main background hue. |
| Font | Use the "Select Font" dropdown to choose a different typeface for your quiz text, further enhancing its visual style. |
| Theme / Select Theme | Use the Theme dropdown (set to "Default" by default) to apply a premade visual theme (such as Space, Neon, or Jungle) which automatically customizes the layout, backgrounds, and styling of your quiz. |
| Upload Logo | Display your brand logo within the game interface. (Note: If you do not upload a custom logo, the default TriviaMaker logo will be used in gameplay.) |
| Background Image | Replace the default background with your own image to make the game visually appealing and thematic. (Note: If you do not upload a custom background image, the default theme background will be used in gameplay.) |
| Theme Song | Upload a background theme song to make gameplay more immersive and entertaining. If you do not want to set any audio, you can upload a blank audio file (downloadable from the blank-audio GitHub repository). |
Game Theme Settings
At the bottom of the customization panel, you will find the Game Theme Settings. Here you can configure the metadata, search tags, language, and general classification of your quiz to make it professional and easy to manage:
| Setting | Description |
|---|---|
| Categories | Define the theme or subject of your quiz to make it easily discoverable. You can select from various pre-defined categories such as Pop Culture, General Education, Entertainment, Business, Science, Math, History, Bible, Sports, Music, English, Religion, Food and Drink, and more. |
| Tags | Add relevant keywords (up to a maximum of 5 tags) to help organize and enable easy search functionality for your games. Type your desired keyword in the "Add a tag..." field and click the green `+` (plus) button to add it. |
| Age Level / Grade Levels | Choose the suitable age or grade range for your players by selecting from the "Select Age" dropdown menu. |
| Difficulty | Select the appropriate challenge level (Easy, Medium, or Hard) using the "Select Difficulty" dropdown to guide your players. |
| Language | Choose the language for your quiz text using the language dropdown (set to "English" by default). |
| Save Your Updates | Click the green "Save & Continue to Preview" button on the bottom-right to confirm all your updates and proceed. You can also click the "Back to Edit" button on the bottom-left to return to the previous editing screen. |
Edit your quiz
How to Edit Questions
You can easily modify any question after it has been added to your quiz. Follow these two simple steps:
Step 1: Click the Edit Icon
Click on the Edit (pencil) icon next to the question you want to modify. This will redirect you to the Edit Question page for that game.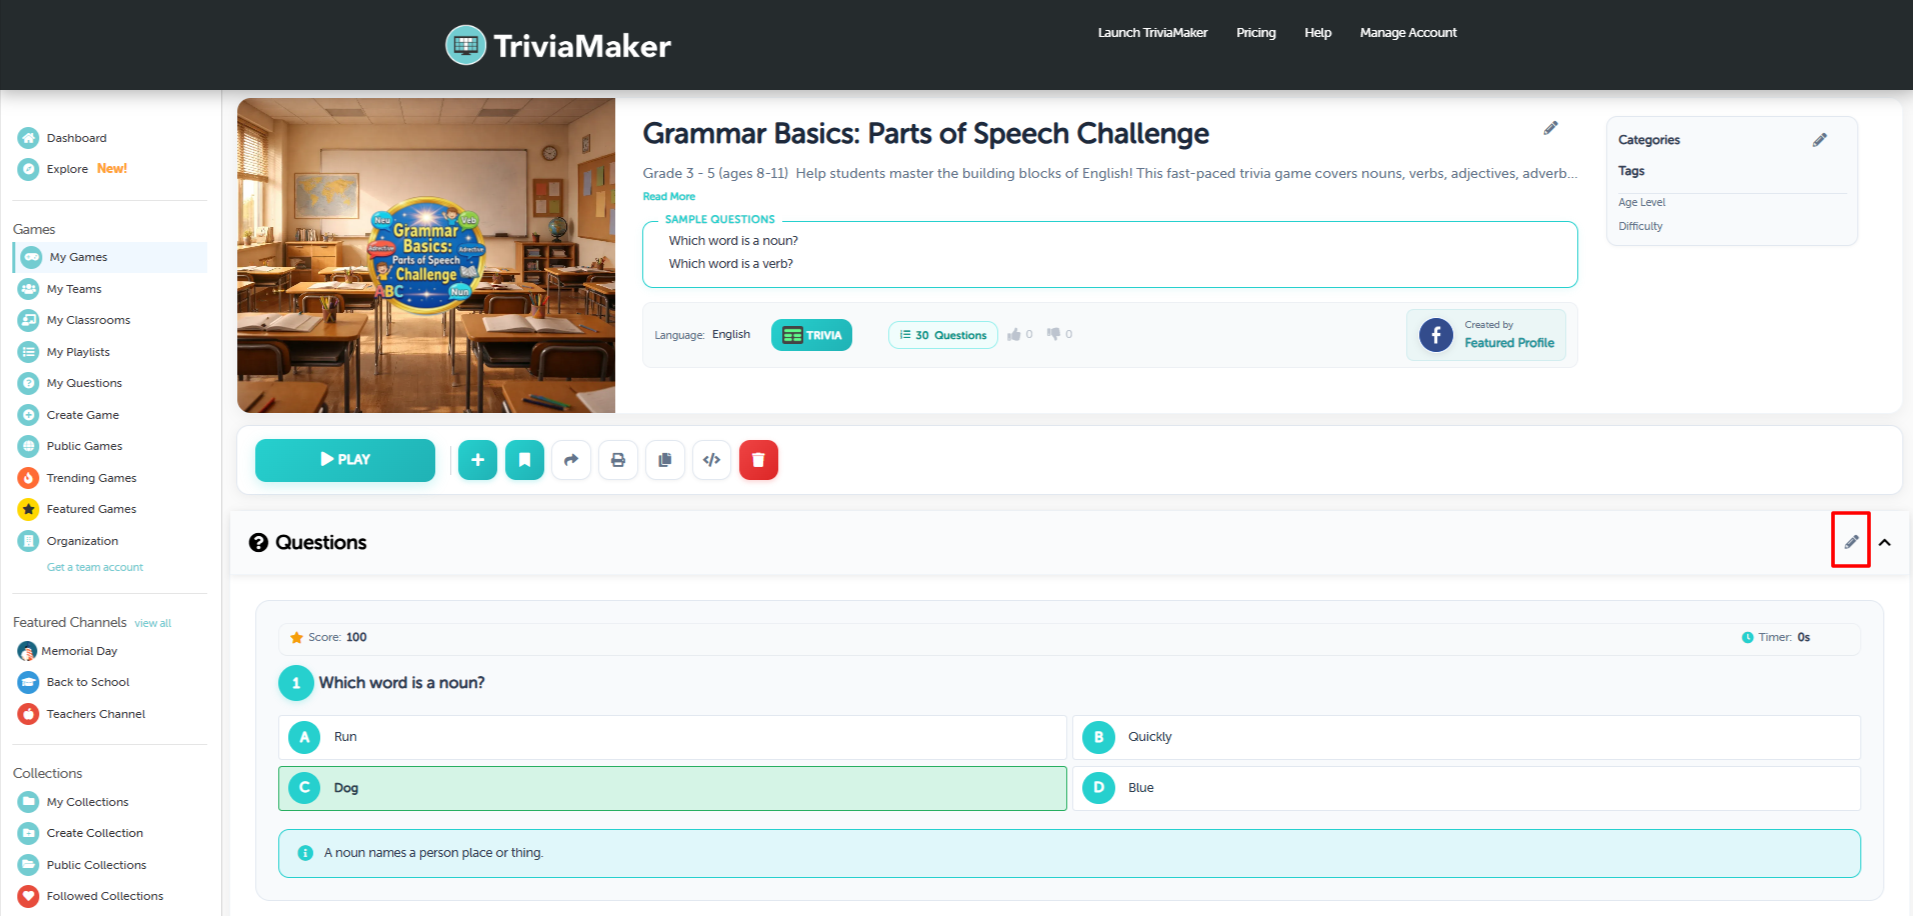
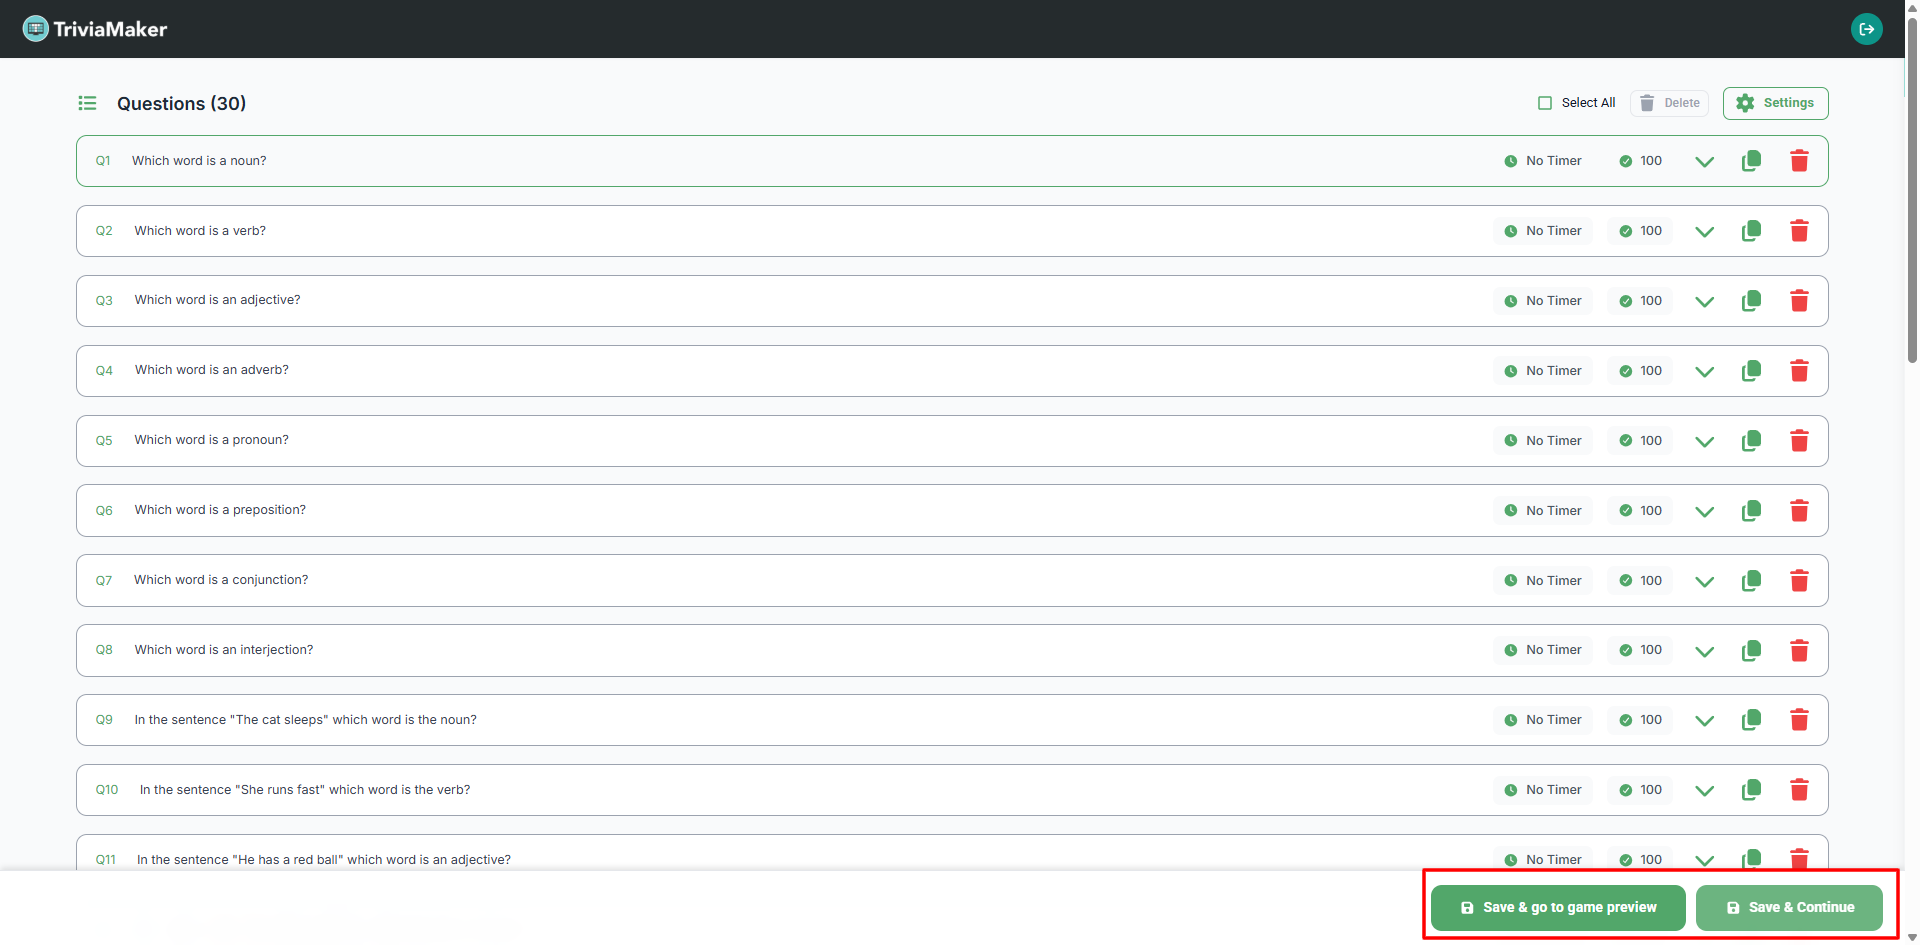
Step 2: Modify Content & Save
Edit the question, answers, or media as desired. Once you're done, you have two options for saving:If you want to go directly to the game preview page, click the Save & go to game preview button.
If you want to return to the customize section, click the Save & continue button.
How to Edit Customization & Game Settings
You can easily update your quiz settings, colors, fonts, background images, and general classification at any time:
Step 1: Click the Edit Icon
Click on the Edit (pencil) icon in the customization/settings header. (Note: On click of that edit icon, it will redirect you to the customization page where you can edit all the game settings and customizations.)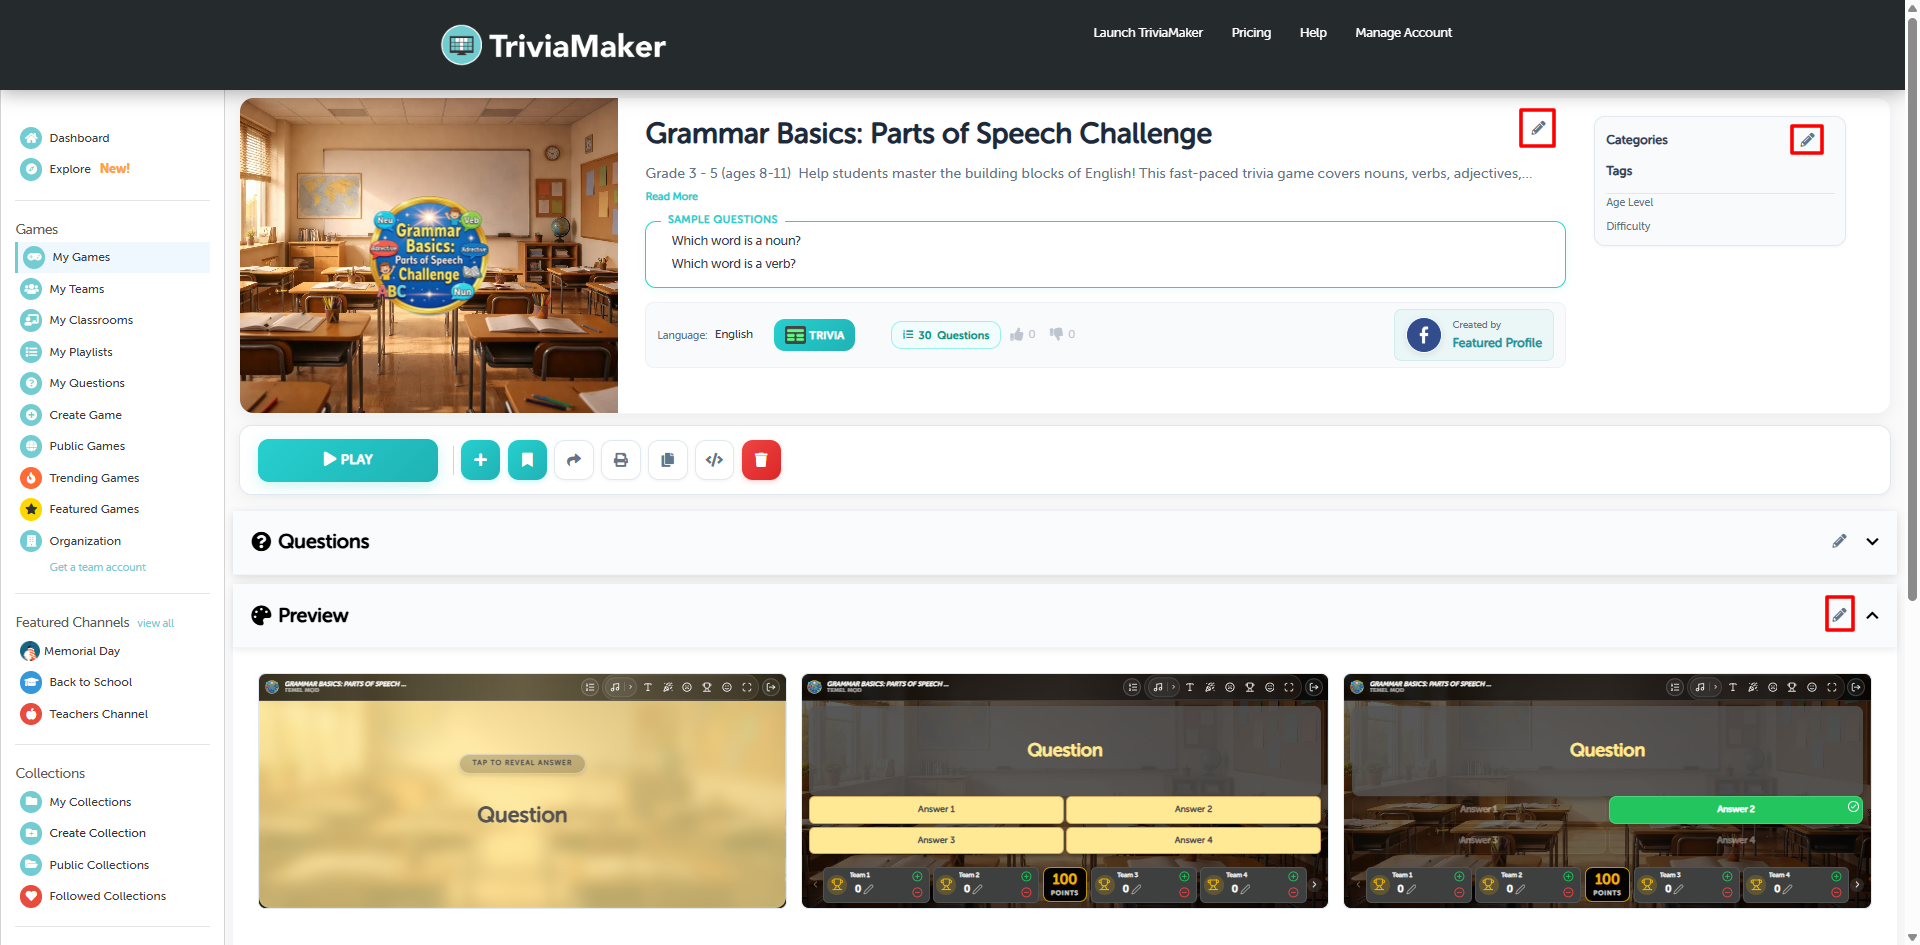
Step 2: Modify Settings & Save
Edit the styling, background music, category, tags, or difficulty levels as needed. After completing your editing, click on the Save & continue to preview button to go to the game preview.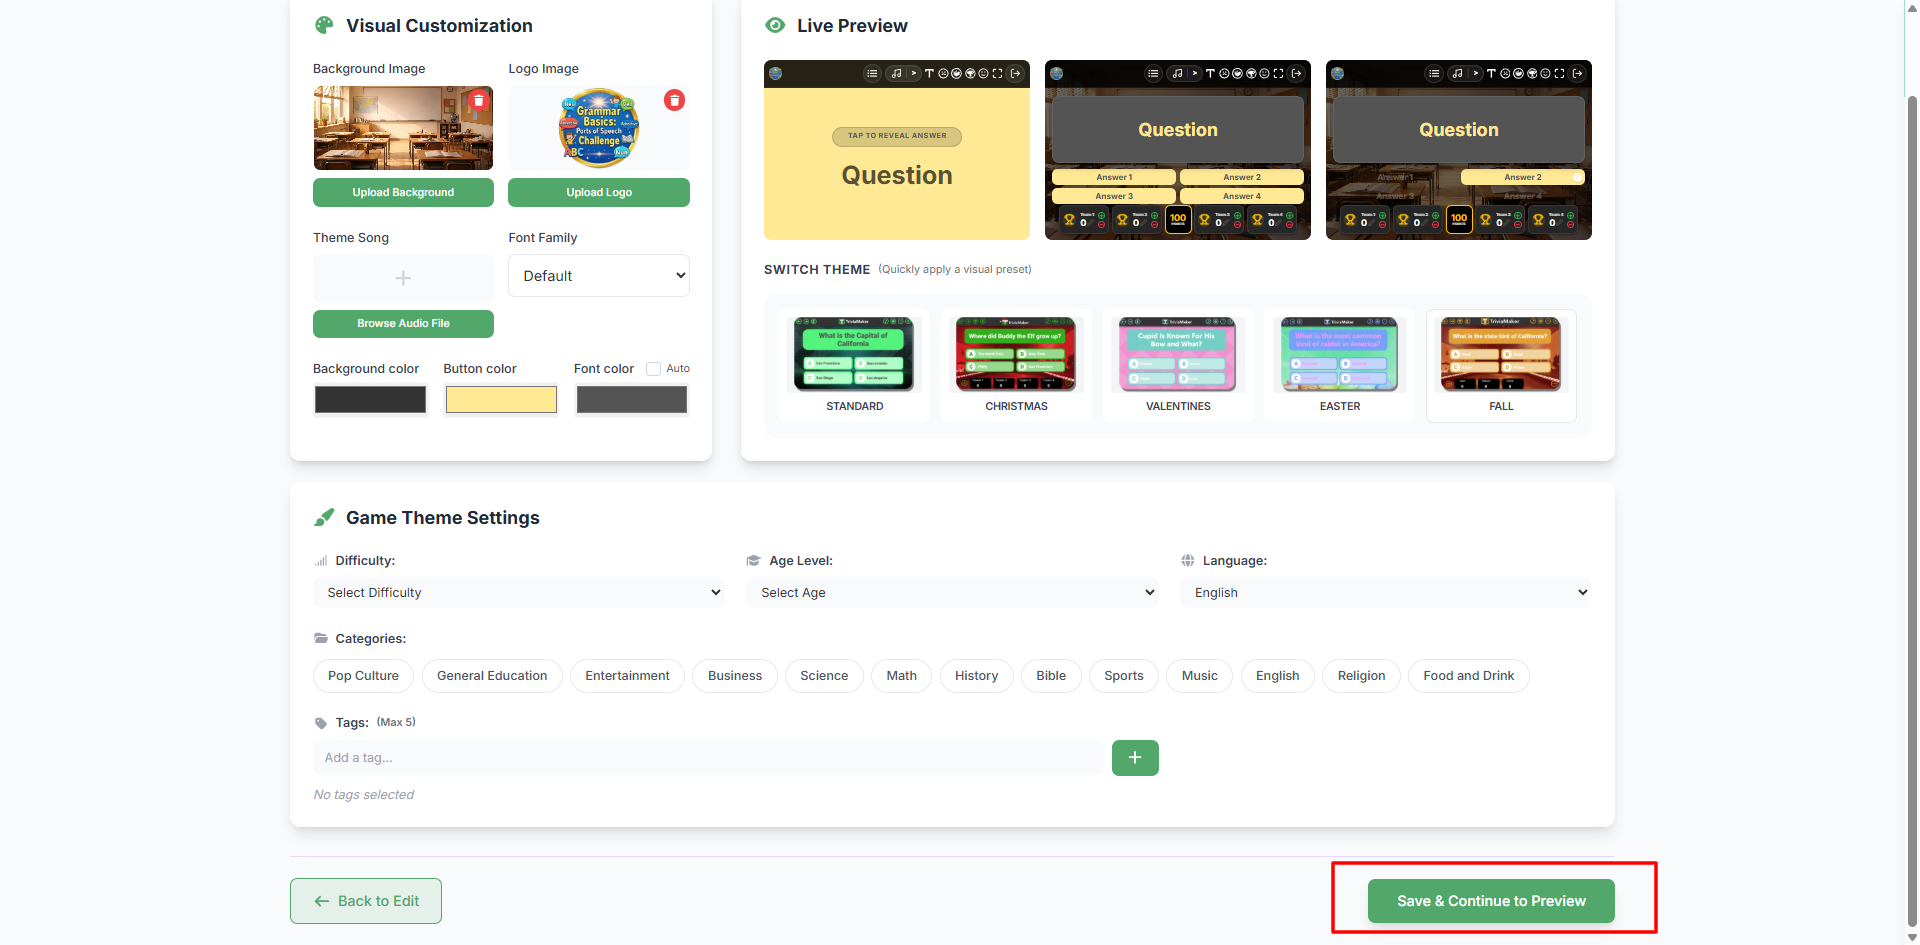
Game Settings & Quick Actions
In the game management panel or dashboard, you can perform several quick actions to manage, share, or customize your trivia game:

| # | Action | Description |
|---|---|---|
| 1 | Add to Playlist | Organize your game into playlists like "Christmas Games" or "Science Games." |
| 2 | Add to Collection | Group different games together for easier management. |
| 3 | Share Game | Copy and share the game link via the share modal. |
| 4 | Print Questions | Open all questions in a new tab — save as PDF or print directly. |
| 5 | Clone Game | Duplicate the game to create modified versions. |
| 6 | Delete Game | Permanently delete the game (cannot be undone). |
| 7 | Embed Game | Get iframe/embed code to display the game on any website. |
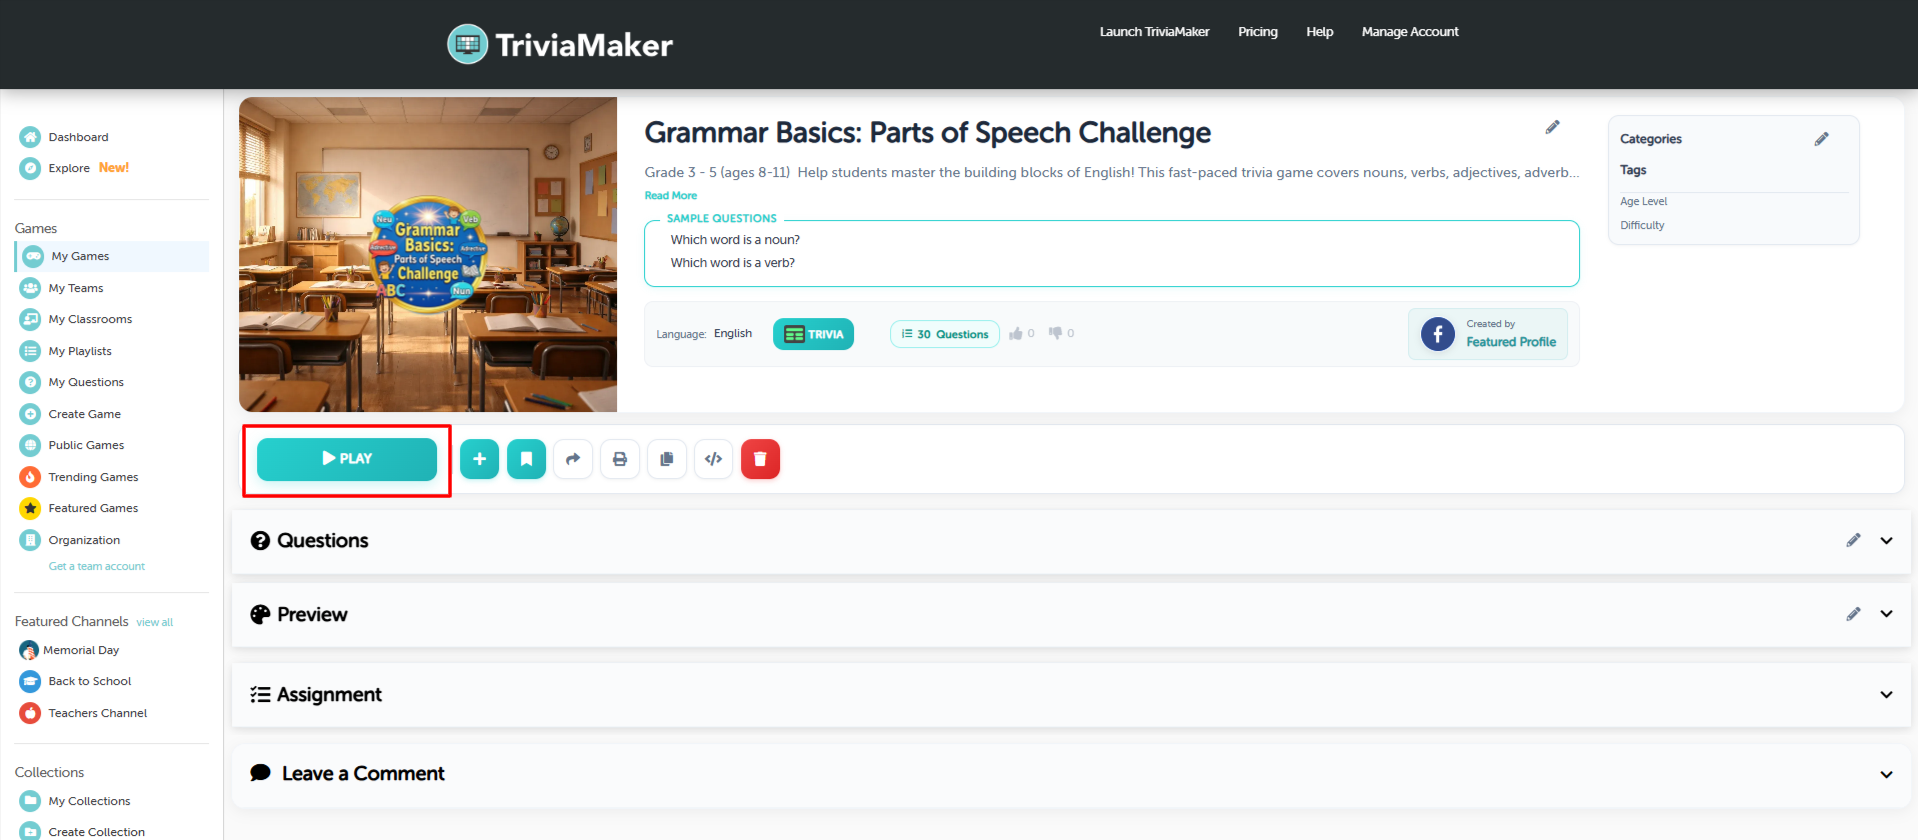
How to Play Your Trivia Game
After clicking the Play button, you will be presented with the Game Mode Selection screen. This allows you to choose the optimal experience based on your specific setup and how you intend to engage with your audience.
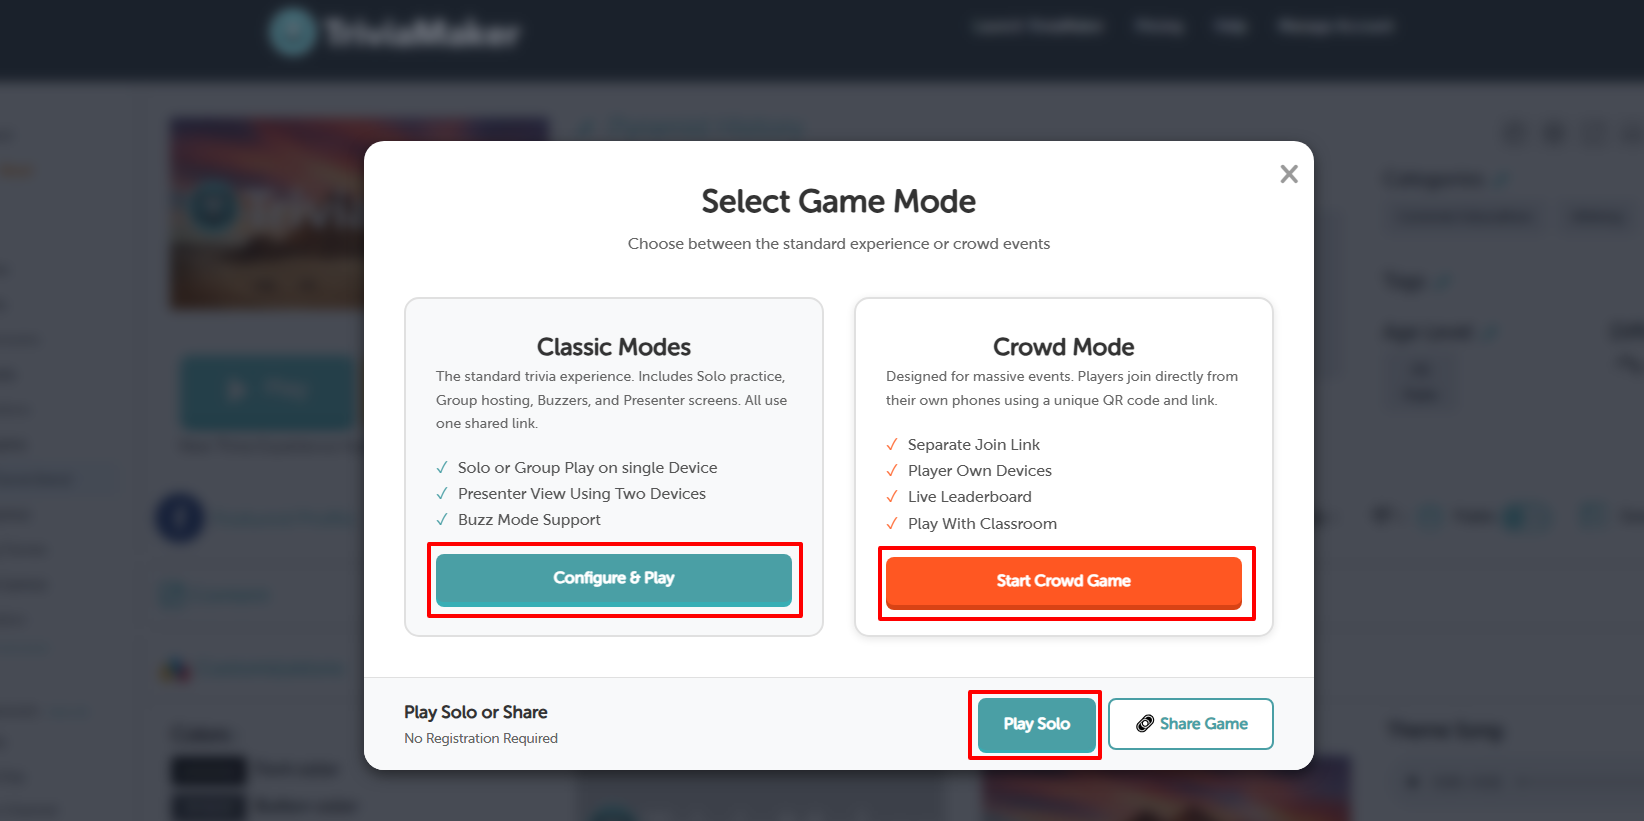
Choose Between Two Game Modes
Basic Modes
The standard TriviaMaker experience for small groups and classrooms.
Best For
Small groups
Classrooms
Team games
Solo practice
Features
Solo or group play on single device
Presenter view using two devices
Buzz mode support
Shared game link
Example
Teacher shows questions on projector and students answer in teams.
Crowd Mode
Designed for large audiences and live events.
Best For
Large groups
Events
Workshops
Live competitions
Features
Separate join link
Players use own devices
Live leaderboard
QR code joining
Example
Conference attendees join from phones and compete live.
Quick Comparison
| Feature | Basic Mode | Crowd Mode |
|---|---|---|
| Best For | Small groups | Large audiences |
| Player Devices | Shared screen | Each player device |
| Join Method | Single link | QR / Link / Code |
| Live Leaderboard | Optional | Yes |
| Buzz Mode | Yes | No |
| Solo Play | Yes | No |
Mode Settings
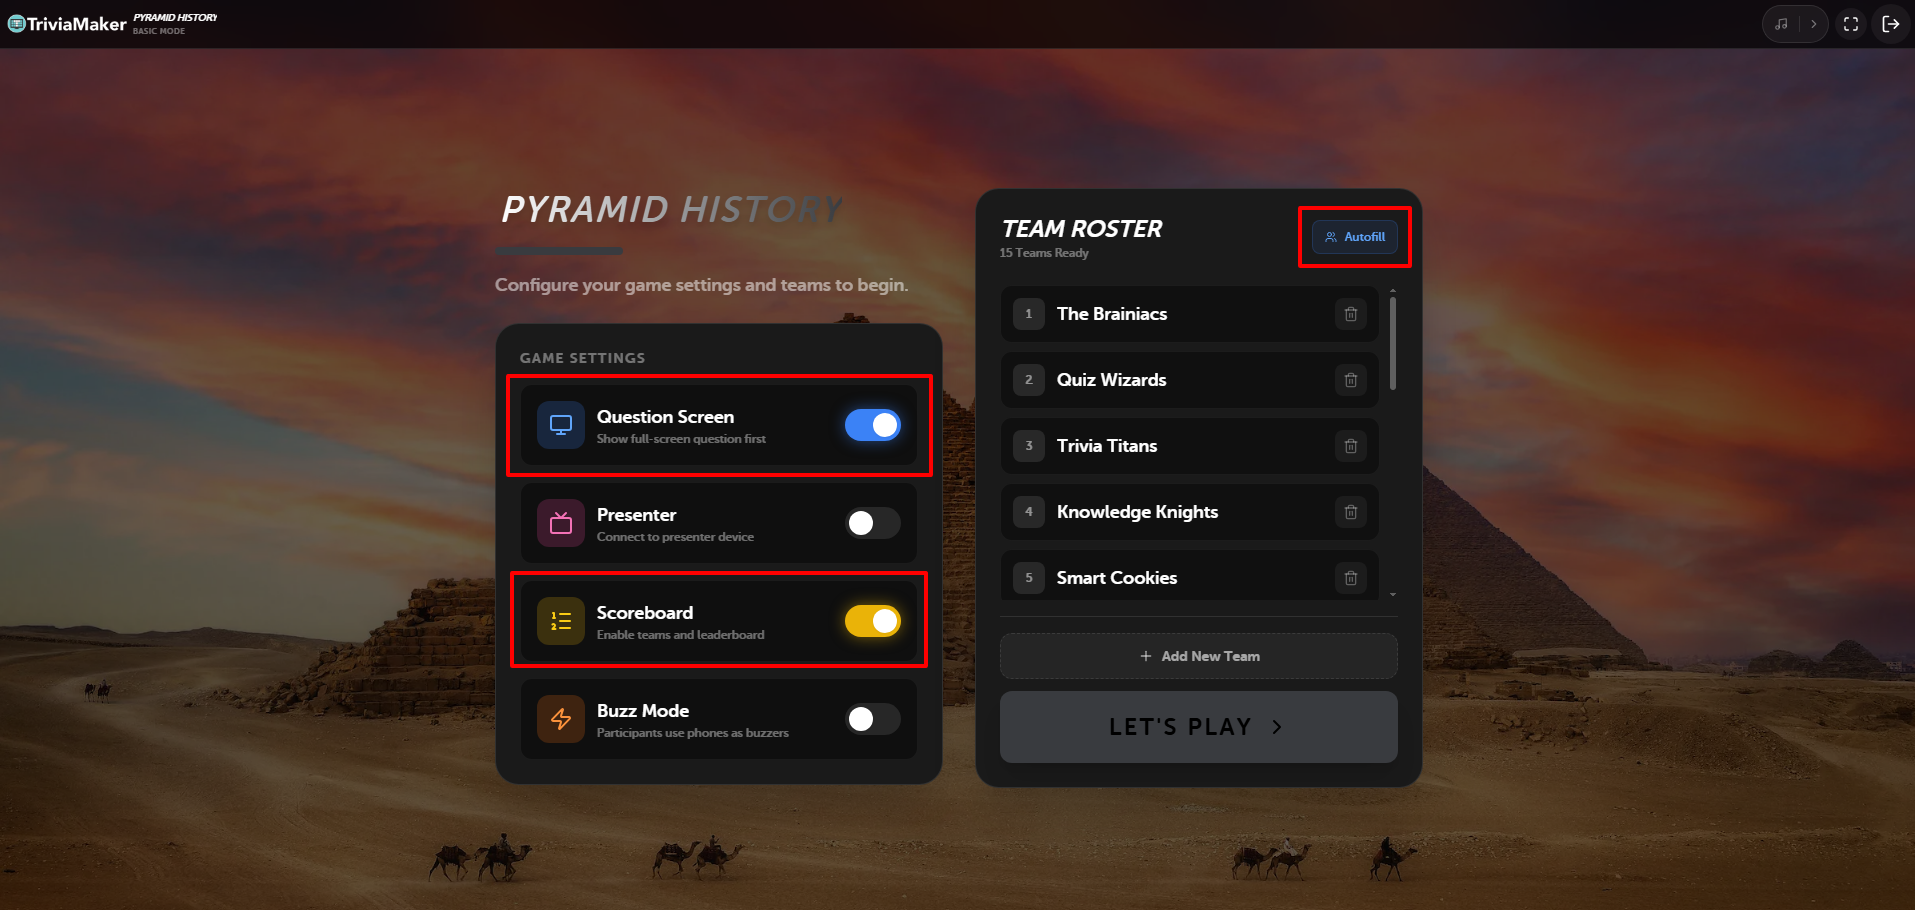 Game Settings panel showing Scoreboard, Presenter, Question Screen and Buzz Mode options
Classic Mode gives you flexible ways to run your game. You can turn settings ON or OFF depending on how you want to play.
Basic Mode → Scoreboard ON
When Scoreboard is turned ON, TriviaMaker runs in Basic Mode.
Play with teams
Track team scores
Best for classrooms and group games
Competitive gameplay
Solo Mode → Scoreboard OFF
When Scoreboard is OFF, TriviaMaker switches to Solo Mode.
Play alone
No teams
No score tracking
Best for practice
Presenter Mode
Presenter Mode lets you control the game from one device while players view on another screen.
Control from laptop or phone
Show game on TV or projector
Best for classrooms and events
Professional hosting experience
Question Screen
Question Screen shows a clean question-only display.
Show questions only
Hide controls and settings
Cleaner classroom display
Better for large screens
Buzz Mode
Buzz Mode allows players to buzz in to answer first.
Players use phones as buzzers
Fastest player answers first
Great for competitive games
Interactive gameplay
Classic Mode Combinations
| Mode | Scoreboard | Presenter | Buzz | Best For |
|---|---|---|---|---|
| Basic Mode | ON | Optional | Supported | Team Games |
| Solo Mode | OFF | No | Not Supported | Practice |
| Presenter Mode | ON | Yes | Supported | Classroom / Events |
Basic Mode – Team Setup
 Team roster panel showing team list and autofill option
When Scoreboard is turned ON, TriviaMaker enables Basic Mode. In this mode, you can create teams and track scores during gameplay.
Question Screen
Enable Question Screen if you want to show a clean, question-focused display to your audience first.
Show questions only
Tip
Turn this ON to focus on the question.
Presenter
There is no need to enable this for Basic Mode. This setting is used exclusively for Presenter Mode.
Keep disabled for Basic Mode
Used for Presenter Mode only
Note
Leave this switch OFF if you are just playing a standard Basic Mode game.
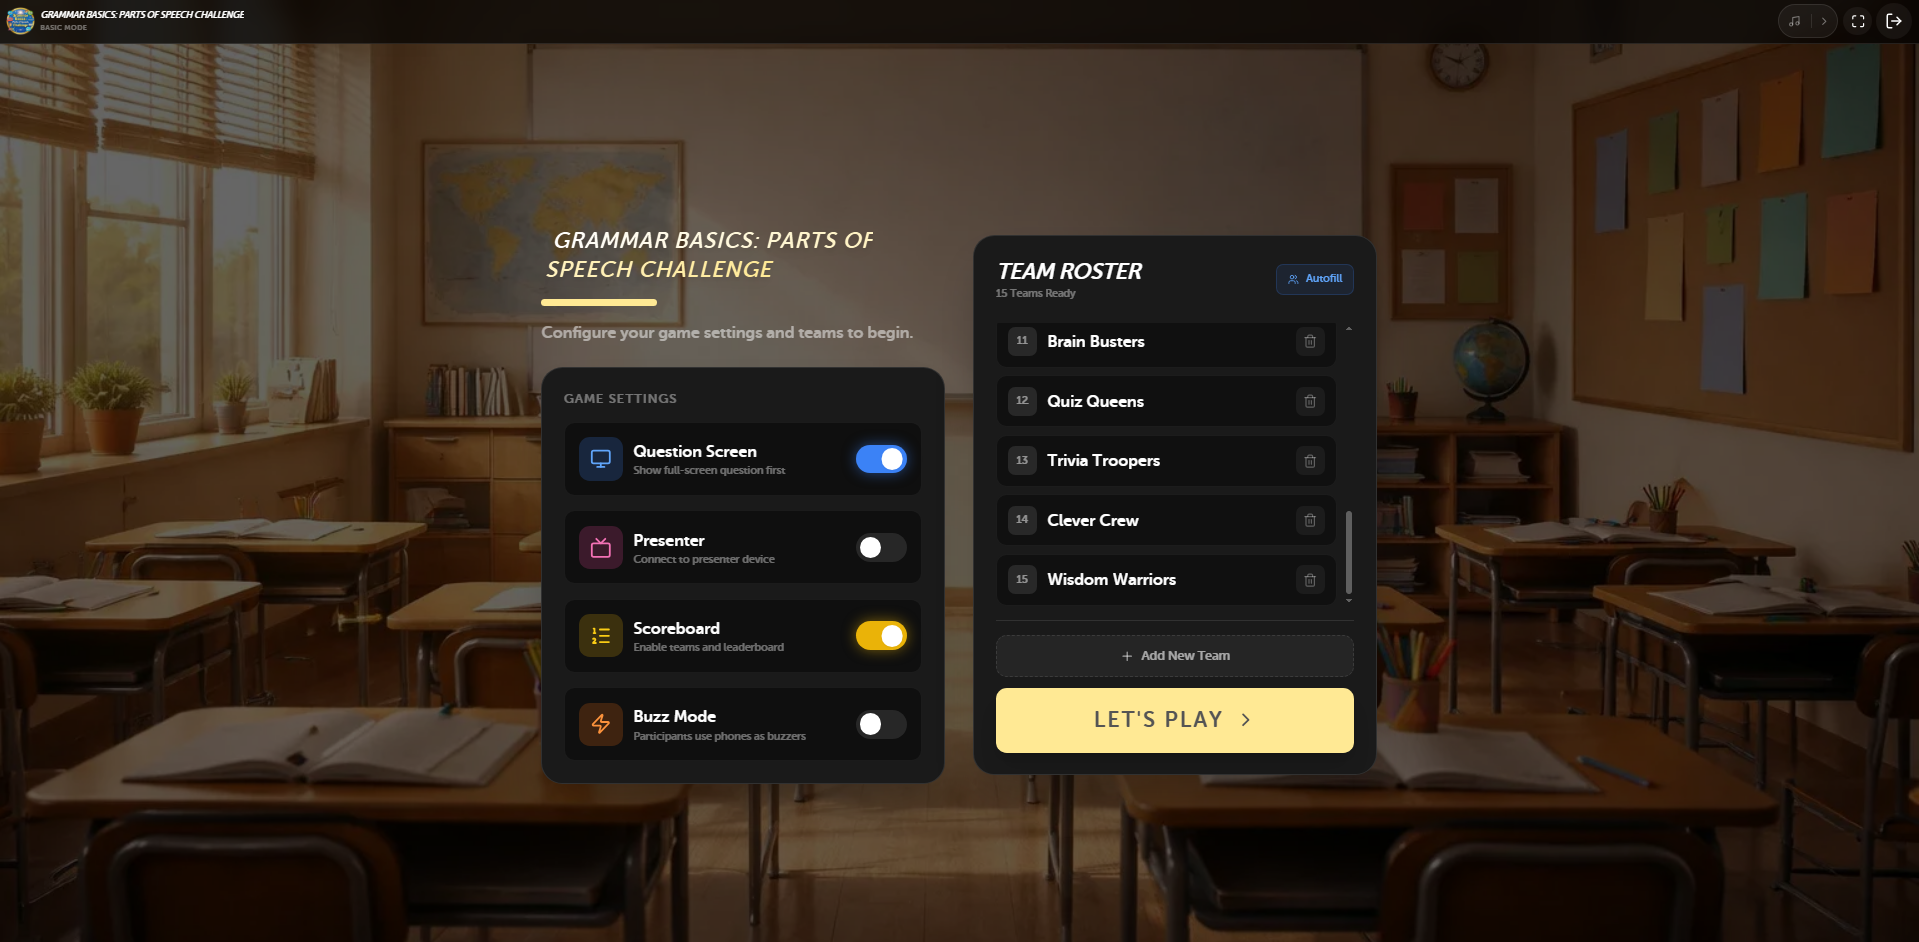
Set Team Names
You can manually create and edit team names before starting the game, or use Autofill to automatically load teams from previously used games.
Add, edit, or remove teams
Organize teams before starting
Quickly reuse saved teams with Autofill
Faster game setup for recurring classes
Tip
Teacher can use the same teams every week by loading them instantly with Autofill.
Buzz Mode
There is no need to enable this for Basic Mode. This setting is used exclusively for Buzz Mode.
Keep disabled for Basic Mode
Used for Buzz Mode only
Note
Leave this switch OFF if you are just playing a standard Basic Mode game.
Start Game
Once teams are ready, click Let's Play to begin the game.
Teams locked after start
Game begins immediately
Scores tracked automatically
Question Screen
When the Question Screen is on, this screen is used to display the question.
 Primary gameplay screen showing question display and navigation controls
Topbar Navigation & Icons
Leaderboard
Click this icon to open the game leaderboard and view the current team standings during the game.
Play Music
Click this icon to play or pause the theme song/background music during gameplay.
Font Size
Click this icon to adjust the font size.
Clap
Click this icon to play a clapping sound effect, perfect for celebrating correct answers or team achievements.
Sad Face
Click this icon to play a sad sound effect, typically used when a team answers incorrectly.
Winner
Click this icon to skip directly to the winner screen and see the final results and leaderboard.
Fullscreen
Click this icon to toggle fullscreen mode for a more immersive gameplay experience.
Exit
Click this icon to exit the game and return to the main dashboard or game selection screen.
Play Screen
 Play screen showing the active question with multiple choice options
Topbar Navigation & Icons
Leaderboard
Click this icon to open the game leaderboard and view the current team standings during the game.
Play Music
Click this icon to play or pause the theme song/background music during gameplay.
Font Size
Click this icon to adjust the font size.
Clap
Click this icon to play a clapping sound effect, perfect for celebrating correct answers or team achievements.
Sad Face
Click this icon to play a sad sound effect, typically used when a team answers incorrectly.
Winner
Click this icon to skip directly to the winner screen and see the final results and leaderboard.
Fullscreen
Click this icon to toggle fullscreen mode for a more immersive gameplay experience.
Exit
Click this icon to exit the game and return to the main dashboard or game selection screen.
Explanation
Click this icon to show the correct answer explanation that you added during game creation.
Image Expansion
Click this icon (located on the question image) to expand the image to full screen for better visibility.
Edit Score
Click this icon (next to a team name) to manually adjust a team's score during the game.
Winner Screen
 Final winner screen showing the top team and final scoreboard standings
Topbar Navigation & Icons
Play Music
Click this icon to play the winner's theme or celebratory background music.
Fullscreen
Click this icon to toggle fullscreen mode for a more immersive victory celebration.
Exit
Click this icon to exit the game and return to your dashboard.
2. Controller Presenter
To use the Controller Presenter mode, simply click on the Presenter button to turn it ON in your game settings. This allows you to host the game professionally from one device while projecting the gameplay to your audience.
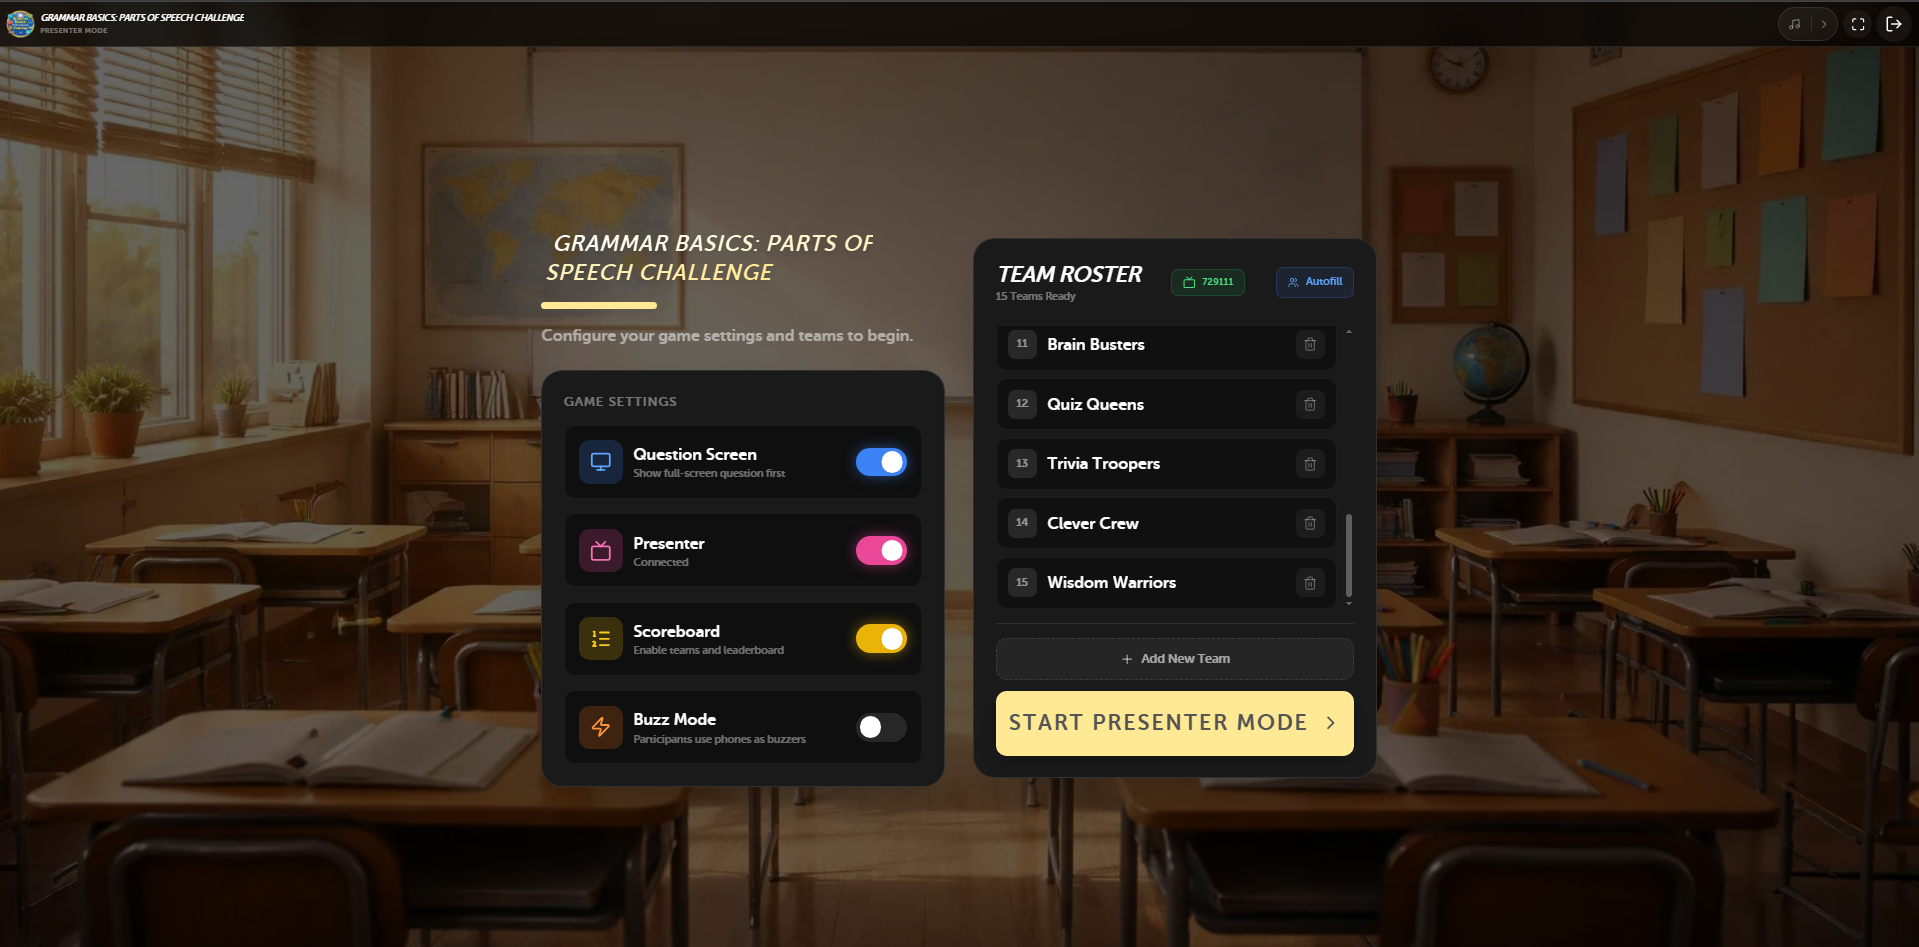 Controller and Presenter Mode view
Connecting the Presenter Display
When you turn the Presenter setting ON, a Presenter Control popup will immediately appear on your controller device asking for a 6-digit code.
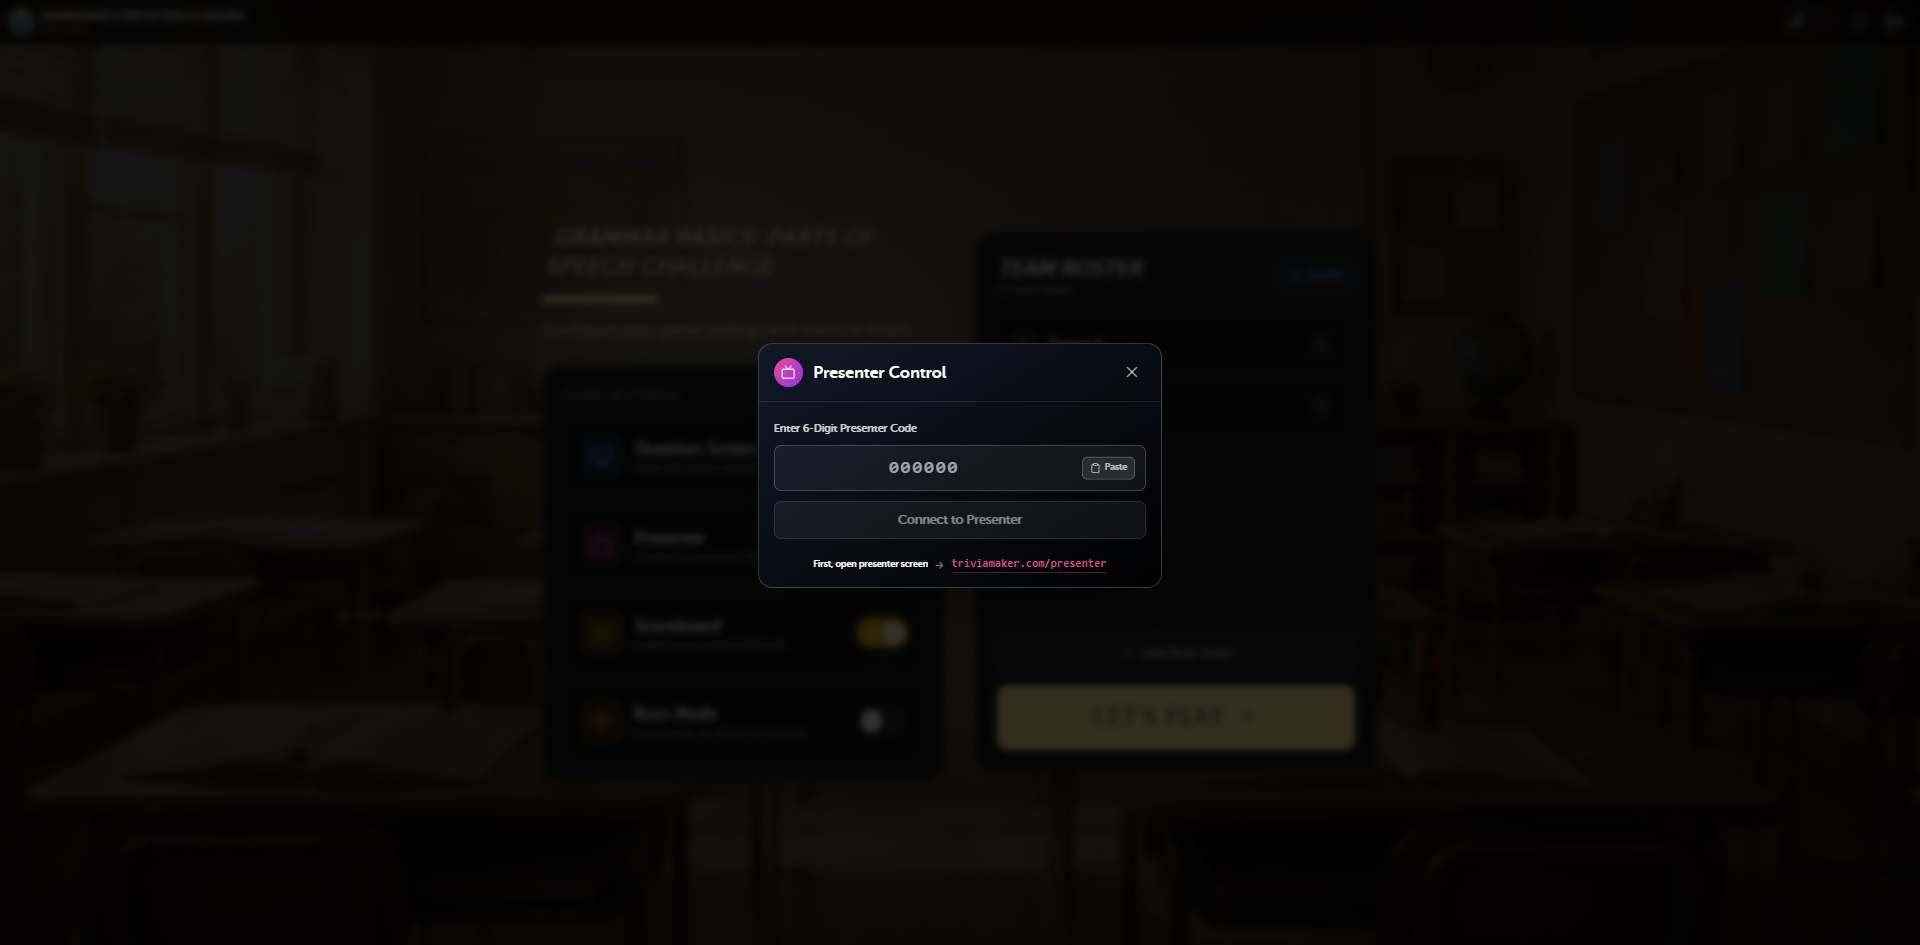 The Presenter Control popup waiting for your 6-digit code
To get this code, open your second device (like a classroom projector or TV) and navigate to triviamaker.com/presenter/. Click on Show Code.
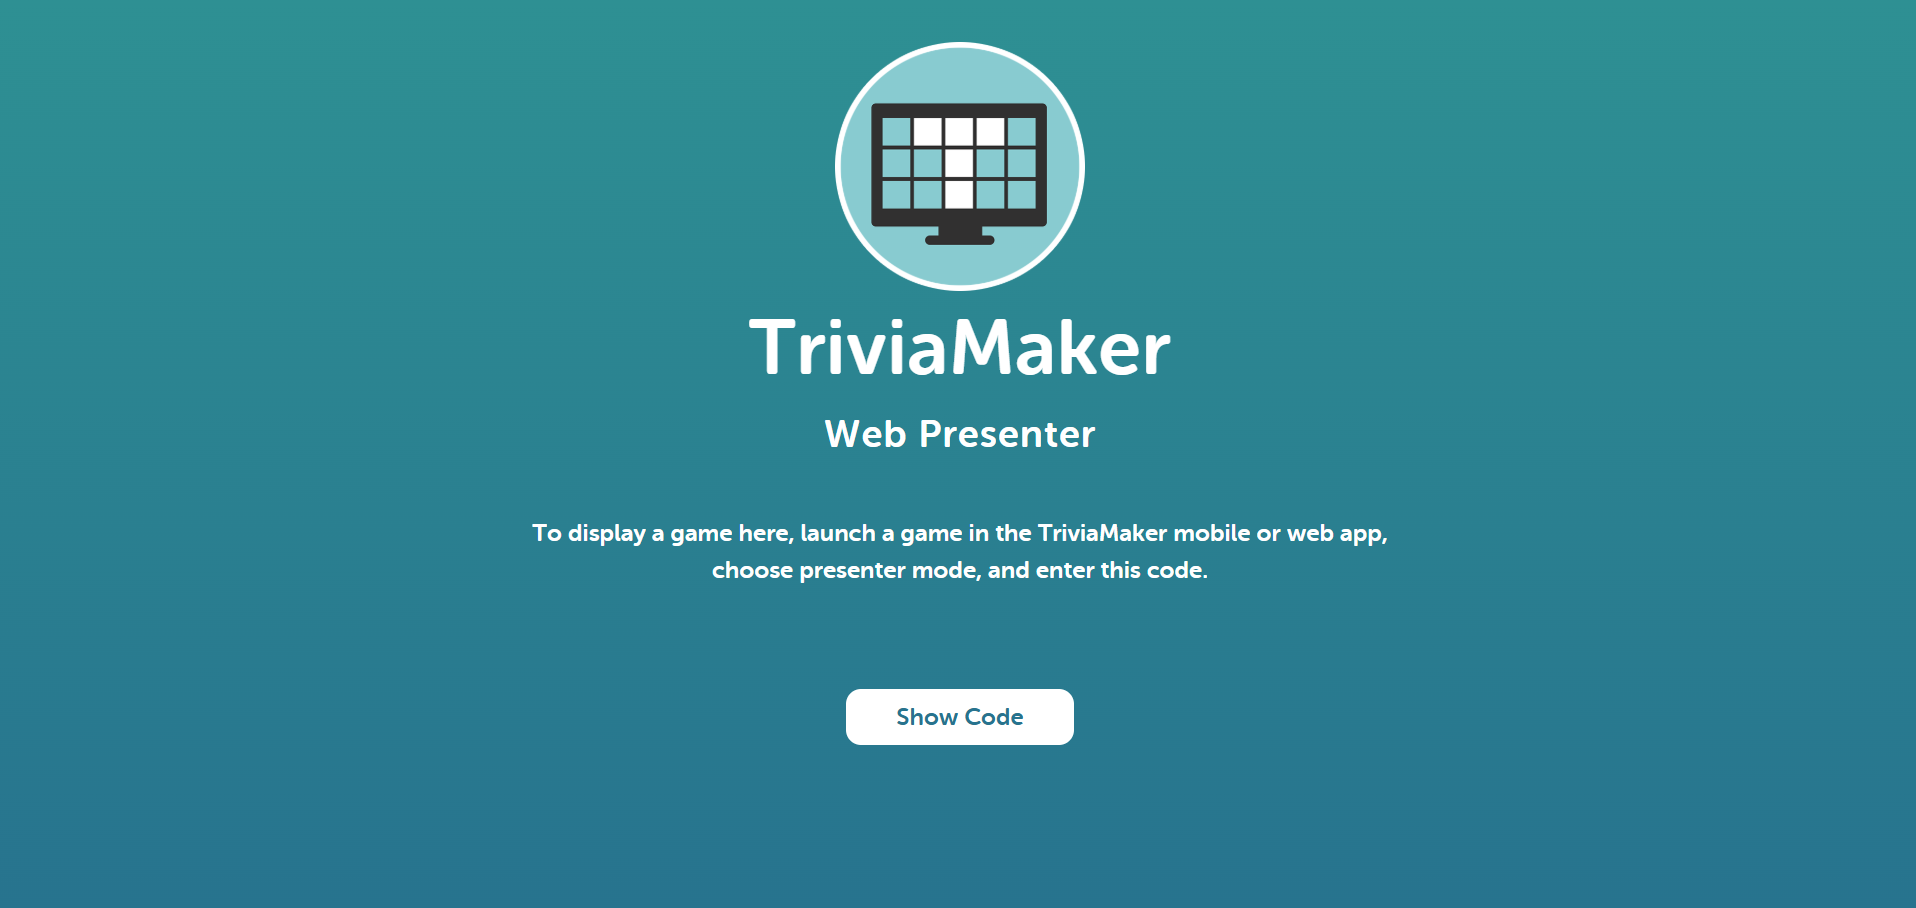 Click on "Show Code" to generate your connection pin
Once you click the button, a unique 6-digit code will be displayed on the presenter screen.
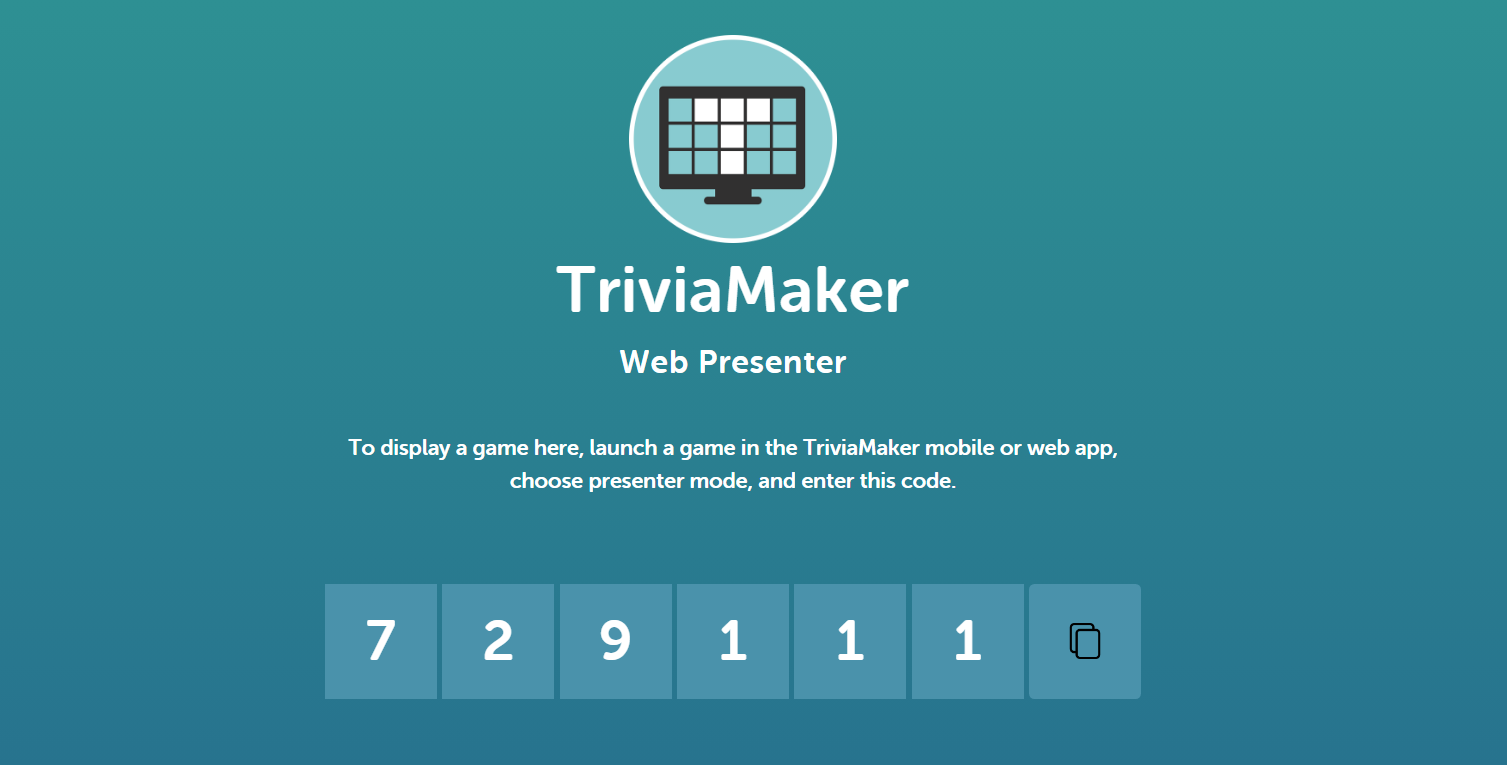 Your 6-digit connection code is revealed
Finally, enter that 6-digit code back into the popup on your controller device.
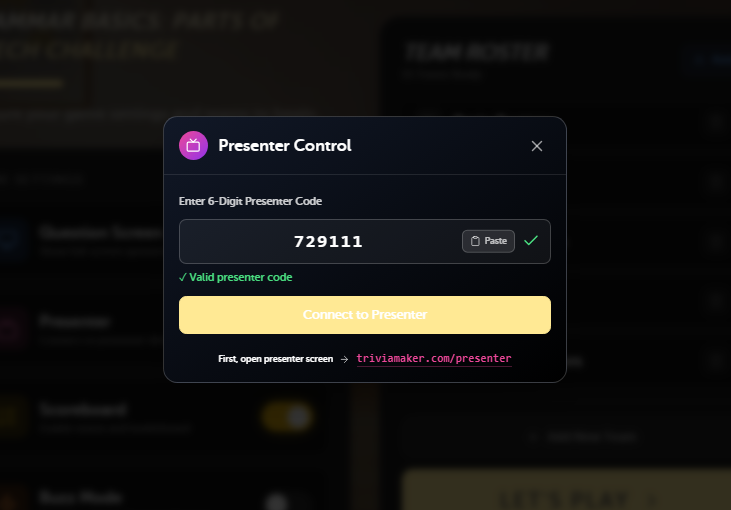 Enter the code on your controller device
After entering the code, click on the Connect to Presenter button to establish the connection.
Click Start Presenter Mode to begin your gameThen, click on the Start Presenter Mode button. Your audience will now see the presentation while you control the game!
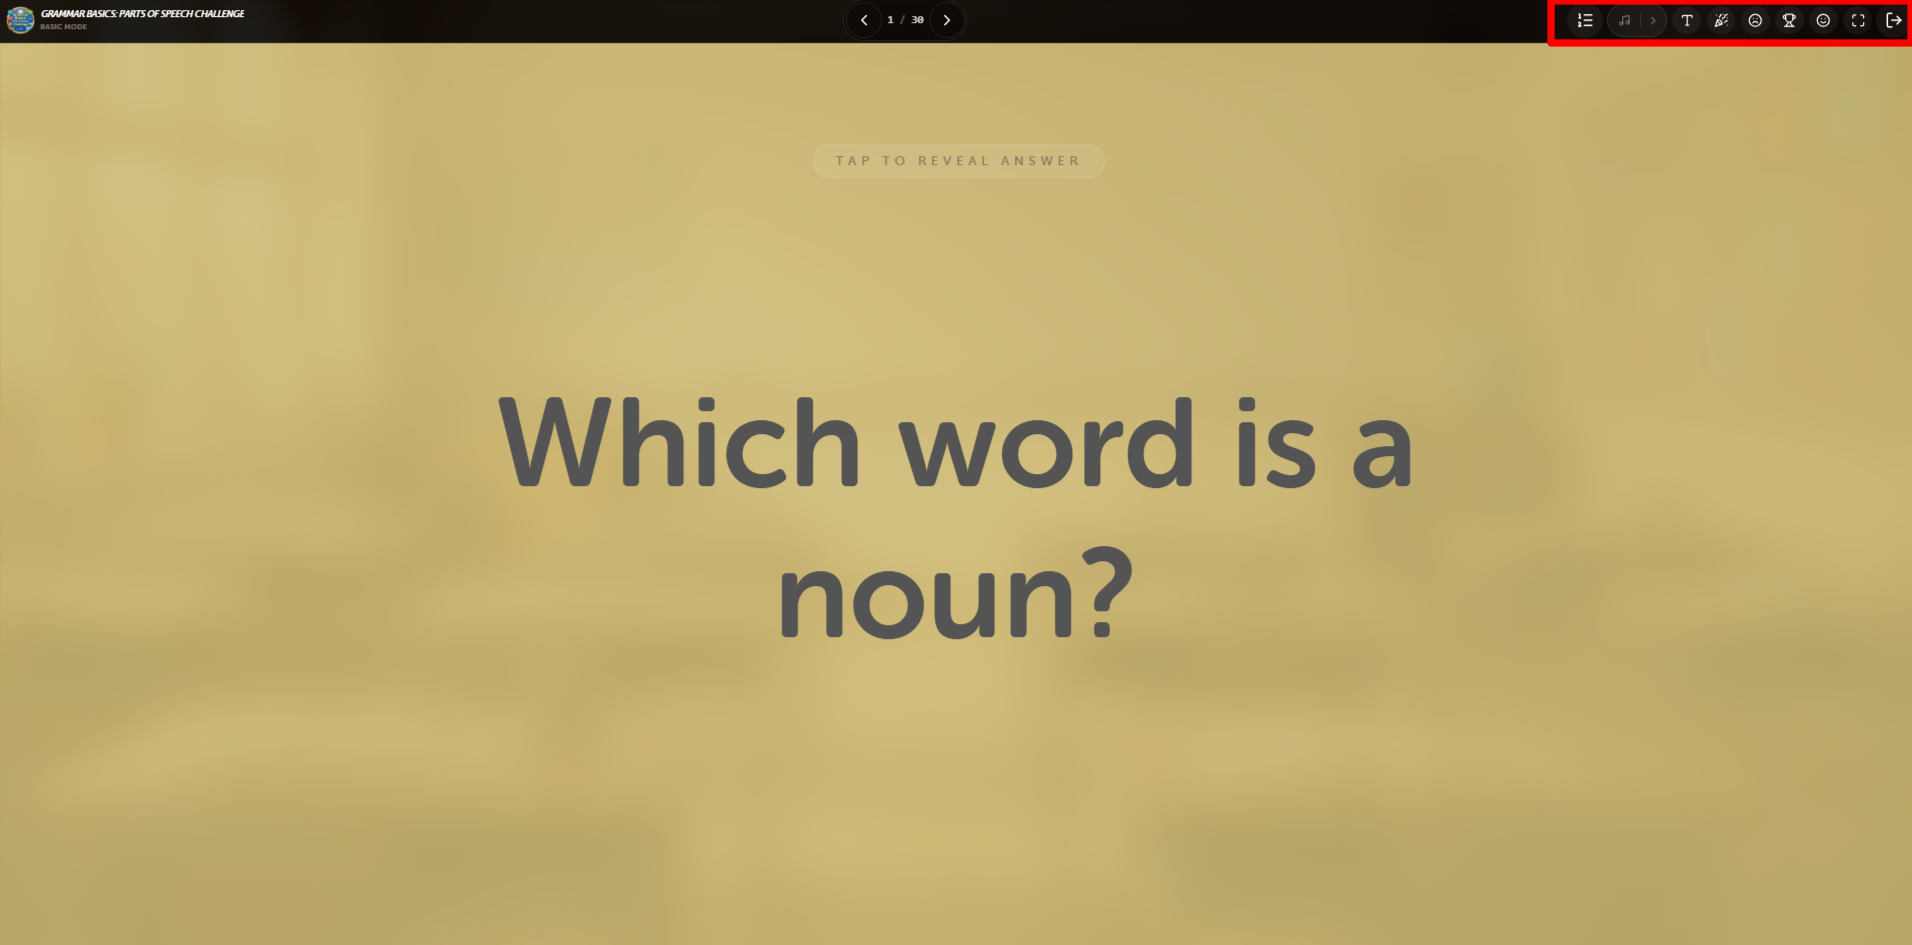
Question Screen
Once the game begins, your two screens will display different interfaces optimized for their roles. Your Controller Screen will show the question along with host controls—such as the Tap to Reveal Answer button—while the Presenter Screen will display a clean, distraction-free view of just the question for your audience.
Controller Screen (What you see)
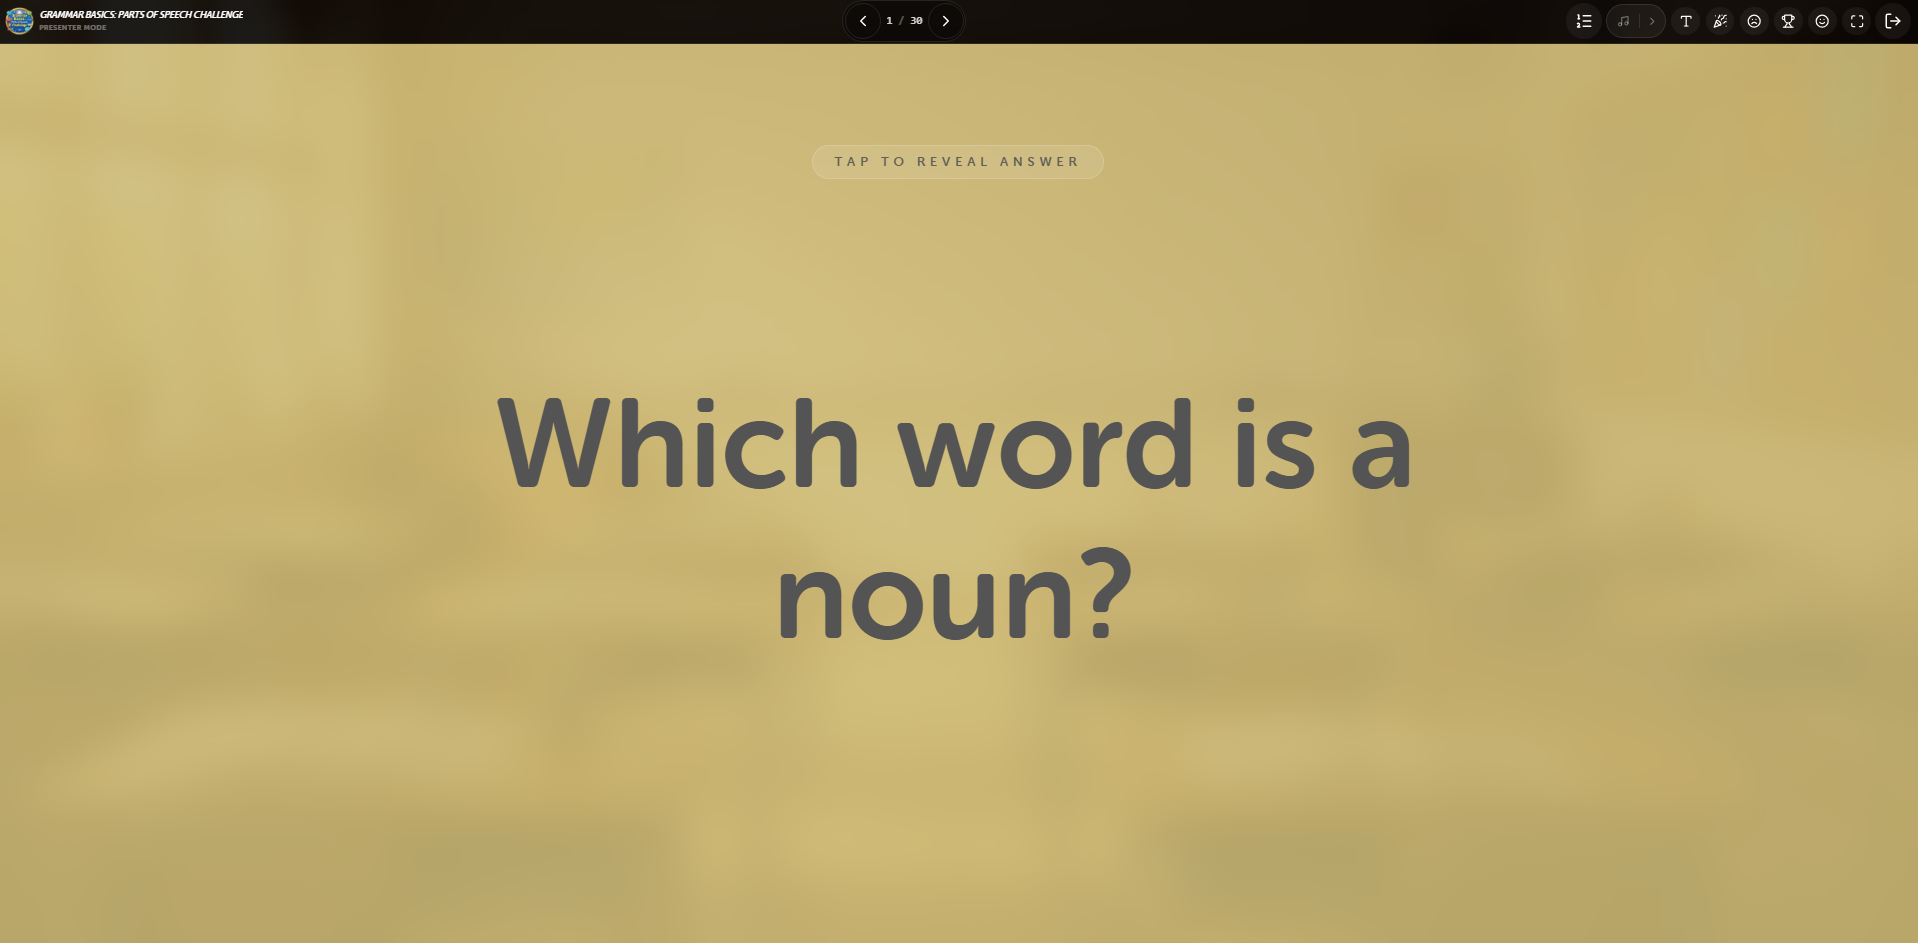 The Controller view with the "Tap to Reveal Answer" button
Controller Topbar Icons
Leaderboard
Click this icon to open the game leaderboard and view the current team standings during the game.
Play Music
Click this icon to play or pause the theme song/background music during gameplay.
Font Size
Click this icon to adjust the font size.
Clap
Click this icon to play a clapping sound effect, perfect for celebrating correct answers or team achievements.
Sad Face
Click this icon to play a sad sound effect, typically used when a team answers incorrectly.
Winner
Click this icon to skip directly to the winner screen and see the final results and leaderboard.
Fullscreen
Click this icon to toggle fullscreen mode for a immersive gameplay experience.
Exit
Click this icon to exit the game and return to the main dashboard or game selection screen.
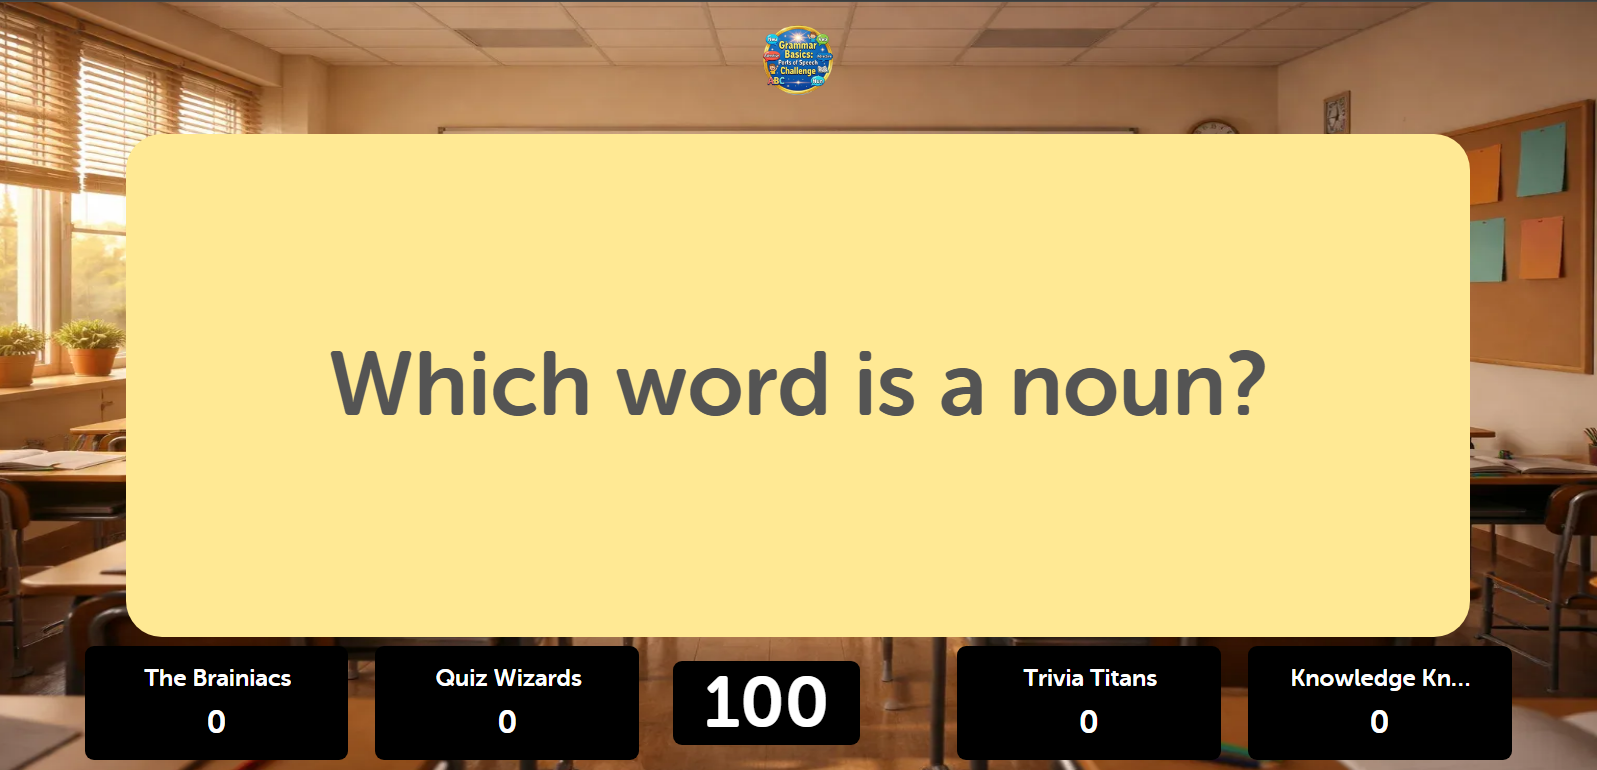
Presenter Screen (What the audience sees)
 The clean Presenter view projected to the audience
Basic Mode – Team Setup
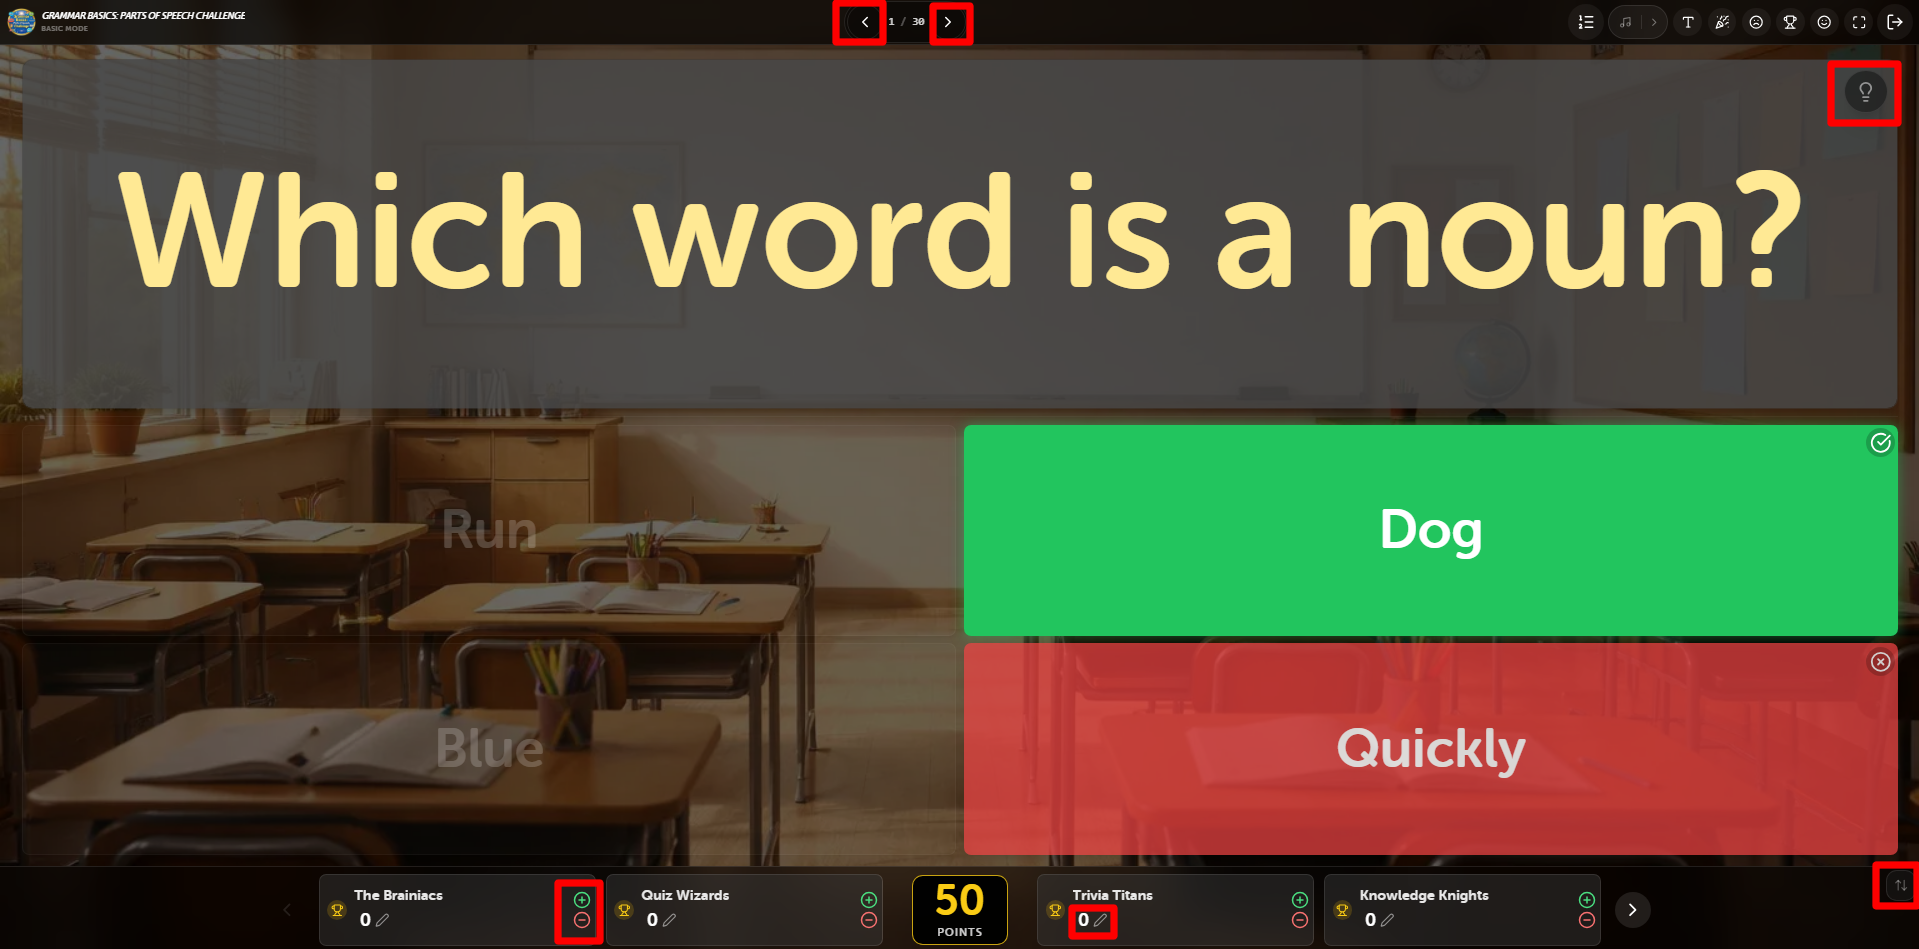
After the question is revealed, the game transitions to the Play Screen. Just like before, your Controller Screen provides you with the options to score teams and manage the game, while the Presenter Screen displays a clean view of the question and the available answer options.
Controller Screen (What you see)
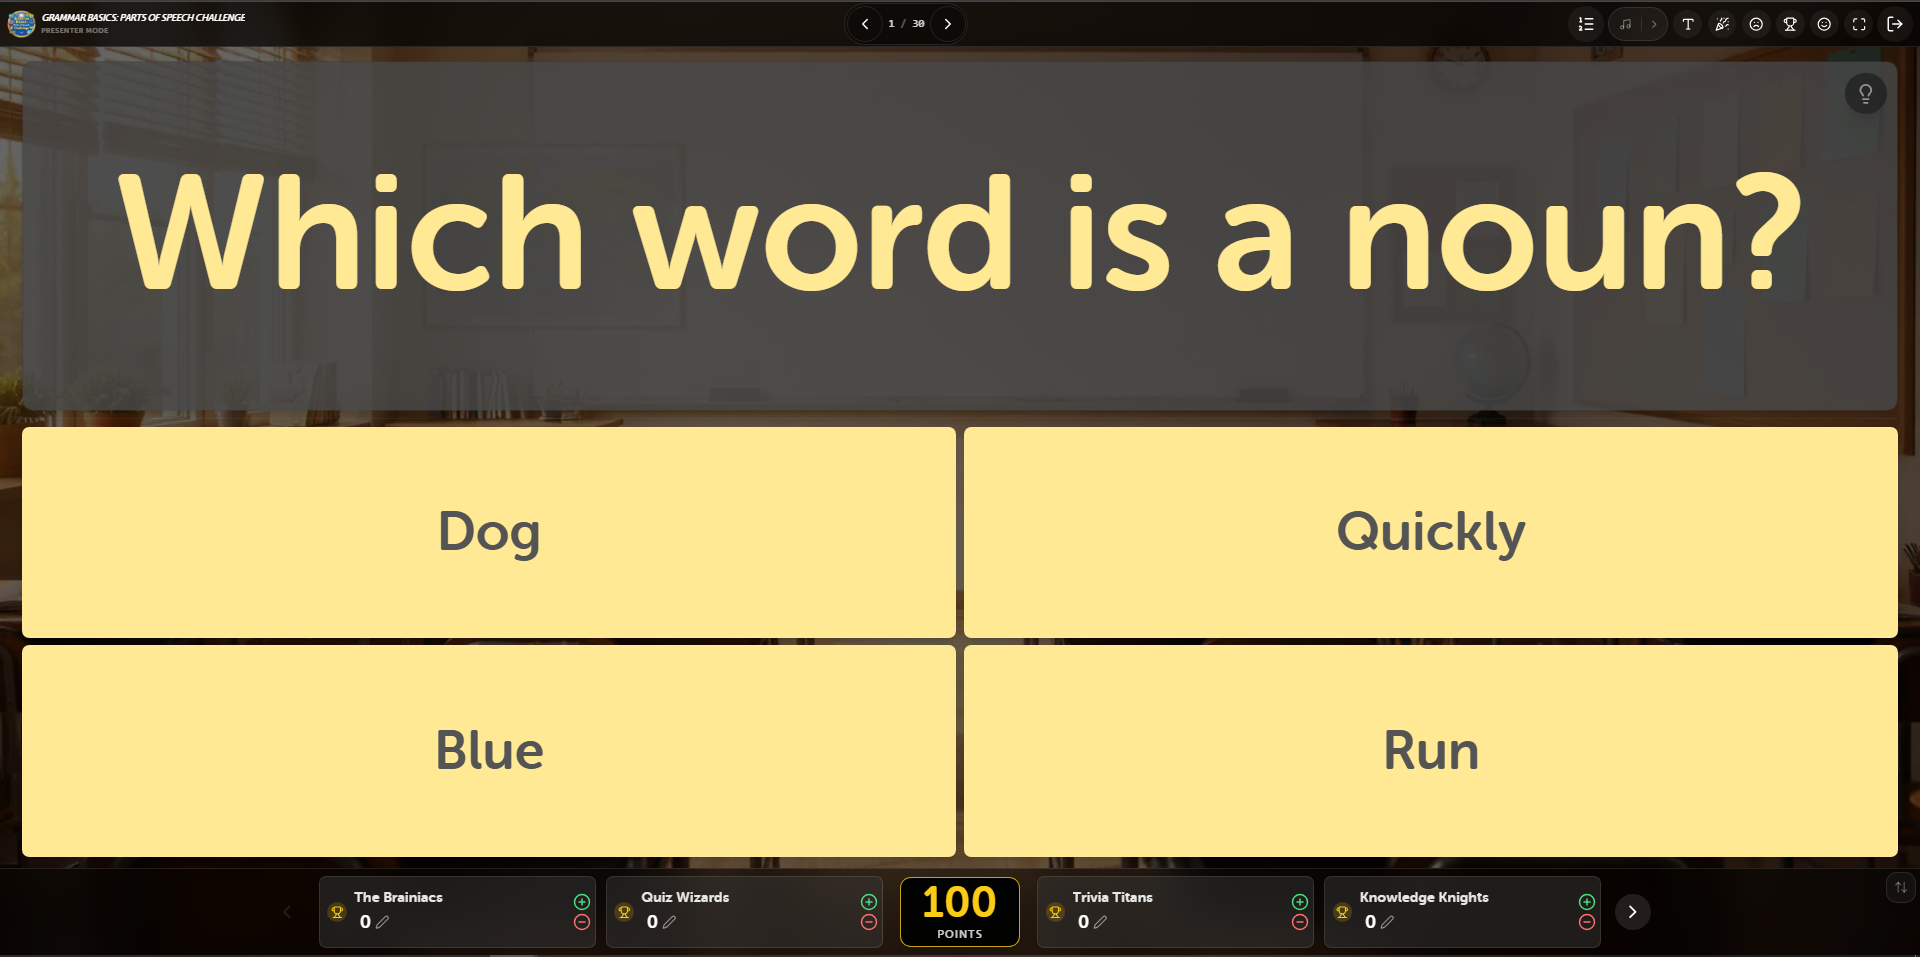 The Controller view with scoring and game management controls
Controller Topbar Icons
Leaderboard
Click this icon to open the game leaderboard and view the current team standings during the game.
Play Music
Click this icon to play or pause the theme song/background music during gameplay.
Font Size
Click this icon to adjust the font size.
Clap
Click this icon to play a clapping sound effect, perfect for celebrating correct answers or team achievements.
Sad Face
Click this icon to play a sad sound effect, typically used when a team answers incorrectly.
Winner
Click this icon to skip directly to the winner screen and see the final results and leaderboard.
Fullscreen
Click this icon to toggle fullscreen mode for a immersive gameplay experience.
Exit
Click this icon to exit the game and return to the main dashboard or game selection screen.
Presenter Screen (What the audience sees)
 The clean Presenter view showing the question and answer choices
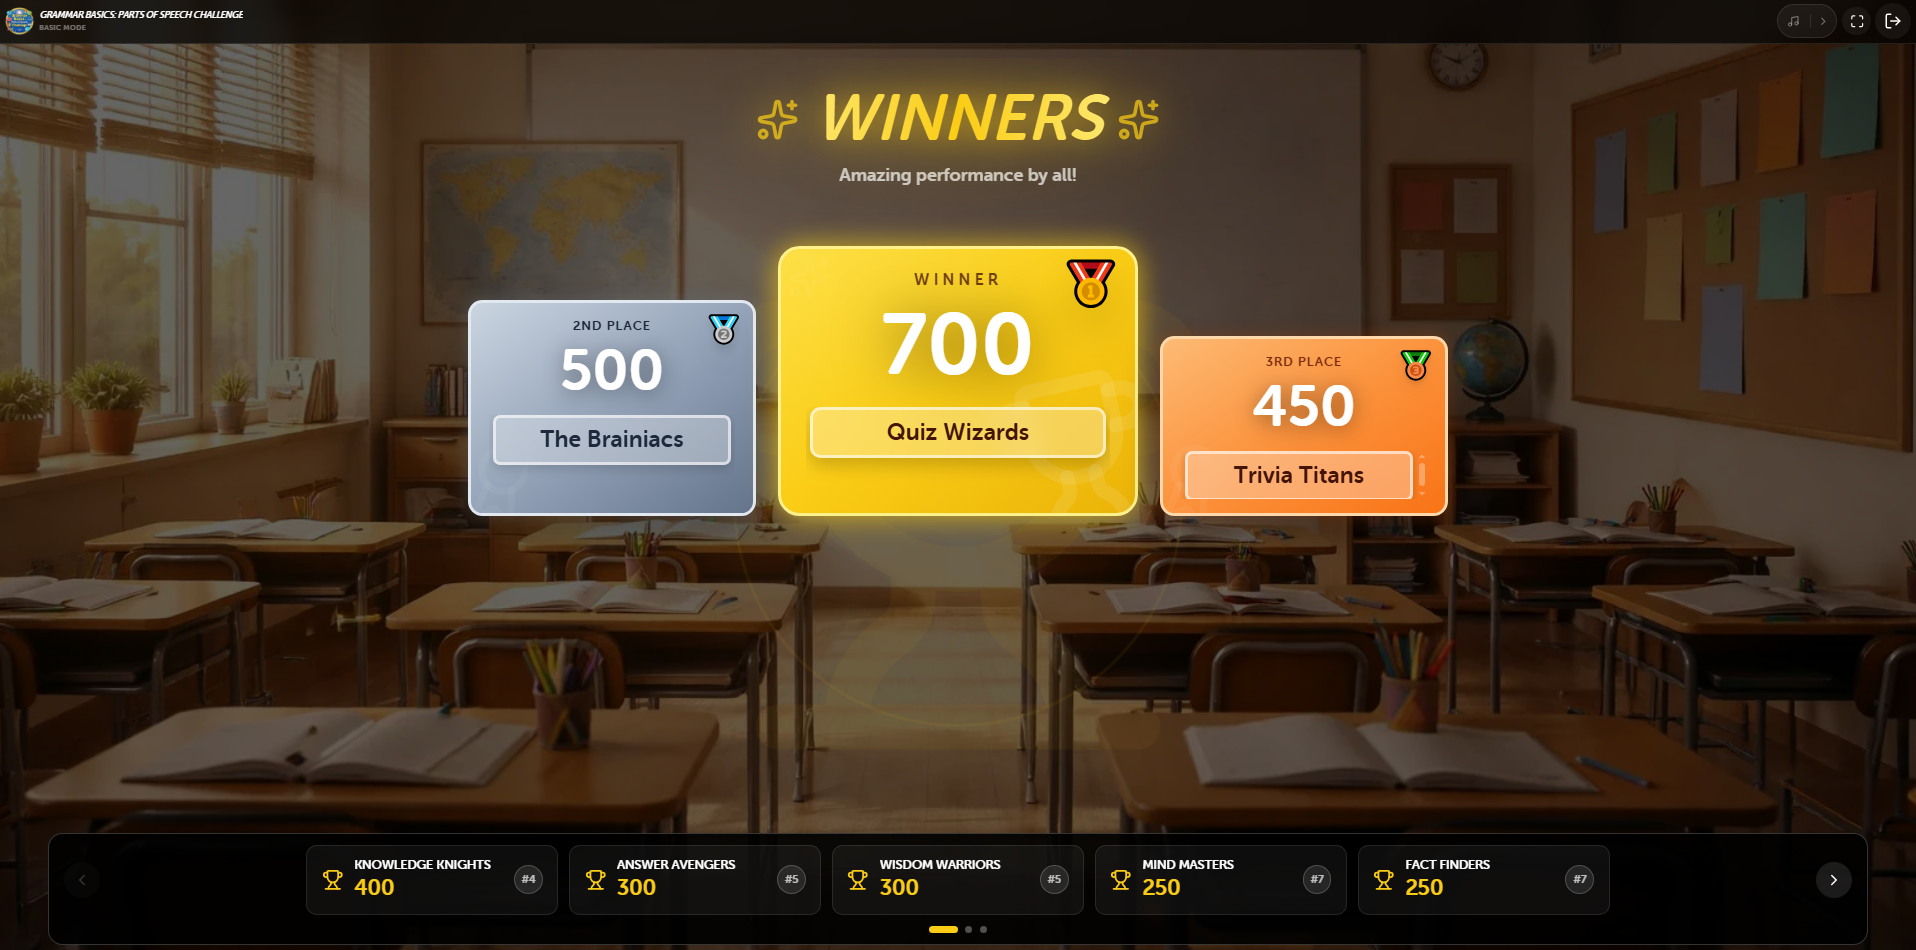
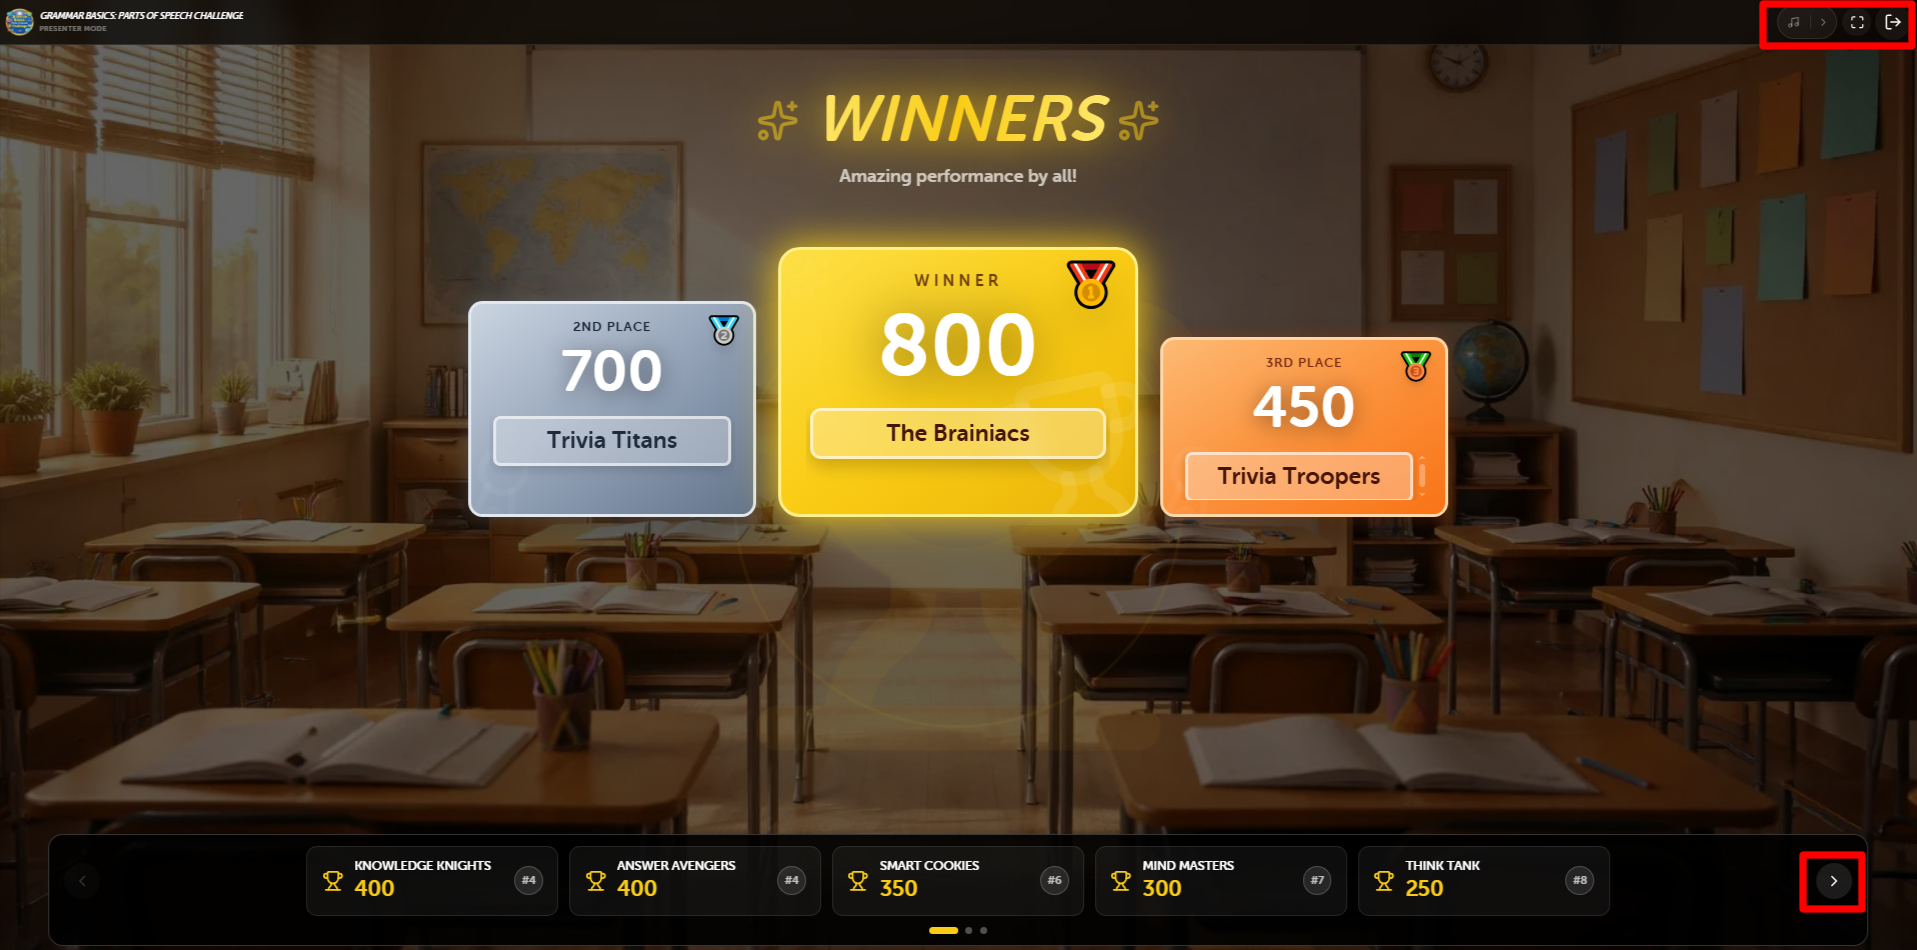
Winner Screen
When the game concludes, the Winner Screen is displayed. The Controller Screen provides the final standings and options to end or restart the game, while the Presenter Screen showcases a celebratory animation of the winning team for the audience.
Controller Screen (What you see)
 The Controller view with the final scoreboard and game over controls
Presenter Screen (What the audience sees)
 The celebratory Presenter view displayed to the audience
3. Buzz Mode
Basic Buzz Mode transforms your trivia game into a high-energy competition. In this mode, players use their own smartphones or devices as wireless buzzers. The first person to "buzz in" locks out others and earns the opportunity to answer the question, creating a true game-show experience.
How it Works
Players can easily join the game by scanning the QR Code displayed on the presenter screen or by clicking the Joining Link provided by the host. This opens the participant portal on their device.
 The joining screen where players can scan to connect
Topbar Navigation & Icons
How to Join
Click this button to display the joining instructions, including the QR code and joining link for your participants.
Copy Code
Click this icon to copy the unique 6-digit game code to your clipboard for sharing with participants.
Play Music
Click this icon to play or pause the theme song/background music during gameplay.
Font Size
Click this icon to adjust the font size.
Fullscreen
Click this icon to toggle fullscreen mode for a immersive gameplay experience.
Exit
Click this icon to exit the game and return to the main dashboard or game selection screen.
Once they've accessed the portal, players simply need to Enter their Name and click the Join button. They will then be ready to buzz in as soon as the question appears.
 Step 2: Successfully connected and ready
Connecting Participants & Starting the Game
As participants join, their names will appear in real-time in the Connected Participants list on the host's screen. You can monitor the total count of joined players at the bottom. Once everyone is ready, simply click the Start Game button to begin the trivia session.
The Question Screen
Once the game starts, the Host Screen provides full control over the question flow and buzzer management. The Participant Screen updates to show a waiting message until the buzzer is opened by the host.
 Host Side: Full control interface
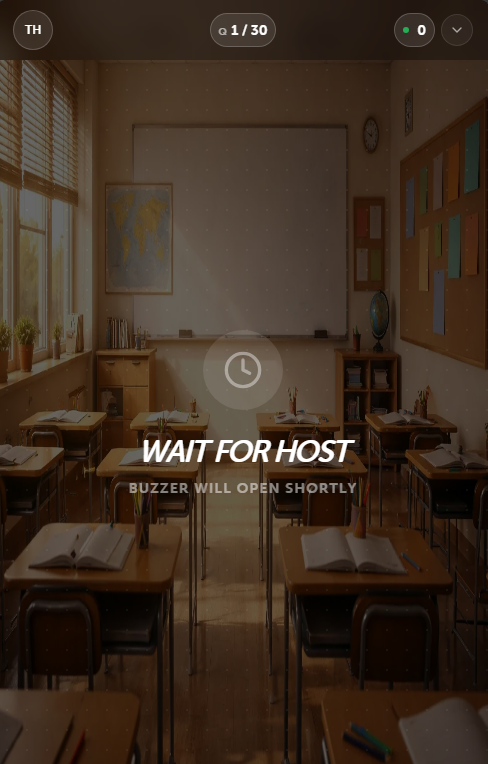 Participant Side: Waiting for buzzer
Question Screen - Buzz Mode
Leaderboard
Click this icon to open the game leaderboard and view the current team standings during the game.
Play Music
Click this icon to play or pause the theme song/background music during gameplay.
Font Size
Click this icon to adjust the font size.
Clap
Click this icon to play a clapping sound effect, perfect for celebrating correct answers or team achievements.
Sad Face
Click this icon to play a sad sound effect, typically used when a team answers incorrectly.
Happy Face
Click this icon to play a happy sound effect to cheer on participants.
Winner
Click this icon to skip directly to the winner screen and see the final results and leaderboard.
Fullscreen
Click this icon to toggle fullscreen mode for a immersive gameplay experience.
Exit
Click this icon to exit the game and return to the main dashboard or game selection screen.
Opening the Buzzer
Once the host is ready for players to respond, they can click the Open Buzzer button on the question screen. This action prepares the game for the competition.
 Host Side: The "Open Buzzer" button is ready to be clicked
 Participant Side: Waiting for the host to open the buzzer
1. Host Setup
Once the buzzer is activated, the Buzz button appears on all participants' devices. The first player to tap the button "buzzes in" and is highlighted on the host screen, earning the chance to answer the question.
 Host Side: The buzzer is active and waiting for participants
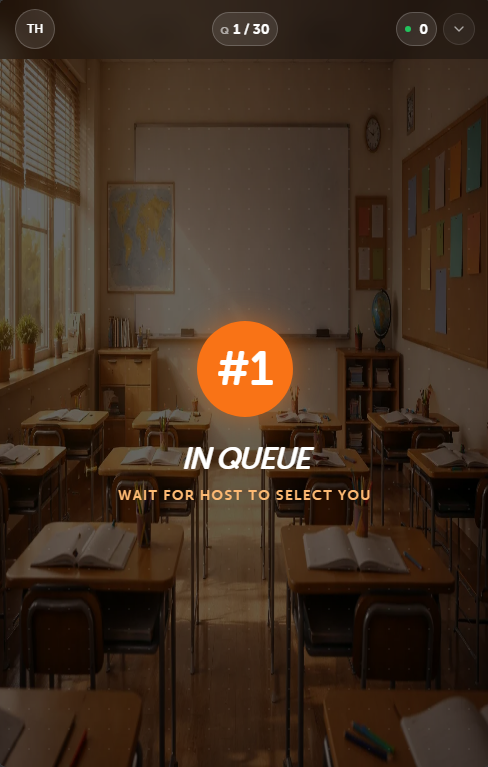 Participant Side: Tap the buzzer to buzz in
When a participant successfully buzzes in, their name is immediately highlighted on the Host Screen, and the buzzer system is locked for all other players. This visual feedback confirms who has earned the right to answer the question.
Buzzer Full Screen
In scenarios where multiple participants are allowed to buzz in (such as the top 3), any players who attempt to buzz after the slots are filled will see a Buzzer Full notification. This screen confirms that the maximum number of participants has already buzzed in for the current question.
Host Controls & Answer Management
When a participant successfully buzzes in, a control popup appears on the Host Screen, while the Participant Screen updates to allow them to select or provide their answer. This synchronized state ensures both the host and the active player are ready for the next step:
- Edit Score: Click the edit icon next to the points to manually adjust the score based on the participant's answer.
- Pass Turn: If the current player doesn't know the answer, the host can pass the turn. This resets the buzzer, giving other participants another chance to buzz in.
- Close Buzzer: Terminates the buzzing opportunity for the current question, typically used after a correct answer or if no one else knows the answer.
 Host Side: Manage scores and buzzer states
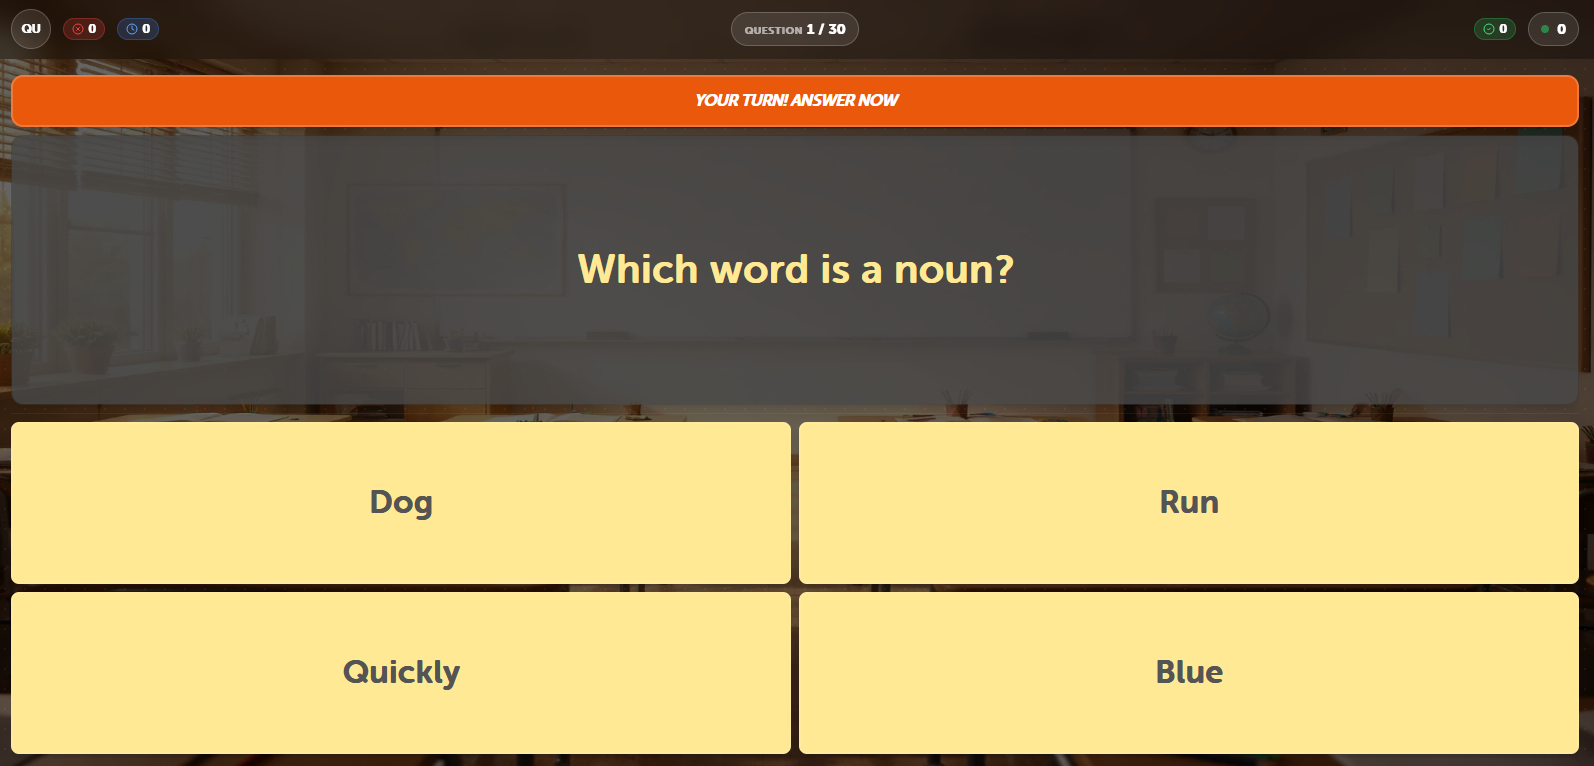 Participant Side: Active player can now answer
Correct Answer & Next Question
When the host marks an answer as Correct, the game highlights the right choice on the Host Screen. The buzzer interface is automatically dismissed, and the host can then proceed to the next question:
- Correct Answer: The Host Screen reveals the correct answer (highlighted in green), and the participant's buzzer popup is hidden.
- Incorrect Answer: If the participant is wrong, the host can reset the buzzer. This allows other participants to buzz in and attempt the question again.
- Next Question: Once the round is finalized, use the navigation controls to move to the next trivia challenge.
Winner Screen & Final Results
At the conclusion of the game, the Winner Screen celebrates the top-performing teams or individuals. The final scores are tallied, and the winner is announced with dynamic visuals on both the host and participant screens:
Host Side: Final leaderboard and winner announcement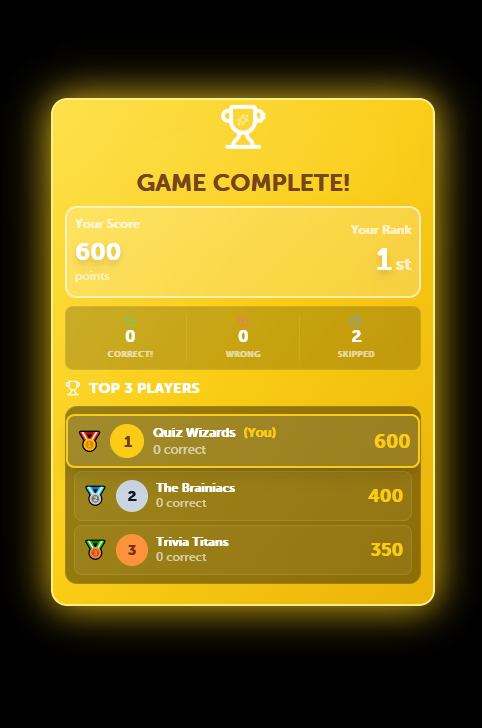 Participant Side: Final standing celebration
4. Crowd Mode
Crowd Mode is designed for large-scale participation, allowing an unlimited number of players to join and interact with your trivia game in real-time. This mode is perfect for live events, conferences, or classroom settings where you want everyone to be involved simultaneously.
Host Side Interface
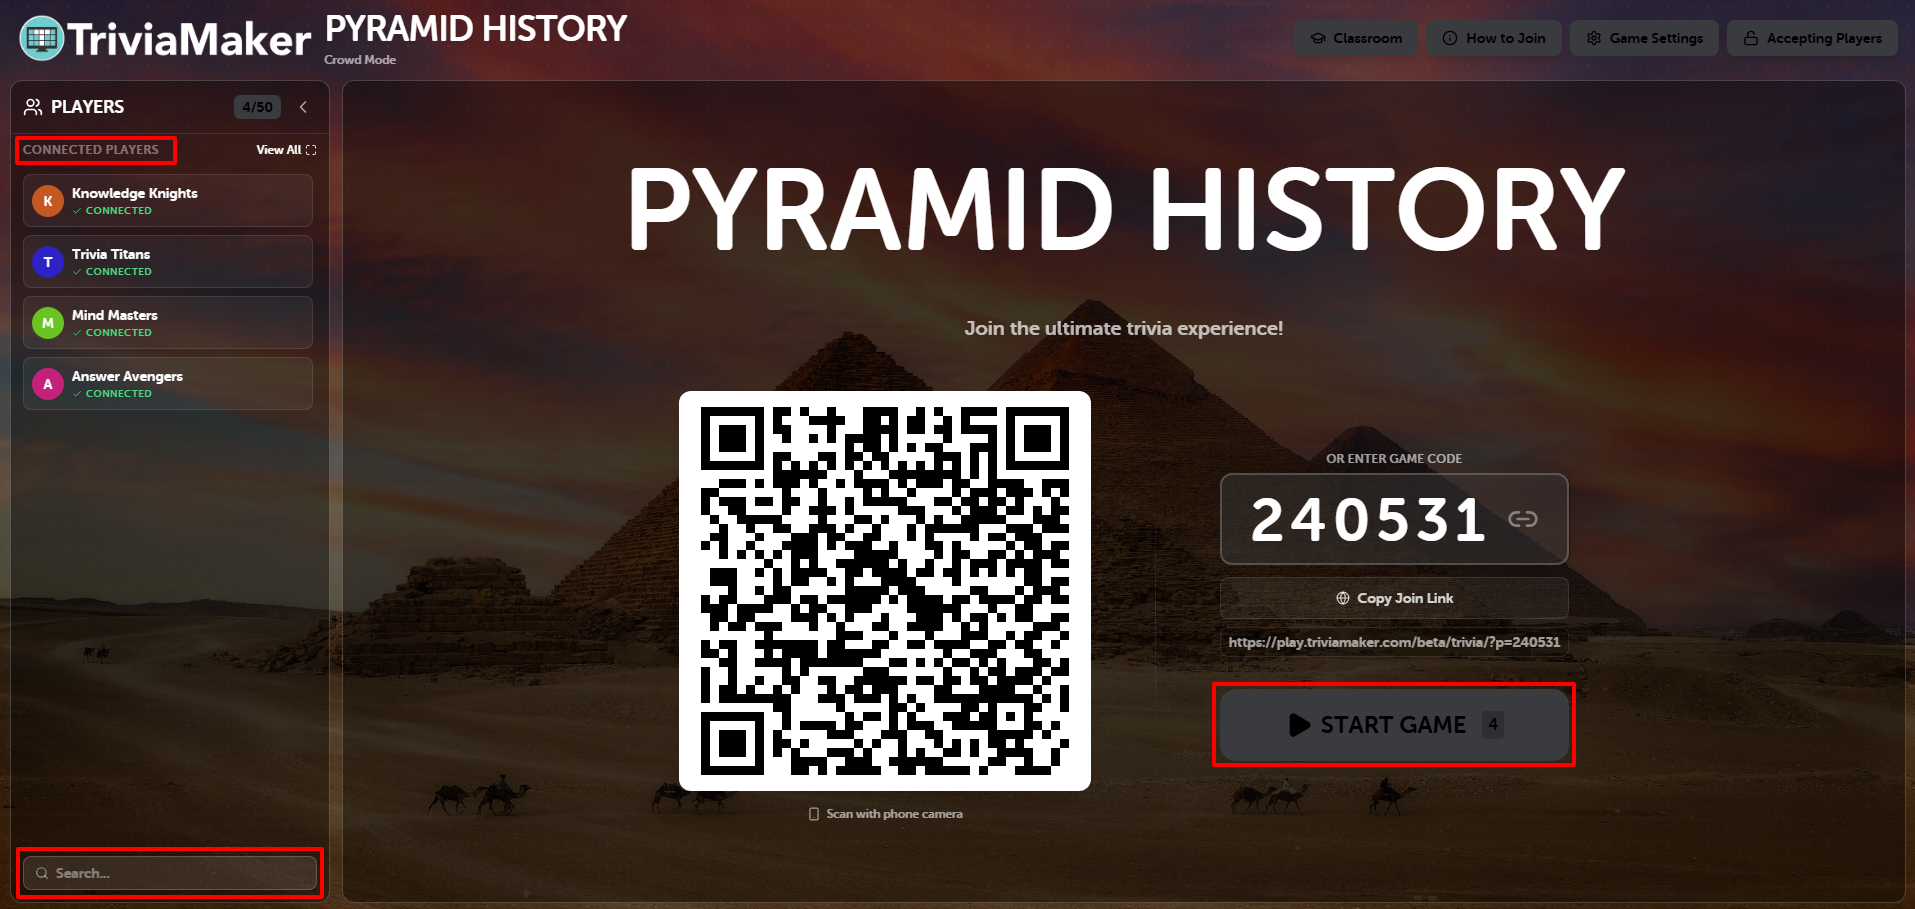
As a host, you have a centralized dashboard to manage the game flow. The main screen displays the game title, a large QR code for easy joining, and the unique game code.
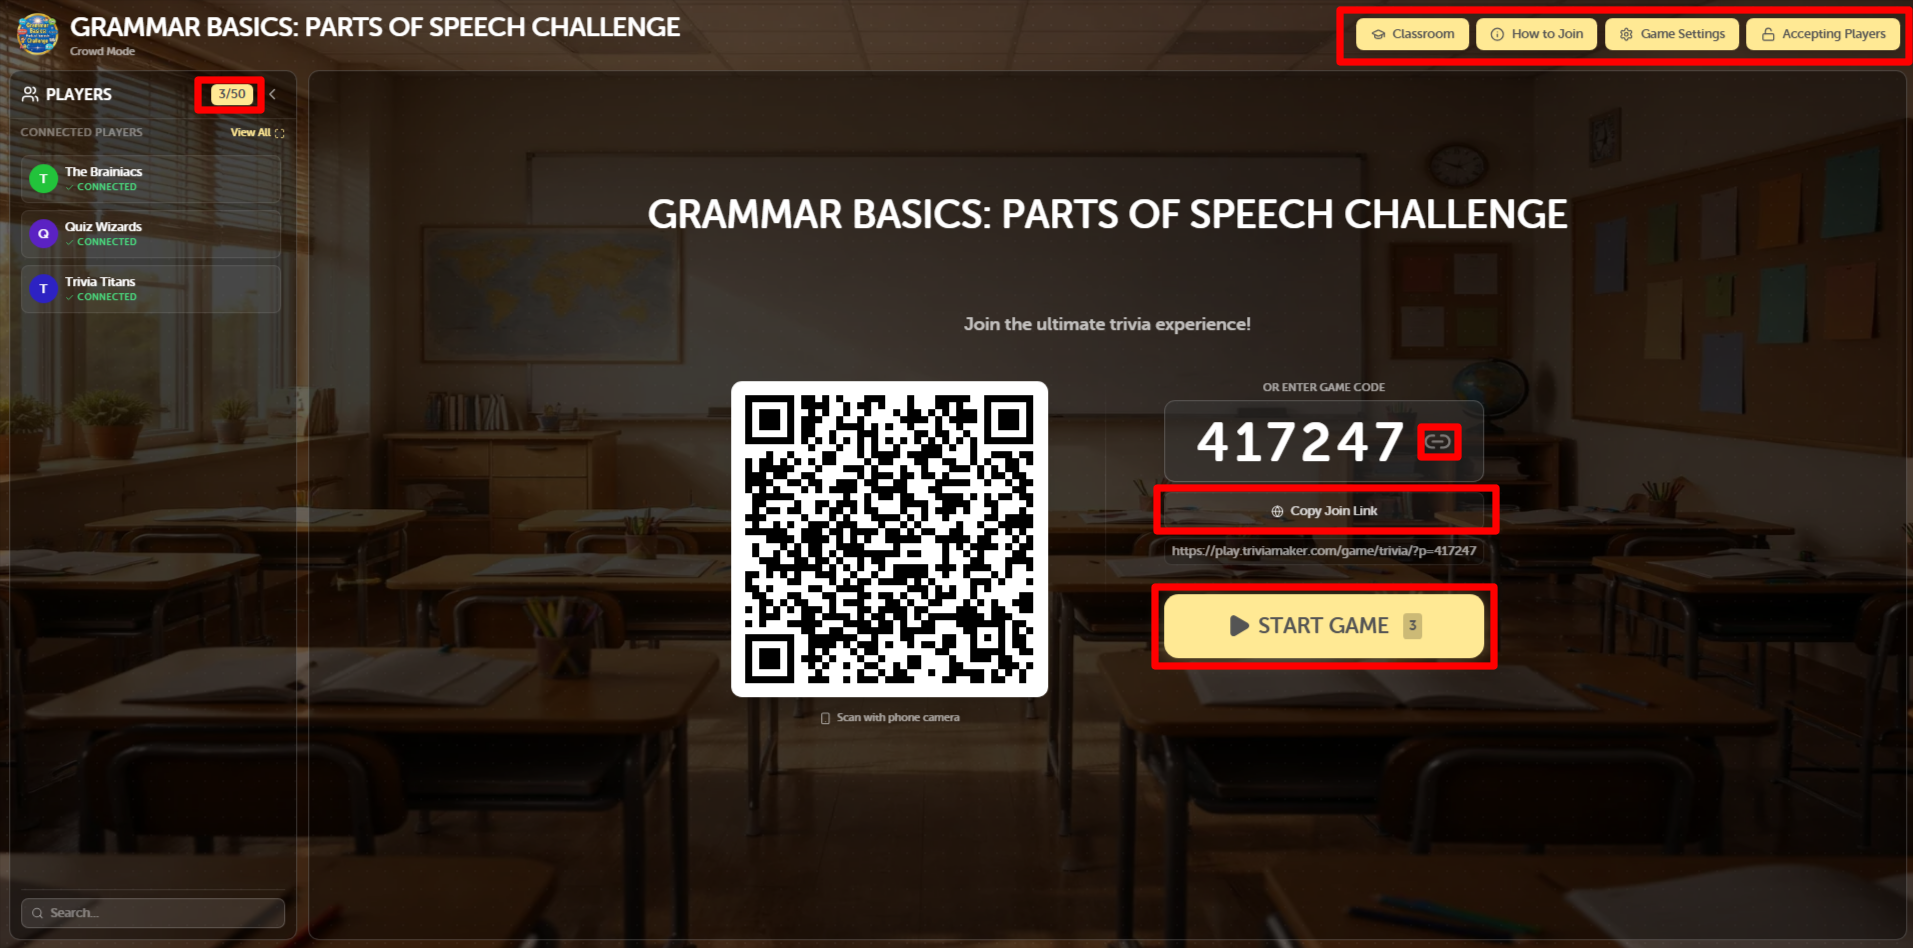 Host Dashboard: The central hub for managing your Crowd Mode session
Host Controls & Navigation
How to Join
Click this to display a modal with step-by-step instructions for participants to join your game.
Classroom
Open the classroom selection modal to convert your current Crowd Mode session into a structured Classroom session.
Game Settings
Access and adjust game-specific settings to customize the experience for your crowd.
Accepting Players
Toggle between 'Accepting' and 'Locked'. When locked, no new participants can join the game.
Copy Join Link
Instantly copy the direct joining URL to share with your audience via chat or social media.
Game Settings
Clicking the Game Settings icon opens a configuration modal where you can fine-tune the gameplay experience.
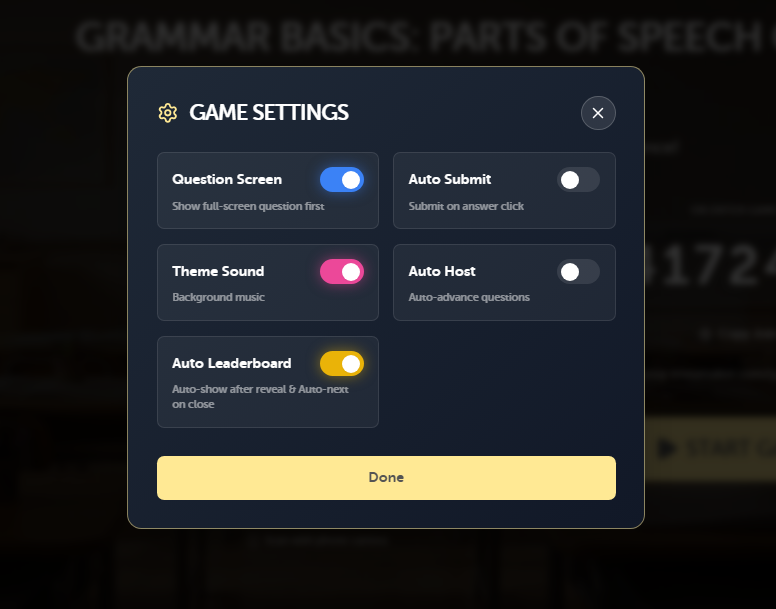 Configure your game with these specialized Crowd Mode settings
Question Screen
Toggle the host-side question screen on or off to control when participants see the questions on the main display.
Auto Submit
When enabled, participants' answers are submitted immediately upon selection, removing the need for a manual submit button.
Theme Sound
Enable or disable the background theme music and sound effects for your trivia session.
Auto Host
With this on, the game will automatically advance to the next question five seconds after all participants have submitted their answers.
Auto Leaderboard
Automatically display the leaderboard after every question once everyone has responded or the host ends the question.
Joining Instructions
When you click the How to Join icon in the topbar, a clear modal appears for your audience. This helps ensure everyone knows exactly how to connect their devices.
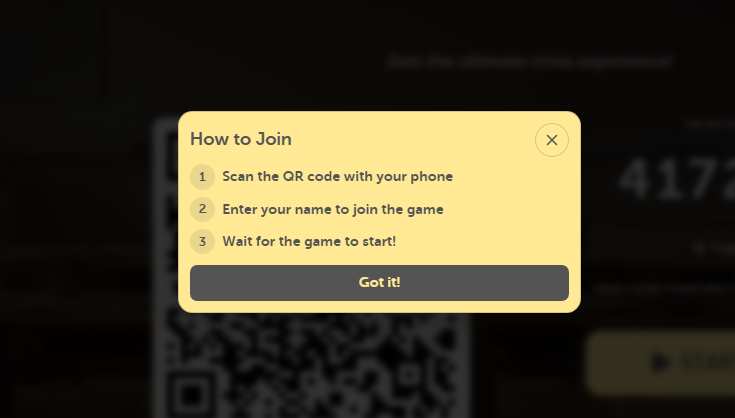 The 'How to Join' modal provides clear steps for participants
Participant Experience
Participants can join by scanning the QR code or clicking the shared link. On their device, they will be prompted to enter the game code to enter the session.
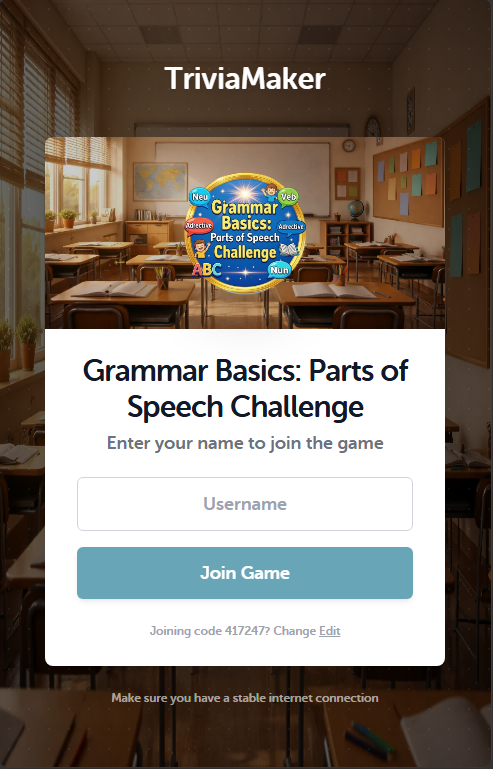 Participant Side: Scanning the QR code or entering the game link to join
Real-time Participant Tracking
Once participants join, the host can see them appearing in the "Connected Players" list in real-time. This allows the host to monitor attendance and ensure everyone is ready before starting the game.
Host View: Monitoring connected players in real-time as they joinThe Question Screen
Once the game begins, the host screen displays the current question and provides a comprehensive set of controls to manage the session. From this screen, you can control the pace of the game, play sound effects, and manage question visibility.
Host View: Full control interface during a live questionQuestion Screen Host Controls
Music
Click this to play or pause the background theme music during the question.
Font Size
Adjust the font size of the question text for better visibility on large screens.
Celebration
Play a cheering sound effect to celebrate correct answers or milestones.
Sad Sound
Play a 'wrong answer' sound effect when participants miss a question.
Happy Sound & Reactions
Play a cheerful sound effect or open the Emoji Reaction modal to display full-screen animations for all participants.
Winner
Skip directly to the winner screen to announce the final results.
Fullscreen
Toggle fullscreen mode for a more immersive audience experience.
Exit
Exit the current game session and return to the dashboard.
Visibility
Toggle whether the question content is visible to participants on their devices.
Emoji Reactions
Clicking the Happy Face icon allows you to choose from various emoji reactions. Once selected, the emoji will appear as a large, full-screen animation on all participants' devices, allowing you to set the mood or react to the game's atmosphere in real-time.
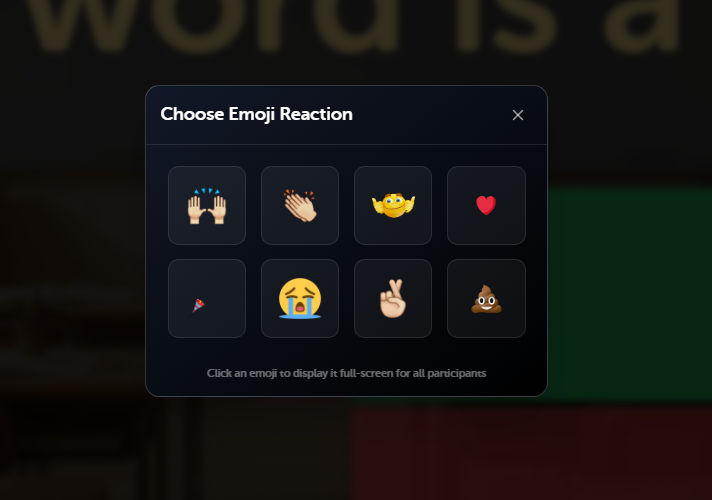 Choose an emoji to display a full-screen reaction to all participants
Monitoring Remaining Participants
During the question, the host can monitor participant progress in real-time. By clicking the LEFT button at the top of the screen, a modal appears showing exactly which participants have yet to submit their answers. From this same modal, the host has the option to click END QUESTION to immediately stop the timer and proceed to the results.
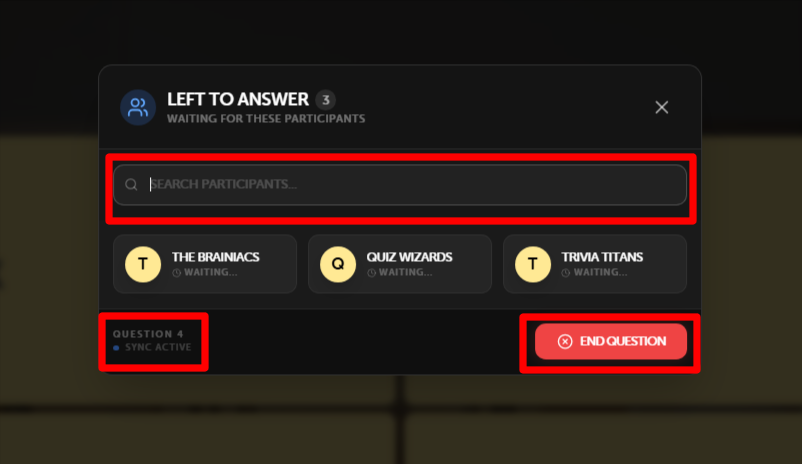 View remaining participants and manage the question duration manually
Answer Statistics & Results
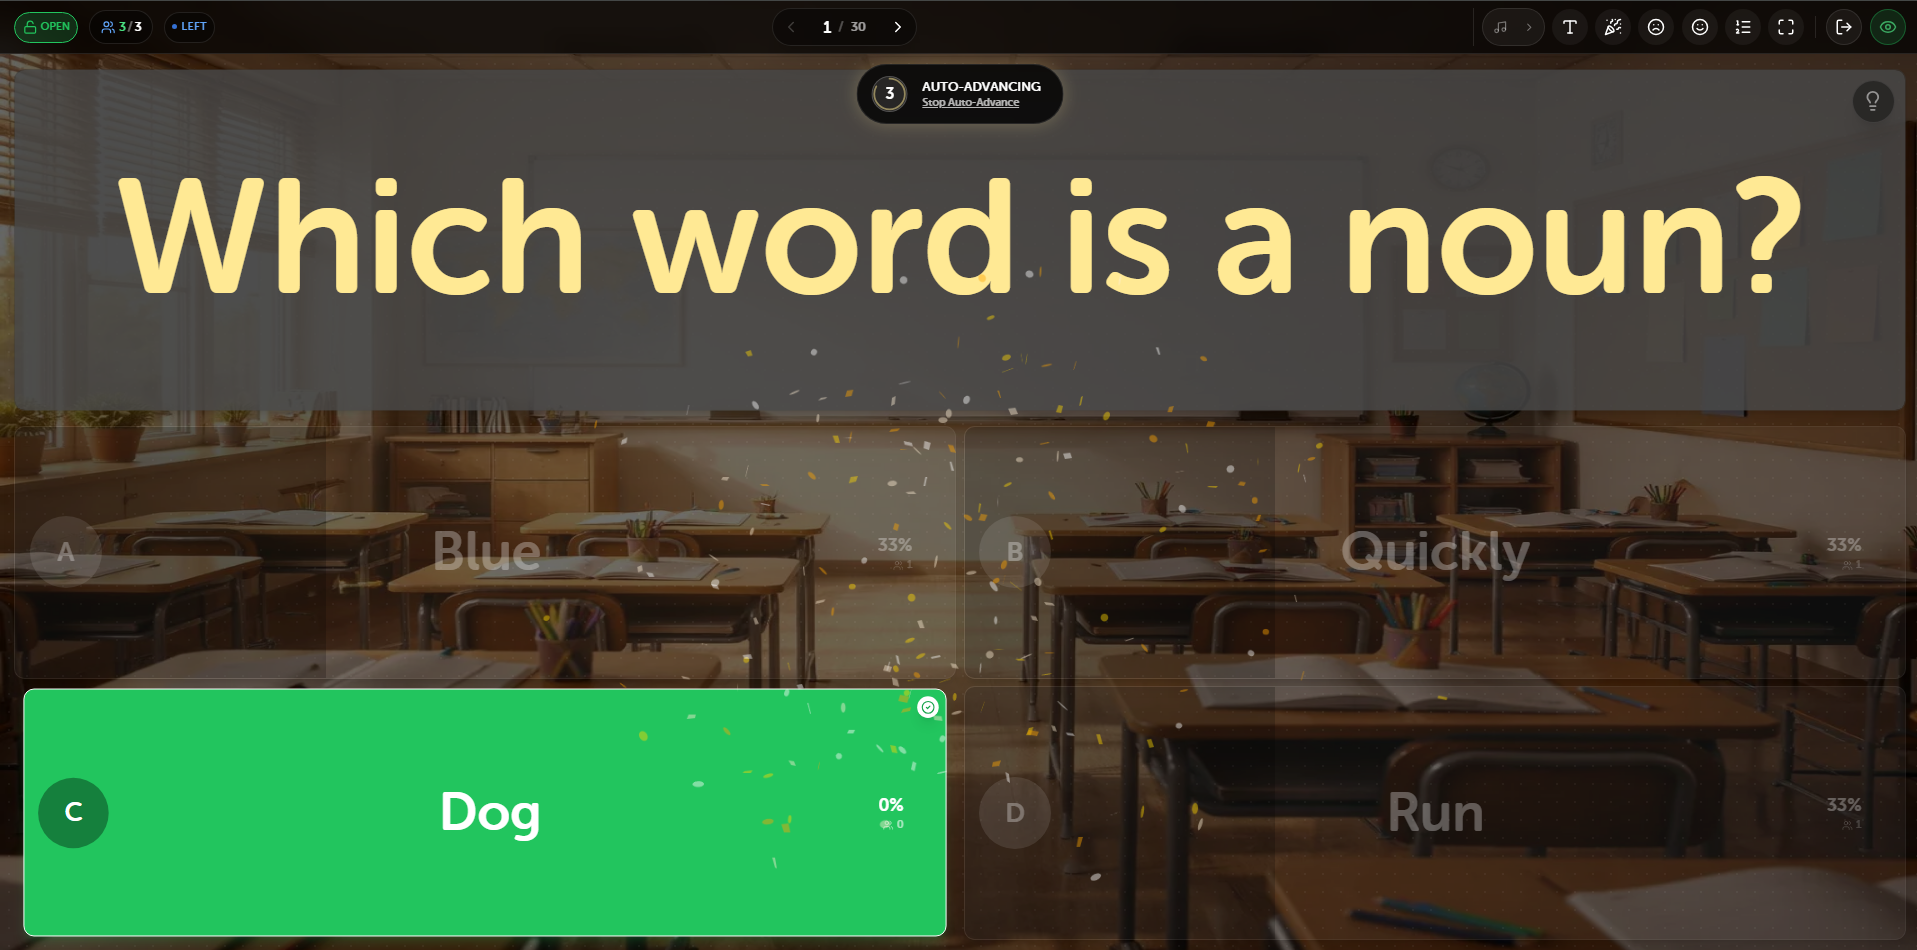
Once participants have submitted their answers or the host reveals the result, the screen displays a real-time breakdown of the responses. You can see the percentage of the audience that chose each option, along with the exact count of participants for every answer.
 Answer Statistics: Real-time response breakdown
Auto-Advancing & Leaderboards
When the Auto Host or Auto Leaderboardsettings are enabled, the game manages the transitions automatically. After all participants have submitted their responses, a countdown appears, typically giving a 5-second delay before automatically showing the leaderboard or advancing to the next question.
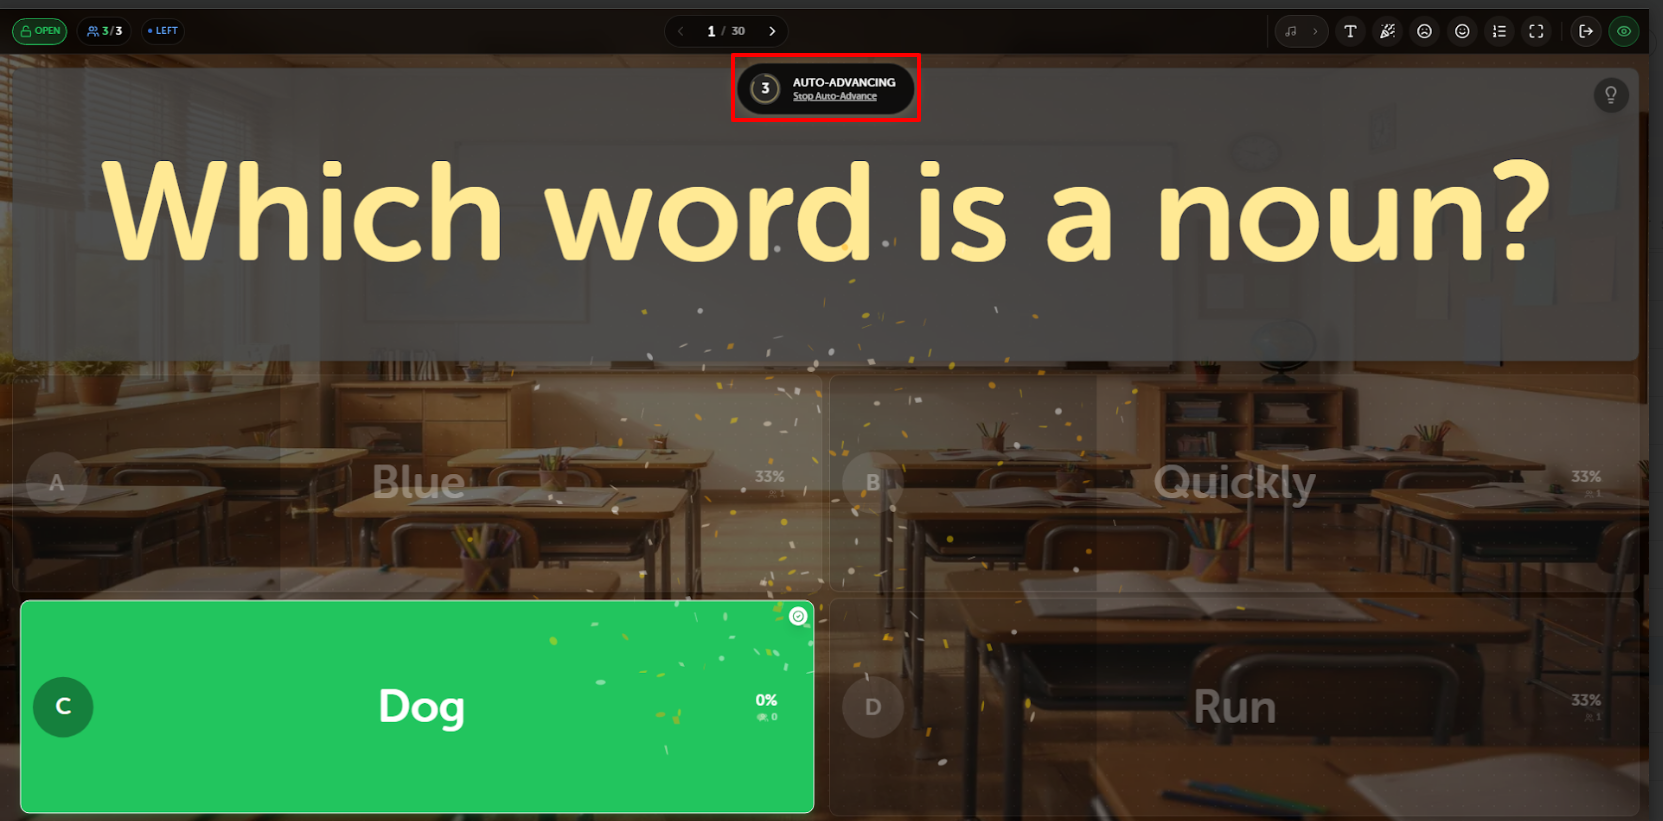 The system automatically counts down before shifting to the leaderboard or next question
Winners & Final Results
At the end of the game, both the host and participants see the final standings. The host screen displays a celebratory winner's podium featuring the top three players.
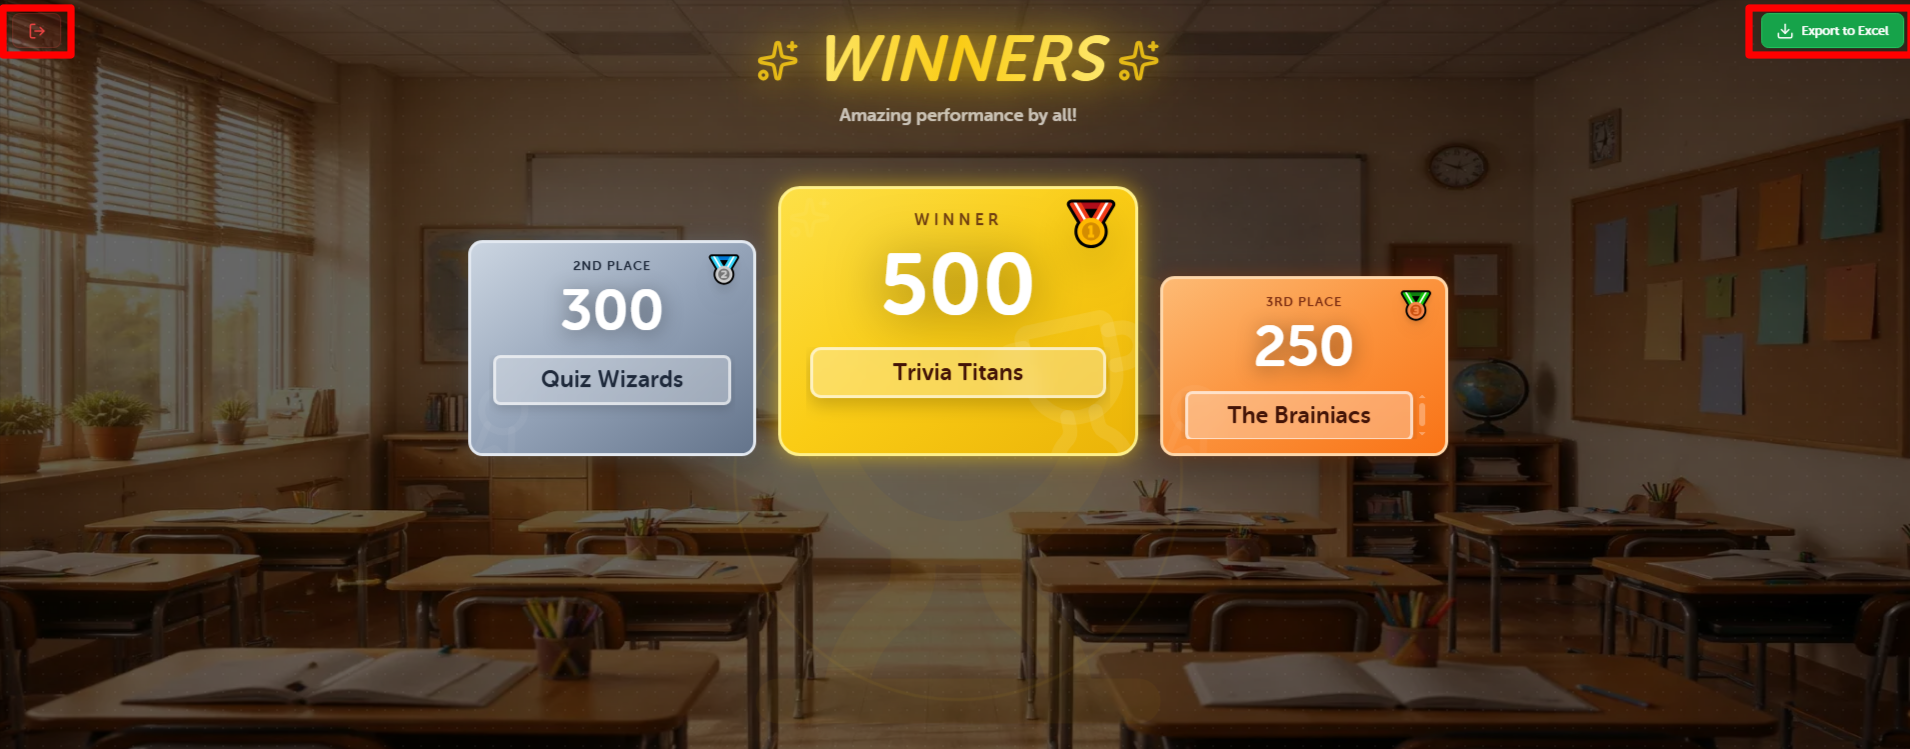 Host View: Final podium showing the top 3 winners
From the host's winner screen, you can click Export to Excel at the top right to download a detailed report of all participant performance data. The exit icon at the top left allows you to close the game and return to the main dashboard.
On the participant's device, they receive a personal summary of their performance, including their total score, final rank, and the number of correct vs. wrong answers. They can also see a summary of the top three players and access a detailed breakdown by clicking VIEW FULL RESULTS.
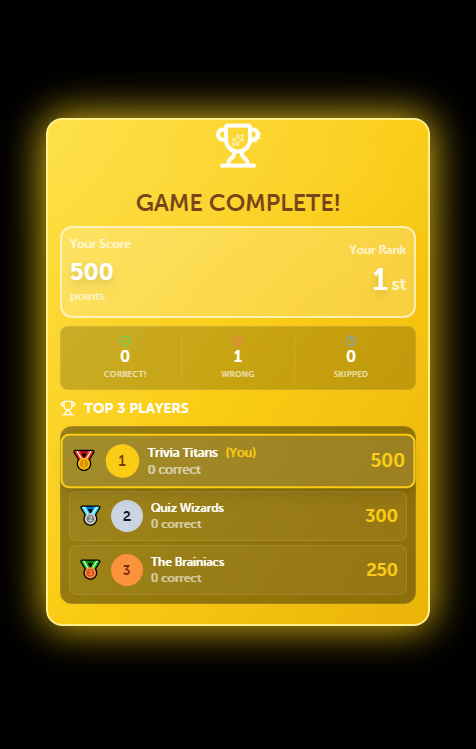 Participant View: Individual performance summary and top 3 leaderboard
5. Classroom Mode
Classroom Mode is a specialized version of Crowd Mode tailored for educational settings. Instead of a general audience, it uses a predefined list of students from your saved classrooms, allowing for more structured tracking and participation.
Host Side Interface
As a host, you can easily transition into this mode by selecting a classroom from your list. The host dashboard remains familiar, with controls optimized for classroom management.
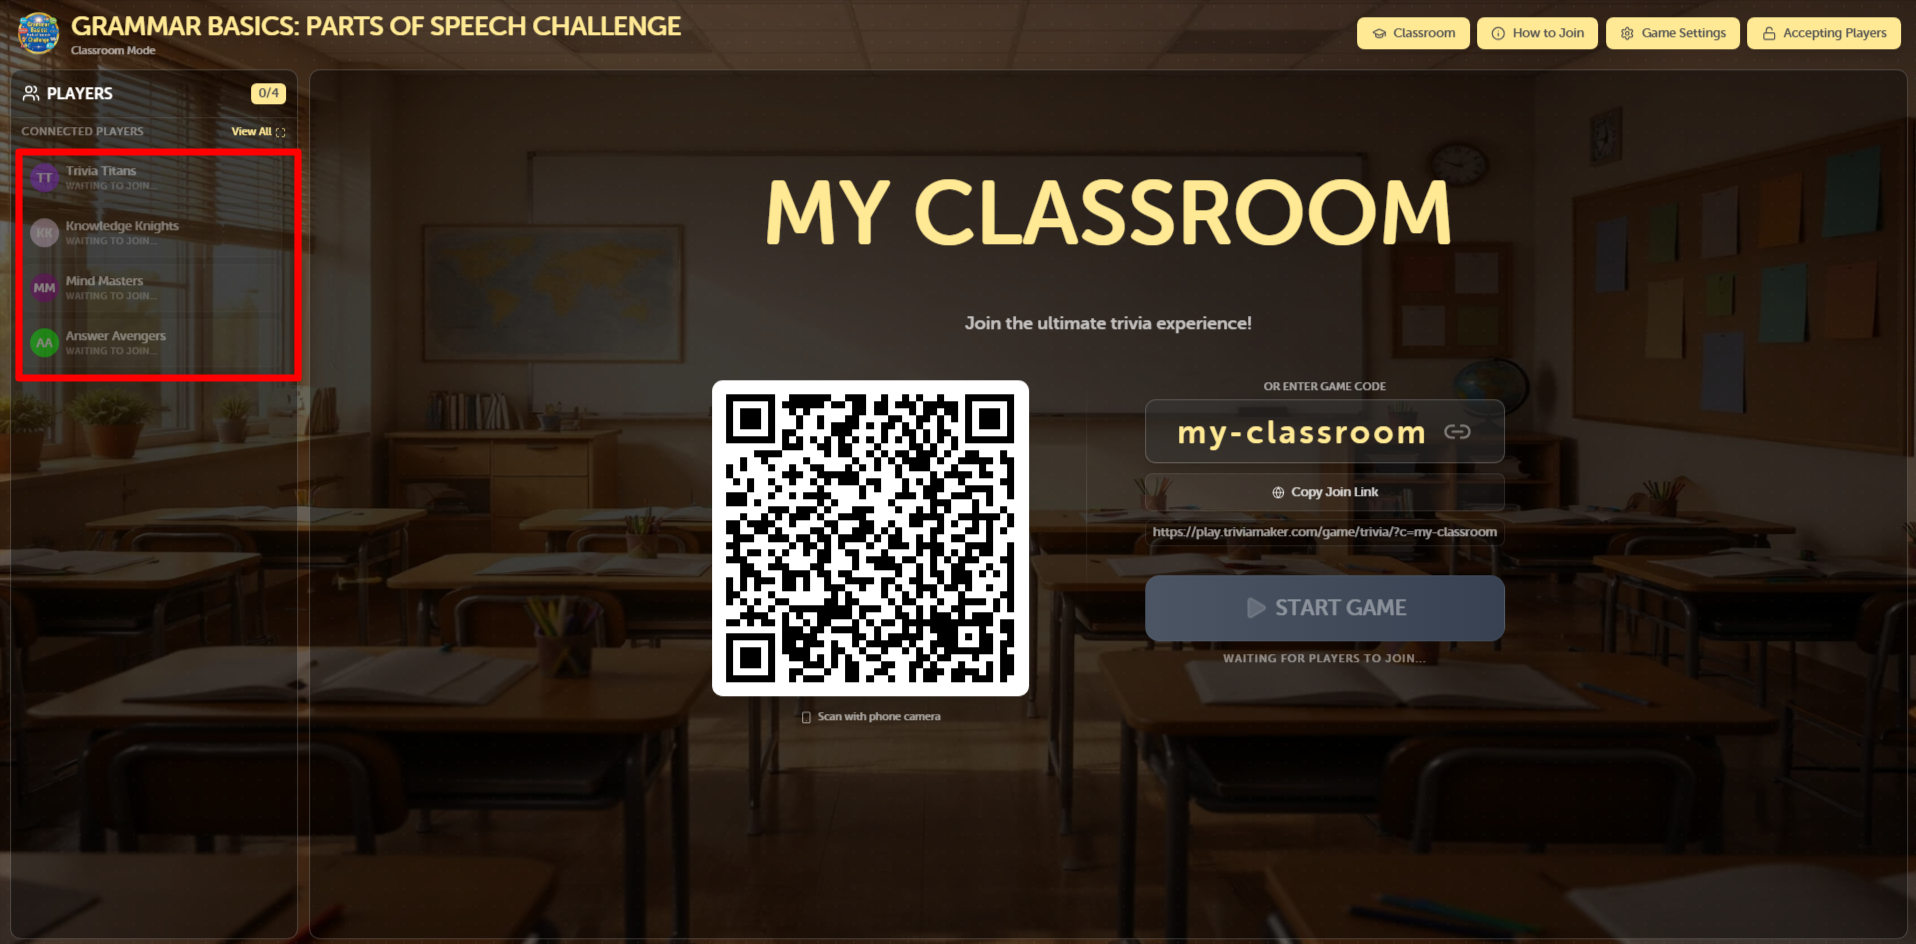 Host View: Selecting a predefined classroom to start the session
Host Controls & Navigation
How to Join
Display joining instructions specifically for your classroom students.
Game Settings
Access and adjust game-specific settings to customize the experience for your class.
Accepting Players
Toggle between 'Accepting' and 'Locked' to control student entry.
Copy Join Link
Instantly copy the direct joining URL to share with your students.
Game Settings
The Game Settings modal allows you to configure rules like Auto-Submit, Auto-Host, and Leaderboard visibility, ensuring the game fits your teaching style.
Configure your game with specialized Classroom Mode settingsQuestion Screen
Toggle the host-side question screen on or off to control student visibility.
Auto Submit
When enabled, students' answers are submitted immediately upon selection.
Theme Sound
Enable or disable the background theme music for the class.
Auto Host
Automatically advance to the next question 5 seconds after everyone answers.
Auto Leaderboard
Automatically display the leaderboard after every question.
Classroom Integration
If you want to use a predefined list of students, you can click the Classroom icon. This opens a modal where you can select one of your saved classrooms. Choosing a classroom will seamlessly convert your Crowd Mode session into a Classroom Mode session.
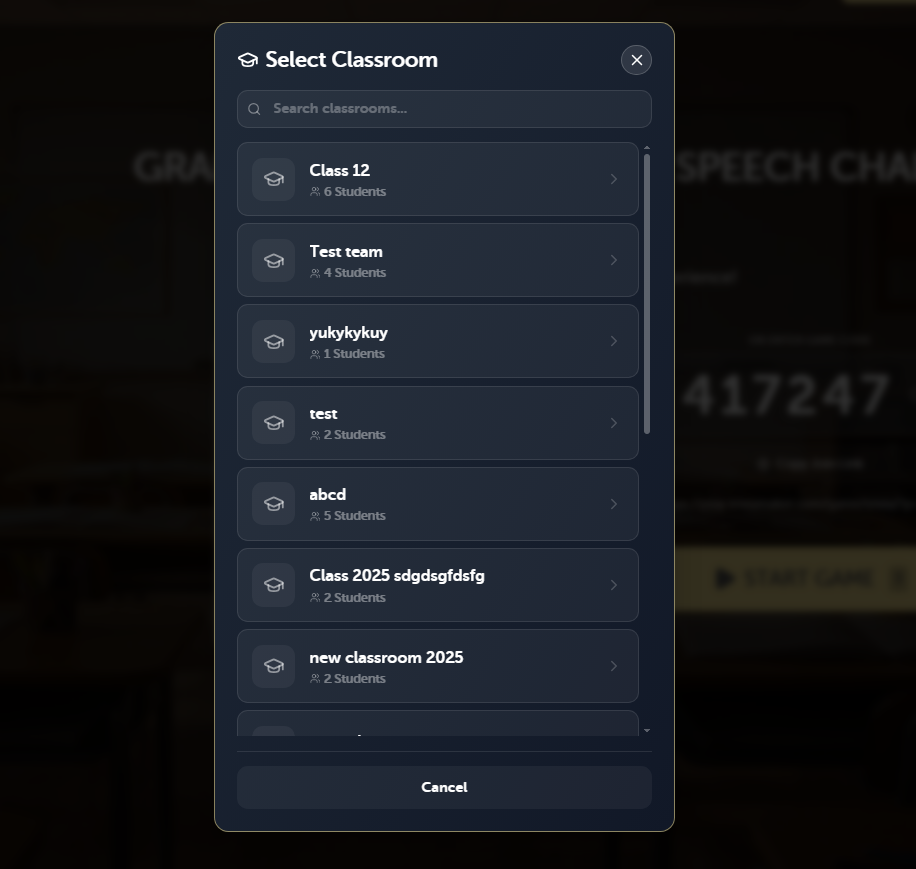 Select a classroom to transition from Crowd Mode to Classroom Mode
Student Joining Process
Students join by scanning the QR code or clicking the link. Since this is a classroom session, they will see their name in the student list and will be required to enter the PIN provided by the teacher to join the session.
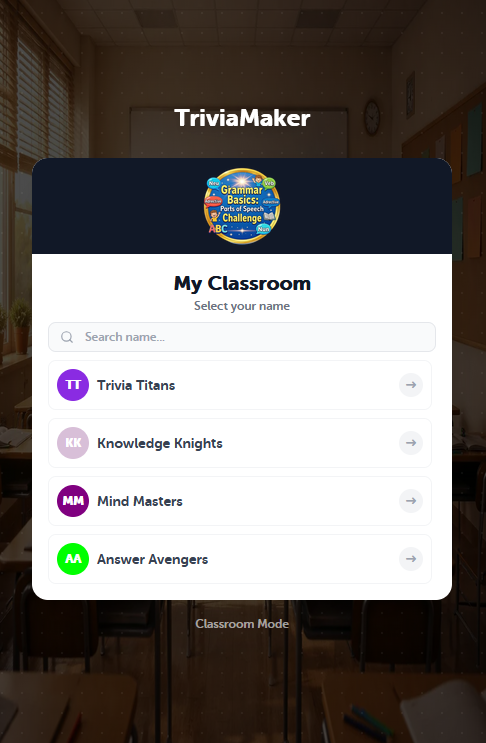 Student View: Selecting their name from the predefined classroom list
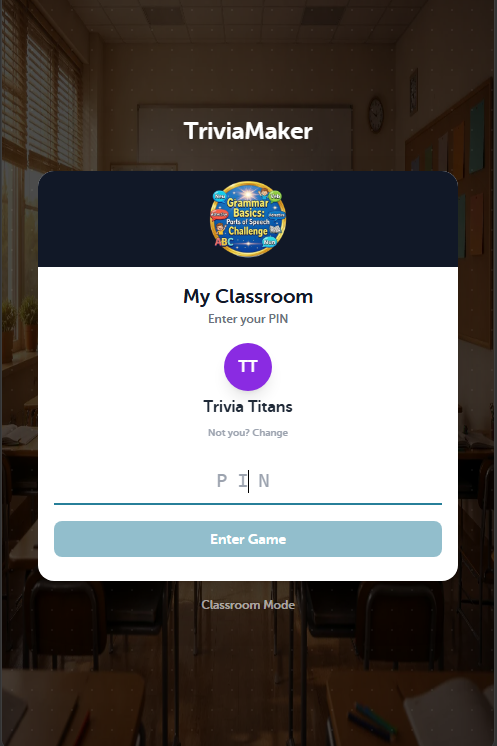 Student View: Entering the secure PIN to join the session
Real-time Attendance Tracking
As students log in, the teacher can see them appearing in the "Connected Players" list in real-time, ensuring everyone is present before the lesson starts.
 Teacher View: Monitoring connected students in real-time
The Question Screen
The question screen provides full control for the teacher, including sound effects, font adjustments, and visibility toggles.
Teacher View: Full control interface during a live questionTeacher Controls
Music
Play or pause the background theme music.
Font Size
Adjust question text size for classroom visibility.
Celebration
Play cheering sounds for correct student answers.
Sad Sound
Play 'wrong answer' sounds for incorrect responses.
Emoji Reactions
Display full-screen emoji animations to reward the class.
Winner
Skip directly to the final winner podium.
Fullscreen
Toggle fullscreen for an immersive classroom experience.
Exit
Exit the session and return to the classroom dashboard.
Visibility
Toggle student visibility of the current question.
Emoji Reactions
Teachers can use the Emoji Reaction modal to display full-screen animations, providing instant visual feedback and encouragement to the entire class.
Choose an emoji to react to classroom performance in real-timeMonitoring Student Progress
By clicking the LEFT button, the teacher can see a list of students who haven't yet submitted their answers and can manually end the question if needed.
Identify students who are still working on the current questionClassroom Results & Statistics
After each question, the teacher can review the class performance statistics, showing the percentage and count of students for each answer.
 Review how the entire class performed on the current question
Student Interface & Submission
Students receive a summary of their performance on their devices. Depending on the teacher's settings, they may submit answers automatically or manually via the submission button.
Student View: Real-time score and performance tracking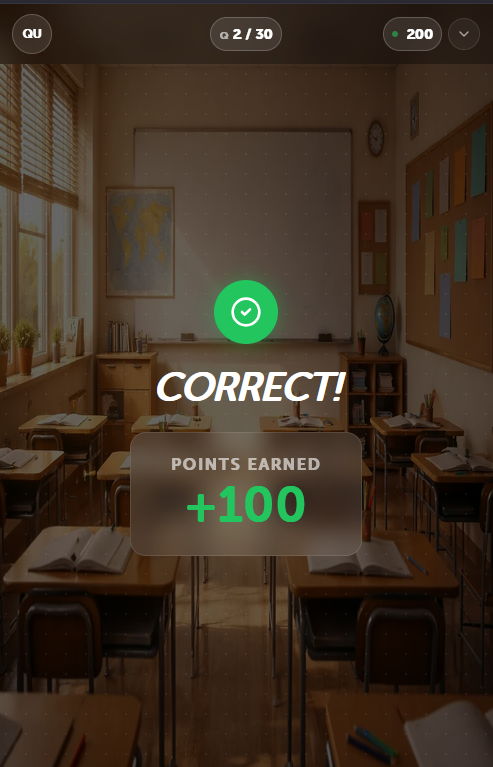 Student View: Manual submission confirmation
Winners & Final Reports
The final podium celebrates the top students. Teachers can export the full classroom performance report to Excel for grade tracking and analysis.
Teacher View: Final class standings and export optionsStudent View: Personal performance summary and rank6. Presenter Buzz
Presenter Buzz Mode is the professional dual-device version of Buzz Mode. It allows you to manage the game from a private Controller (your laptop/tablet) while displaying the questions and live buzz-in results on a Presenter screen (Projector/TV).
Launching Presenter Buzz Mode
To start, toggle the Presenter switch to ON in your game settings, then click theBuzz In Mode button. This will launch the dual-screen interface where your audience can join via QR code or URL.
Connecting the Presenter Display
Setting up your professional presenter display is a simple 3-step process that ensures your audience sees the action while you maintain full control.
Step 1: Toggle Presenter Mode
In your Game Settings panel, ensure the Presenter toggle is switched ON. This tells TriviaMaker to prepare for a second display.
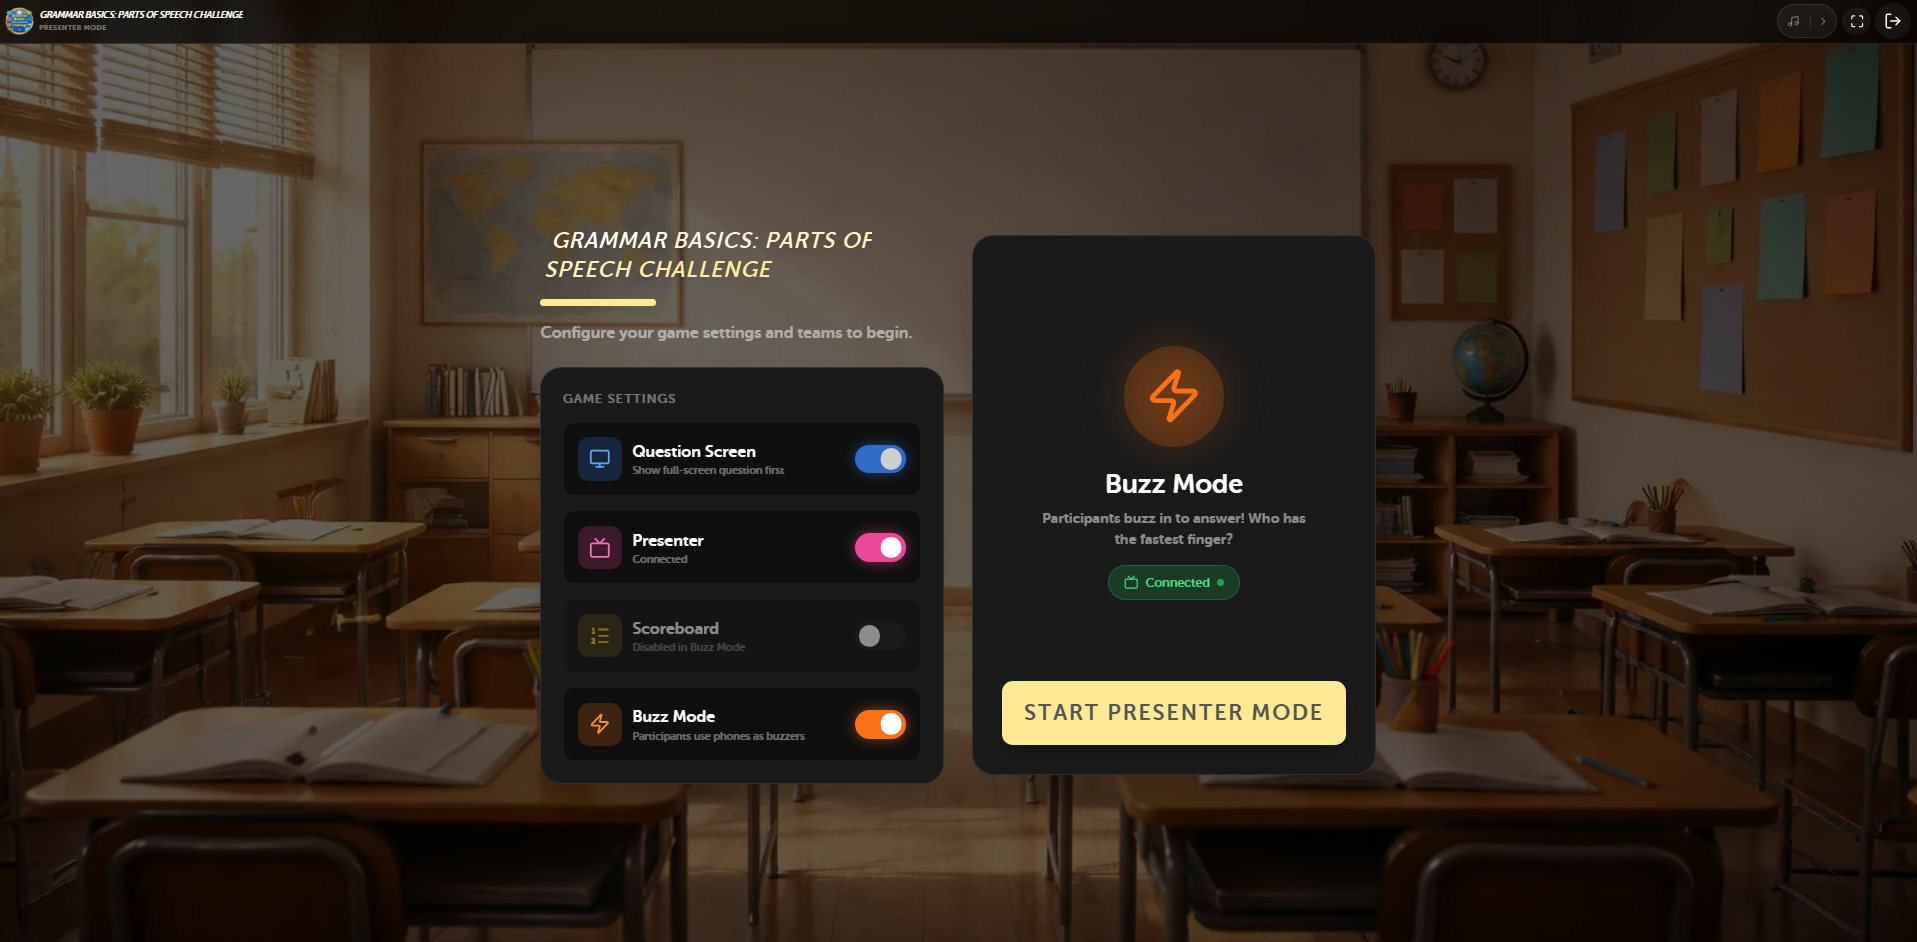 Toggle the Presenter setting to ON in your game configuration
Step 2: Get your Presenter Code
On your audience-facing device (TV, Projector, or Laptop), navigate to triviamaker.com/presenter. Click on Show Code to generate your unique 6-digit connection code.
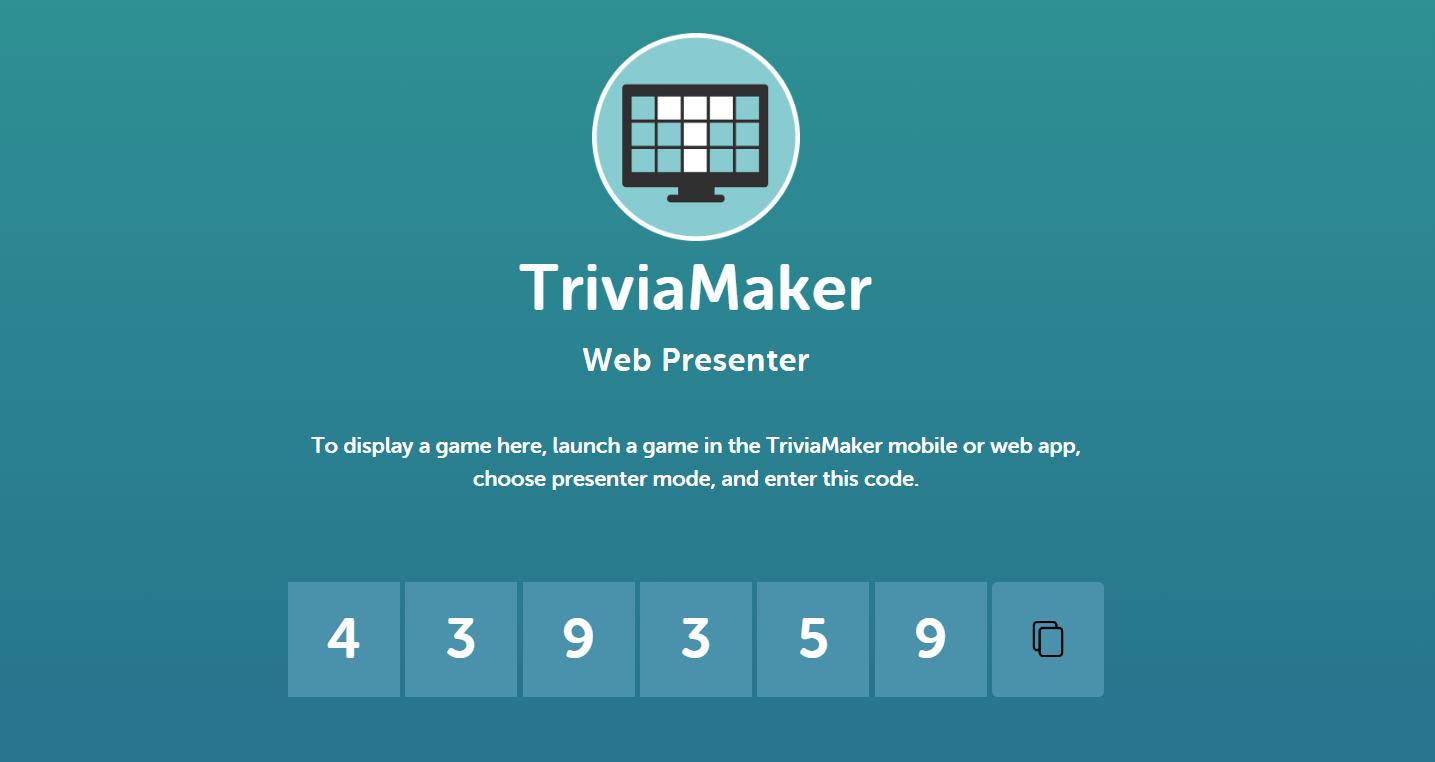 The Web Presenter screen showing where to find your connection code
Step 3: Enter Code & Connect
Return to your controller device. A Presenter Control modal will be waiting for you. Type in the 6-digit code and click Connect to Presenter.
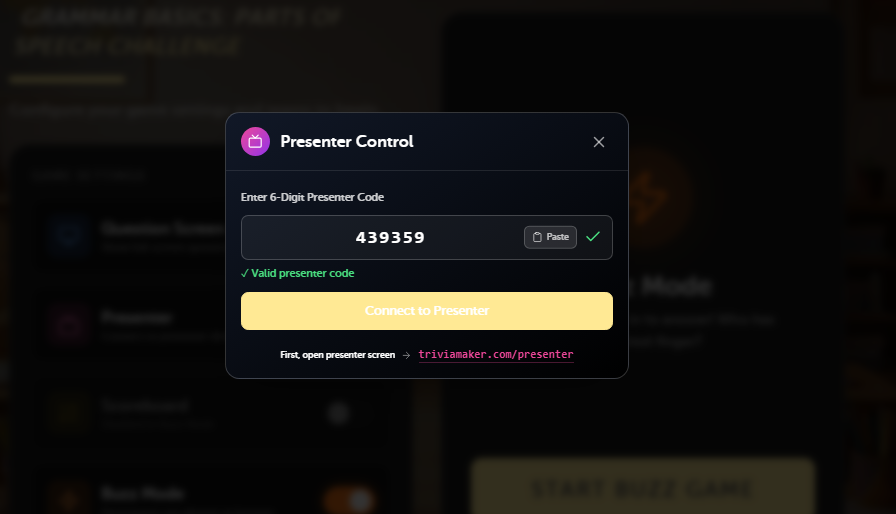 Enter the 6-digit code into the Presenter Control modal on your controller
Connection Tip: If the code doesn't work, refresh the presenter page to generate a new one and ensure both devices have a stable internet connection.
Joining the Game
Once the connection is established, your audience can join the game in two ways. As they join, they will immediately appear in the Incoming Playerslist on both the host and presenter screens.
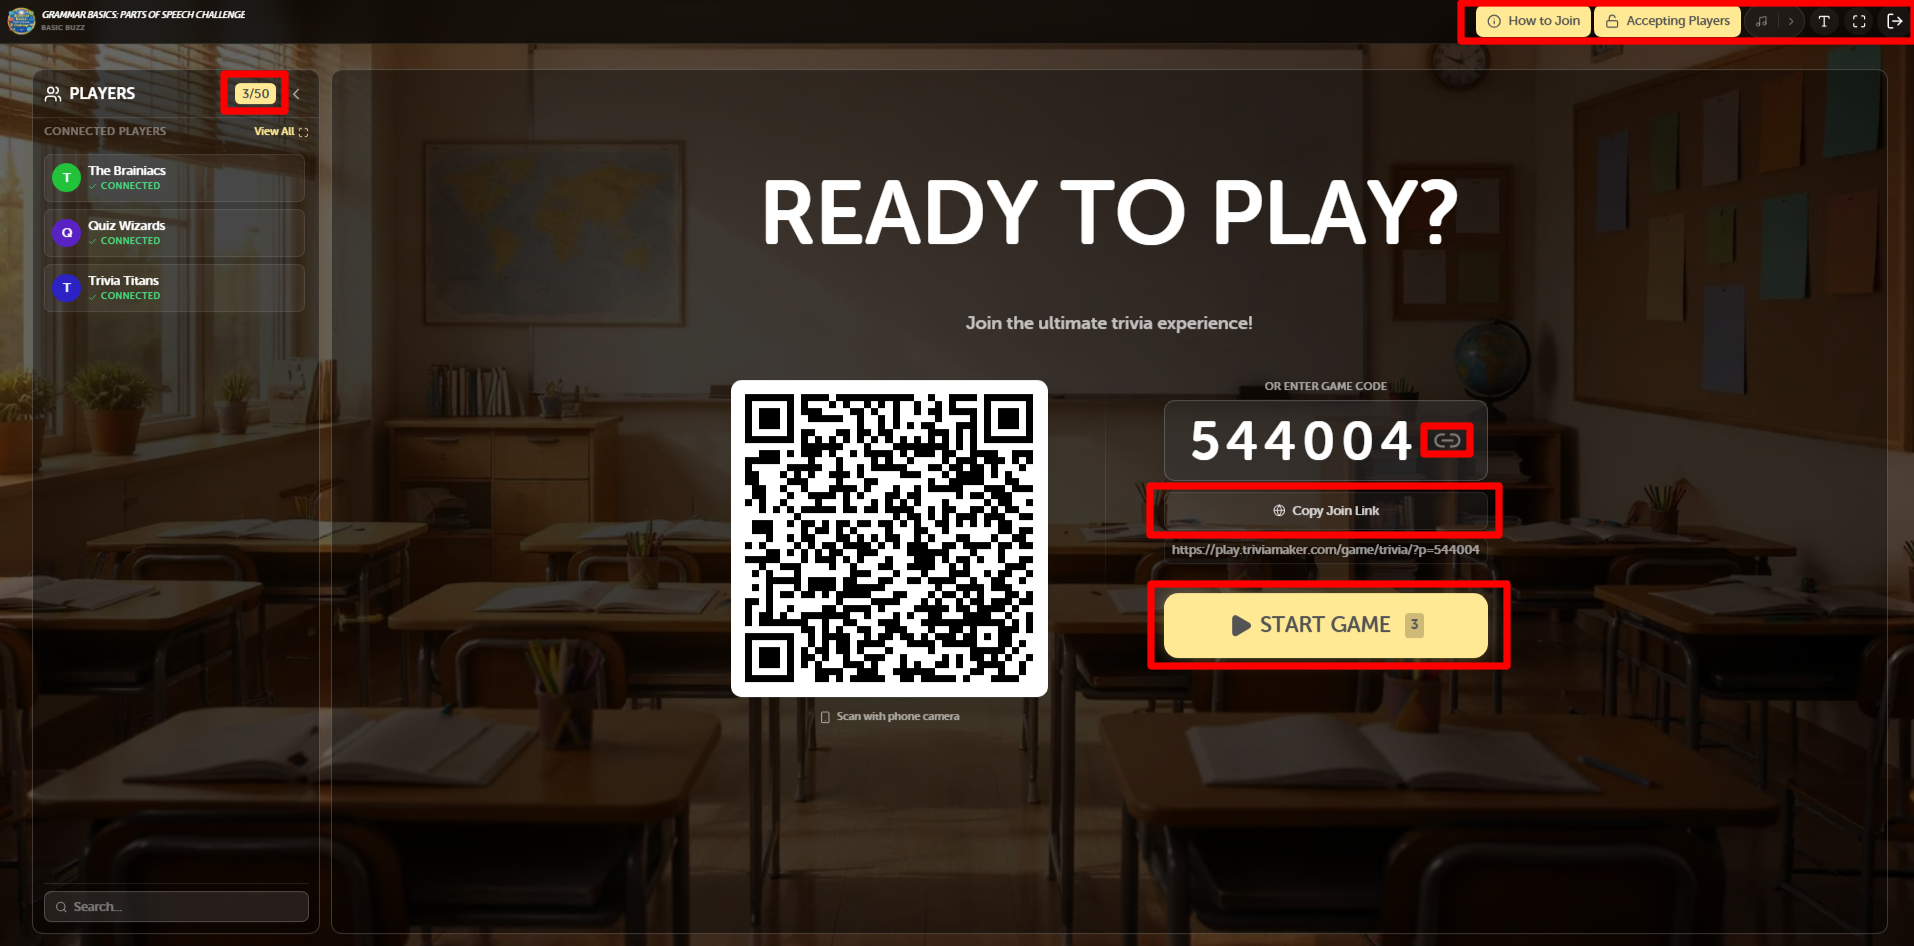
Option 1: Scan QR Code (Host Display)
The host can display a large QR code on their screen. Participants simply scan this with their phone camera to jump straight into the game.
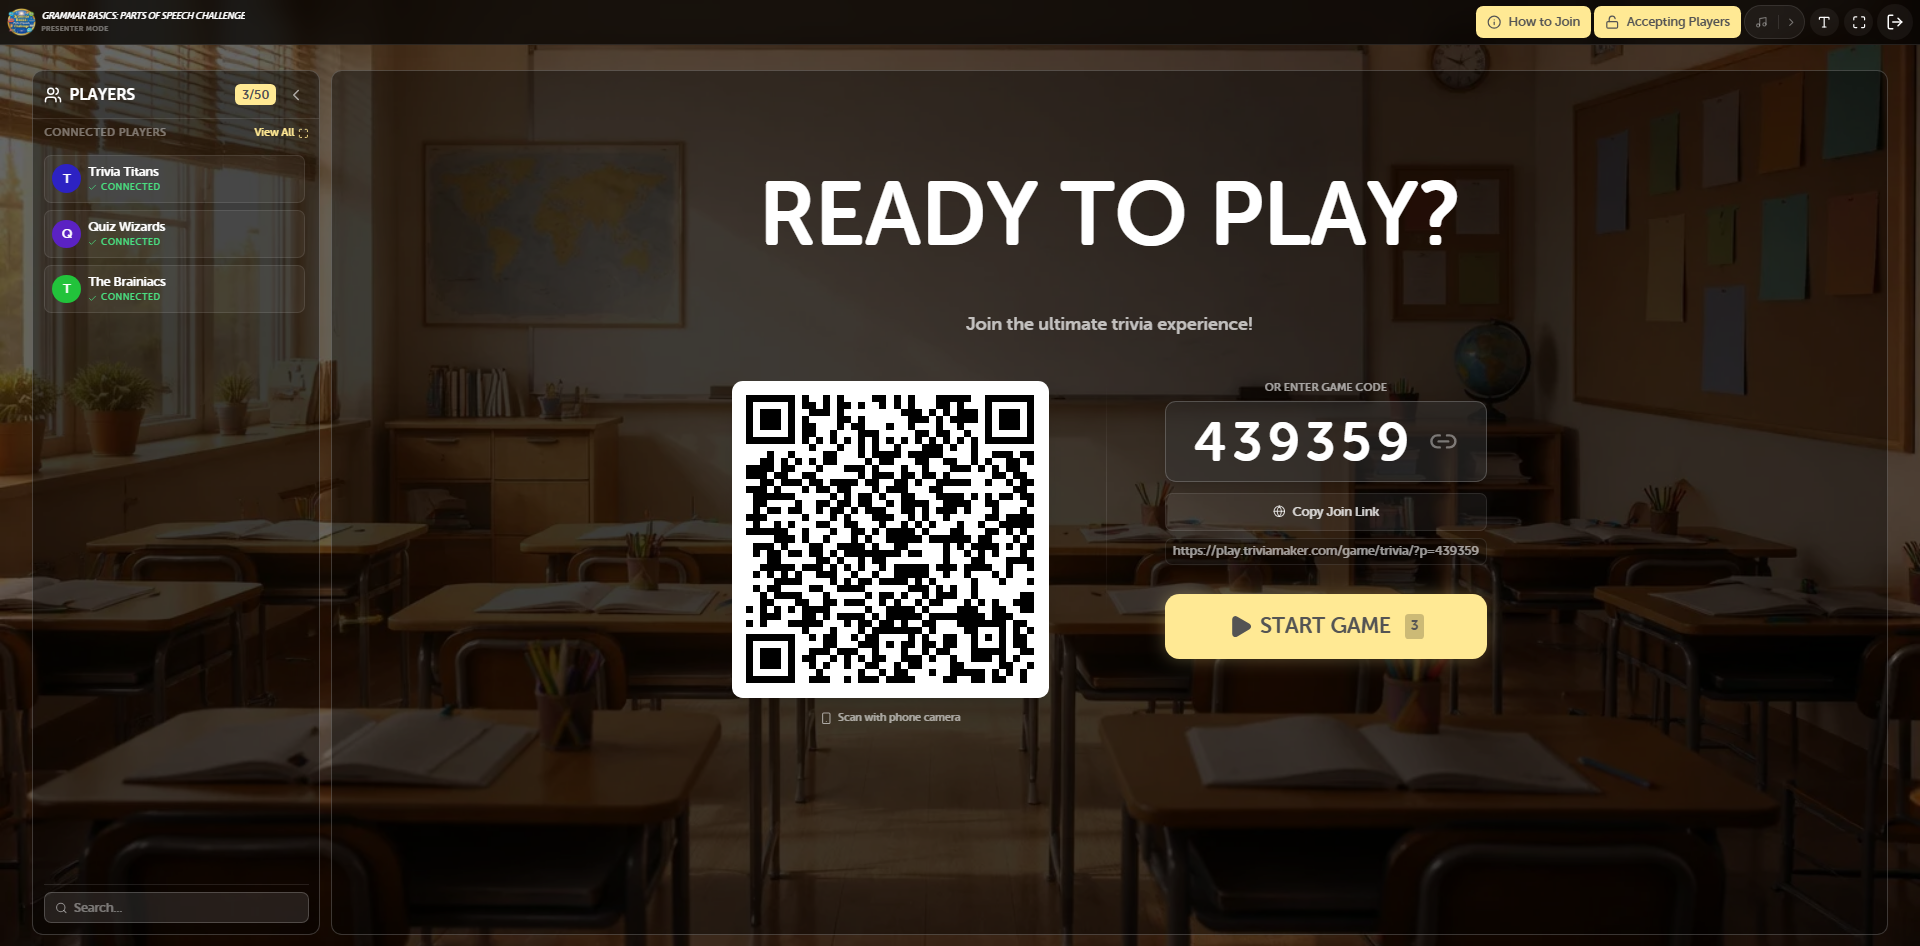 Participants scanning the QR code from the host's 'Ready to Play' screen
Option 2: Join URL & Code (Presenter Display)
The presenter screen also displays a direct join URL and the 6-digit game code. This is perfect for larger audiences who are further away from the screen.
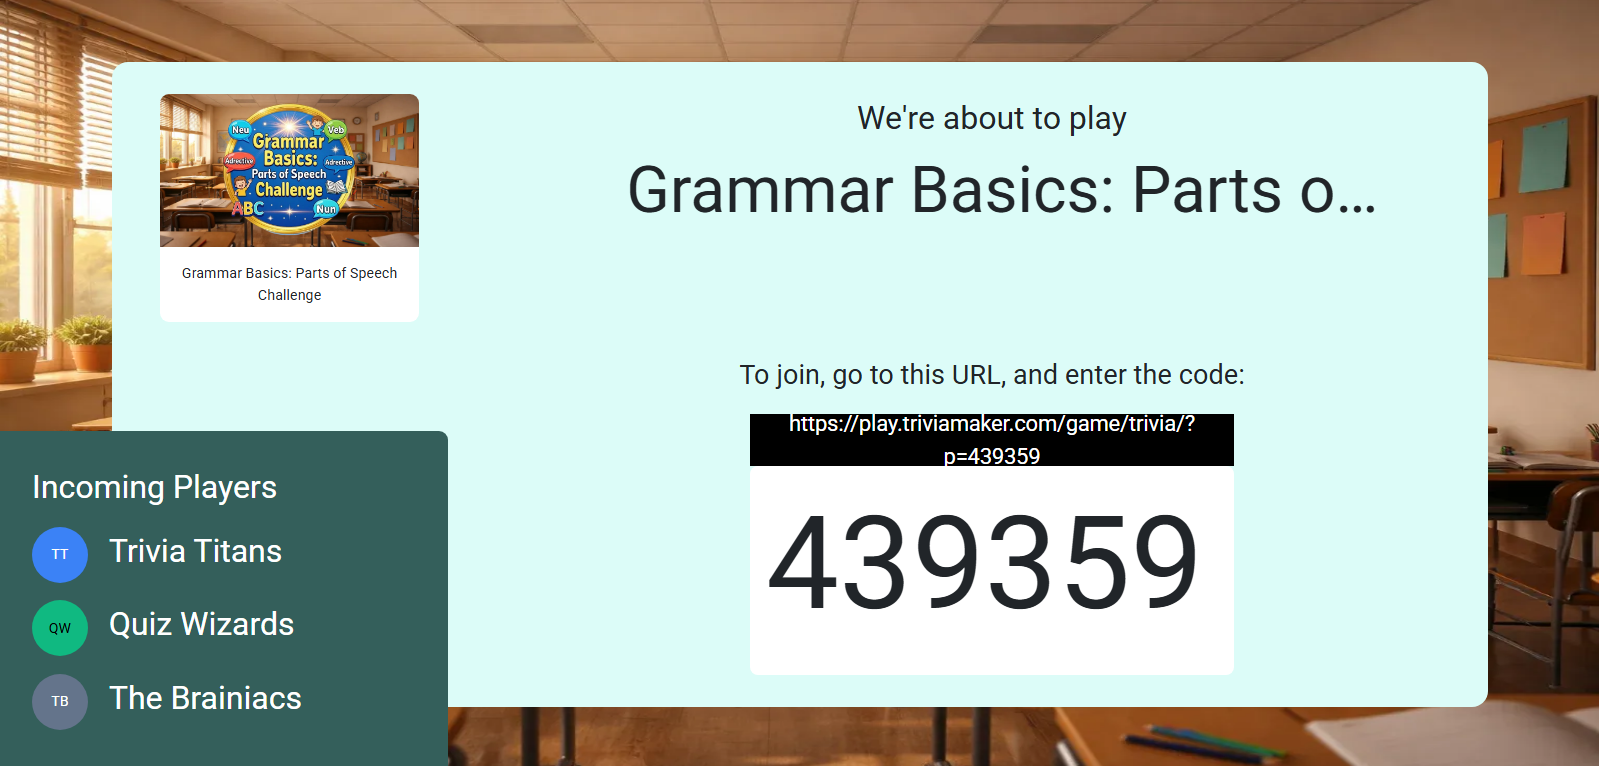 The presenter screen showing the URL and code for incoming players
Participant Experience: Joining & Waiting
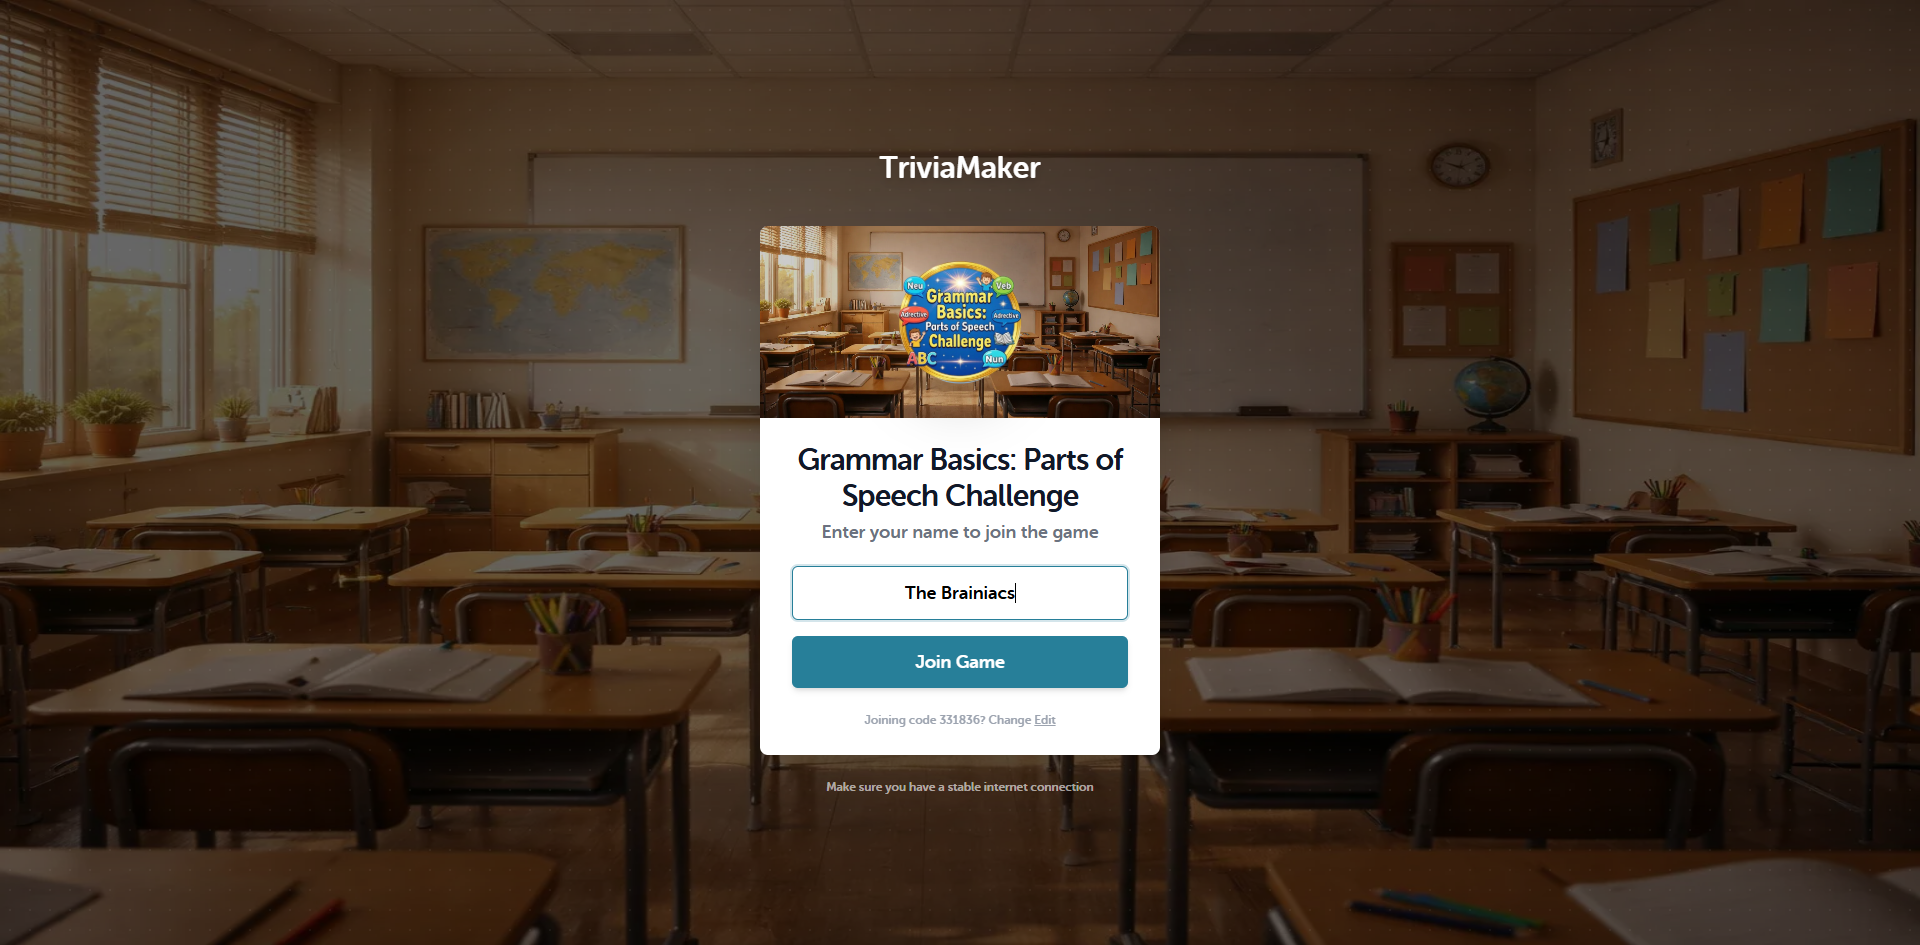
When a participant scans the code or visits the URL, they are prompted to enter a Username. After clicking Join Game, their screen will update to show they are successfully in the lobby.
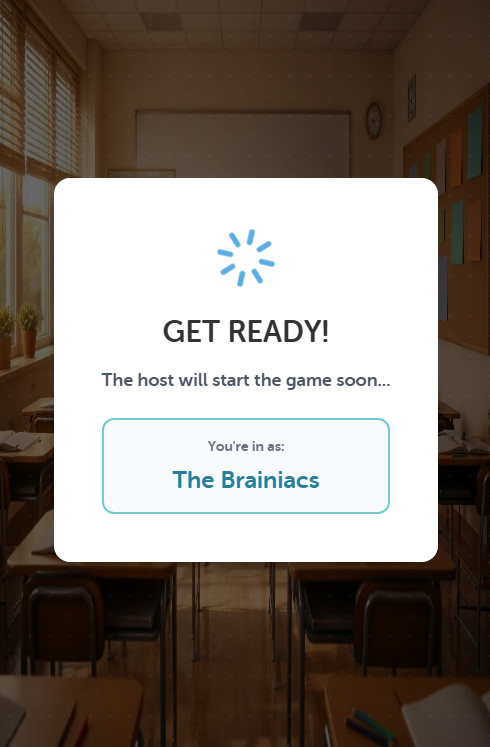
Step 1: Participant entering their username to join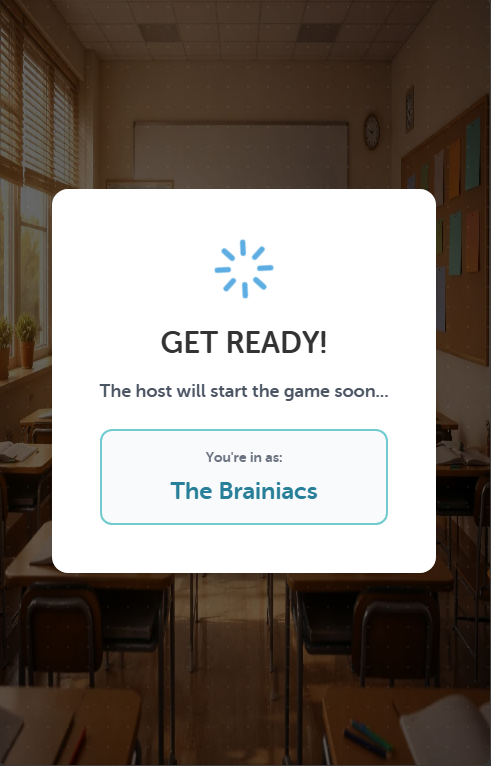 Step 2: Participant waiting for the host to start the game
Gameplay & Buzz-In Logic
Presenter Buzz mode uses a specialized workflow where the host controls the timing of questions and buzzers, while the presenter display provides the cinematic experience for the audience.
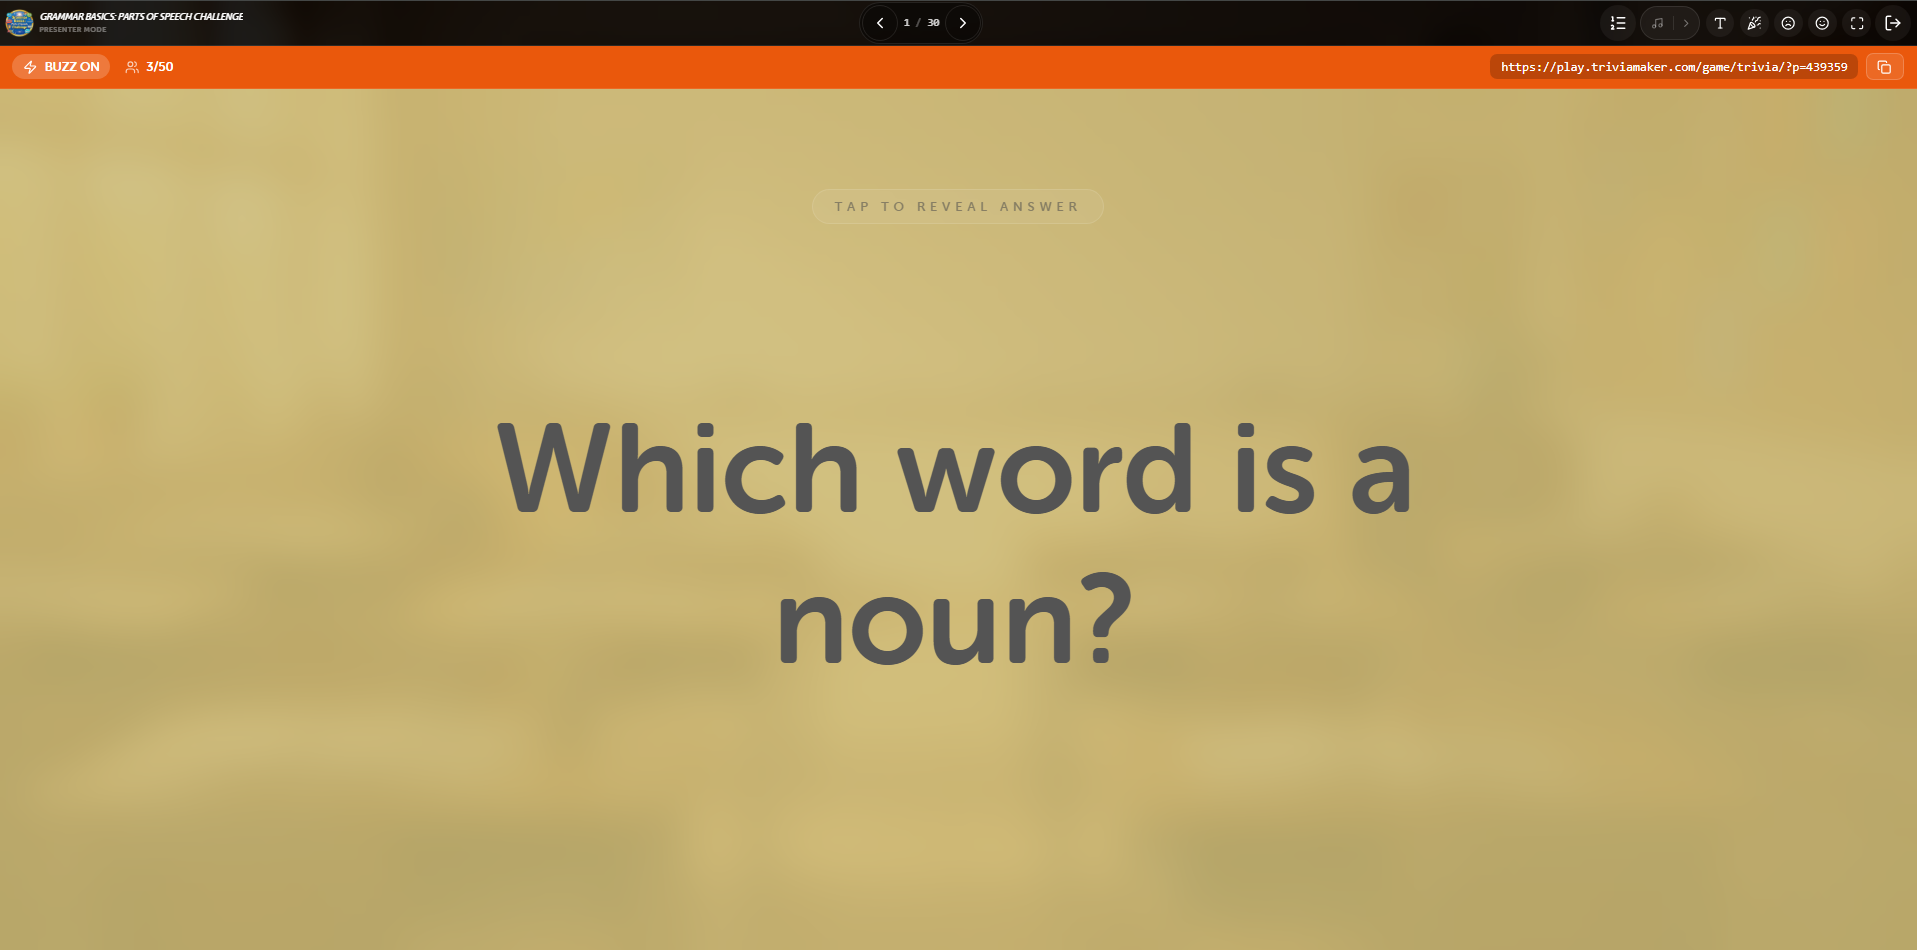
Phase 1: The Question Phase
When you advance to a question, it is displayed on both the Host and Presenter screens. During this phase, participants are in a "Wait" state, as the host prepares to read the question.
Host/Controller: View the question and control the Buzz-In toggle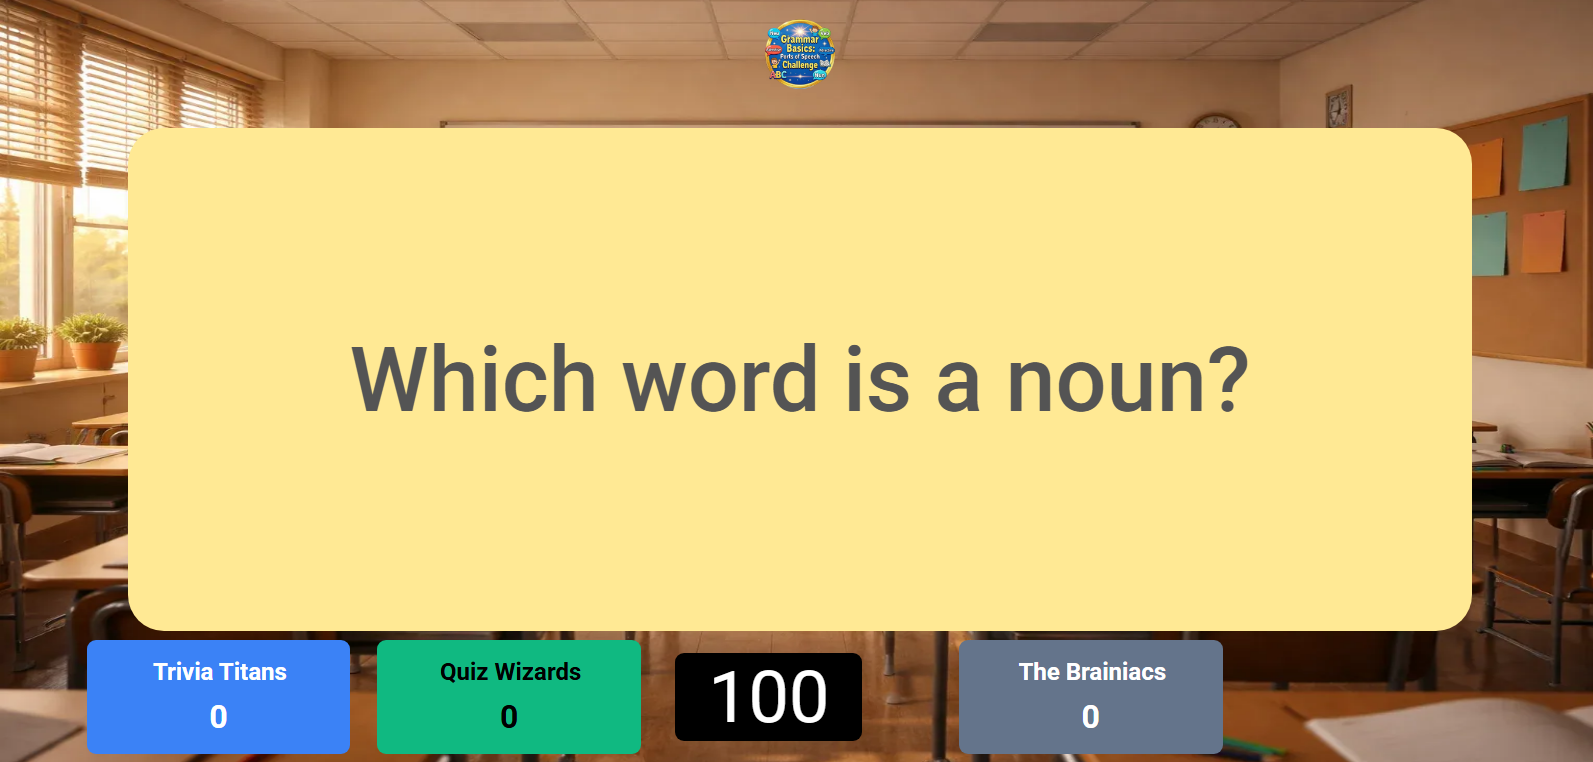 Presenter: Large, cinematic question view for the audience
Participant View: Waiting for Buzz-In
While the question is being read, participants see a Wait for Hostmessage. This prevents accidental buzzing before the question is fully understood.
Participant: Screen showing the 'Wait for Host' message before buzzers openHost Control: As the host, you decide exactly when to open the buzzers by toggling the BUZZ ON button at the top left of your screen.
 Host View: Managing the question and seeing who buzzed in first
Pro Tip: Use the Auto-Next feature in settings to keep the game moving quickly, especially in large audience environments.
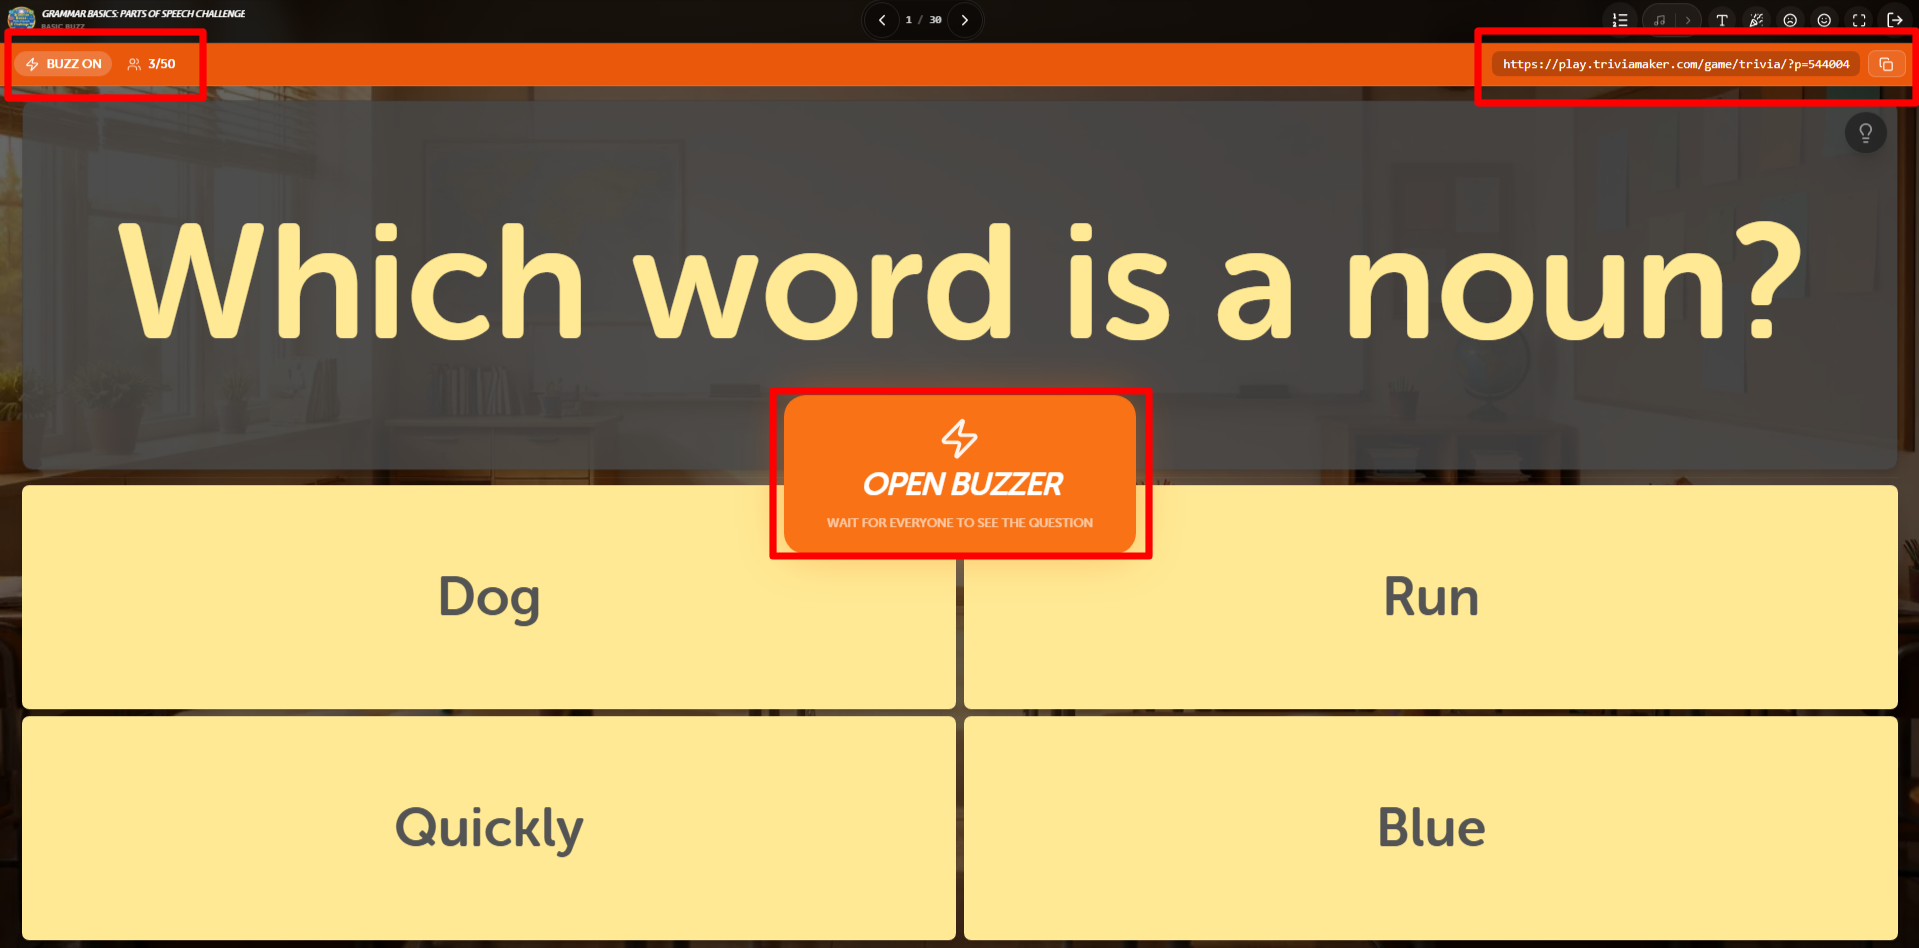
Phase 2: Opening the Buzzer
After reading the question, the host can reveal the answer options. A large OPEN BUZZER button appears on the host screen. Clicking this will activate the buzzers for all participants.
Host/Controller: Reveal options and click 'OPEN BUZZER' when ready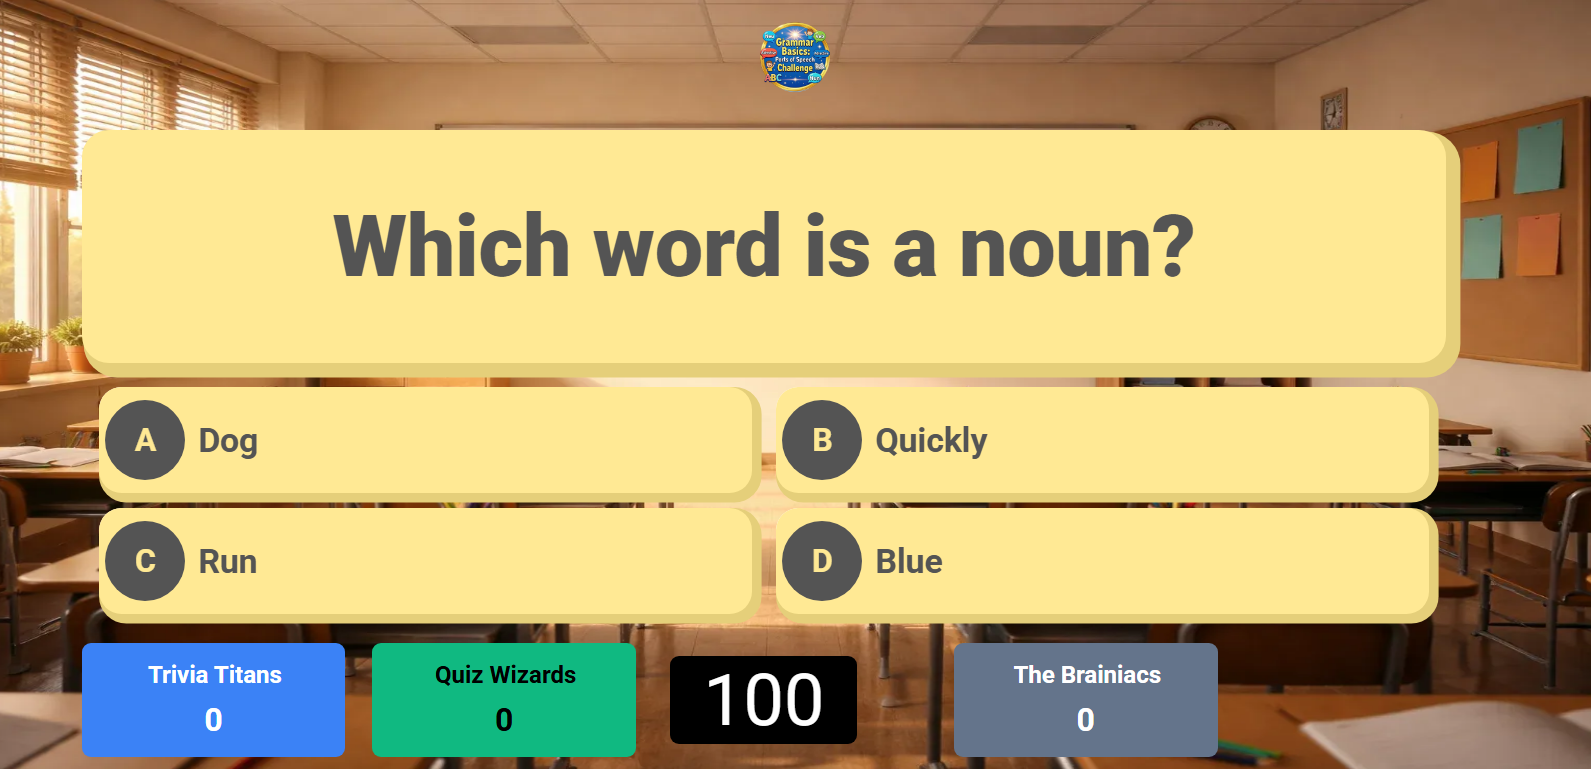 Presenter: Displaying the multiple-choice options to the audience
Phase 3: Buzzers Active
The moment the host clicks OPEN BUZZER, a large red BUZZbutton appears on every participant's phone. On the host side, a "Waiting for Buzzers" modal tracks the first players to respond.
Host/Controller: Modal tracking incoming buzzes in real-timeParticipant: The red BUZZ button is now live on the phone screenPhase 4: The Buzzer Queue
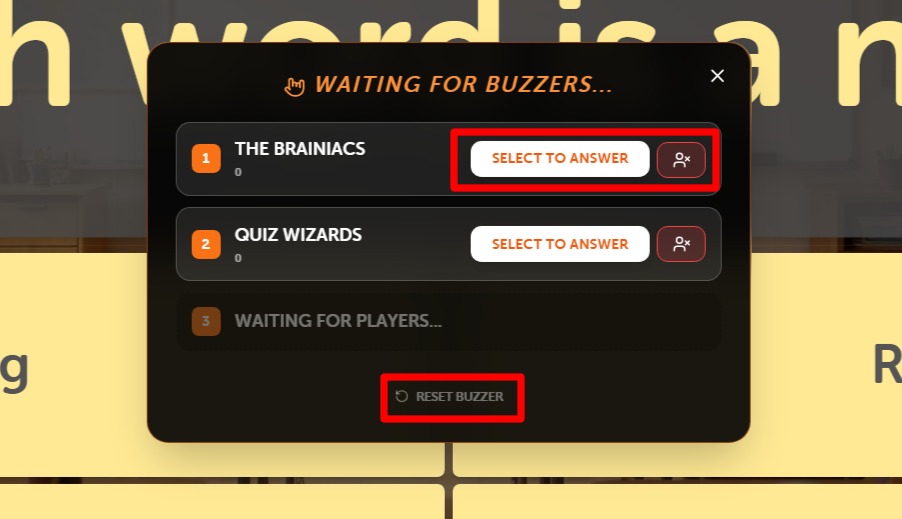
As soon as the first person buzzes in, they are placed at the top of the queue. Their phone screen updates to show their position (e.g., #1 IN QUEUE), while the host sees their name with a SELECT TO ANSWER button.
Participant: Visual confirmation of their place in the buzz-in lineHost/Controller: Identifying the first player and preparing to let them answerMultiple Buzzes: If several players buzz in, they will all be listed in order. If the first player gets the answer wrong, the host can easily move to the next person in the queue.
Phase 5: The Active Turn
When the host clicks SELECT TO ANSWER, that specific player is granted the turn. The host sees a "Now Answering" status, and the chosen player's screen updates with an orange YOUR TURN! banner, revealing the question and options on their device.
Host/Controller: Viewing the active player and management options (Pass/Close)Participant: The screen reveals the question and options for the active playerManaging the Turn: If the player is unsure or takes too long, the host can click PASS TURN to let the next person in the queue try, or CLOSE BUZZER to end the attempt for that question.
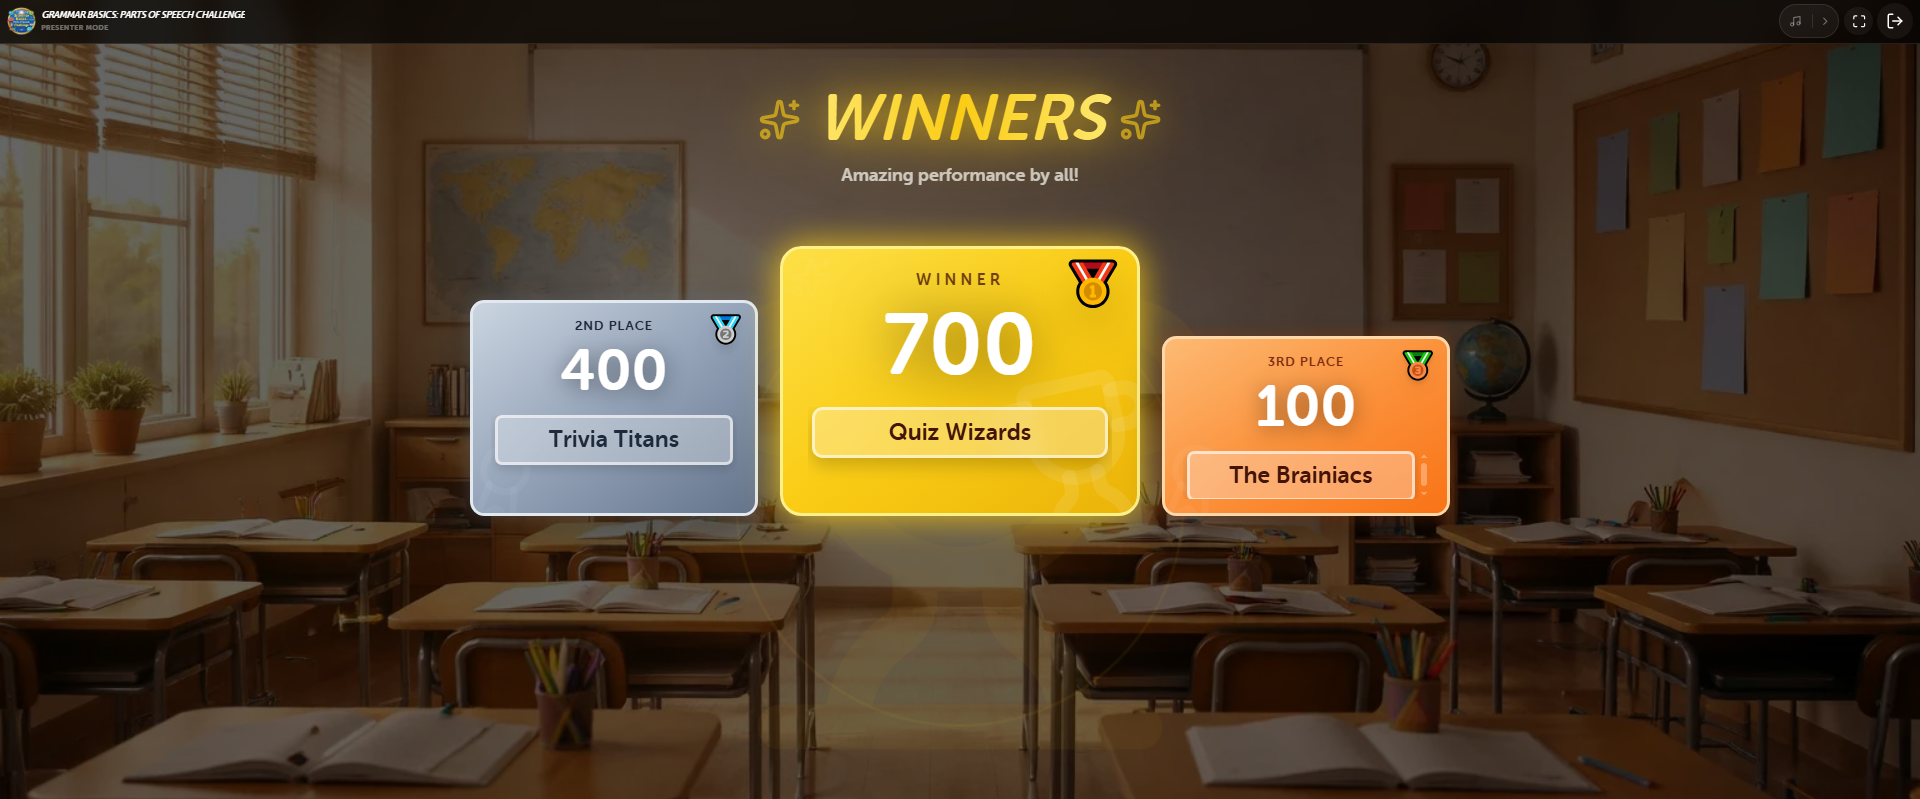
Winner Screen & Final Results
At the conclusion of the game, the Winner Screen celebrates the top performers. The final scores are tallied, and the winner is announced with dynamic visuals across all three displays:
 Host View: Final leaderboard and game summary
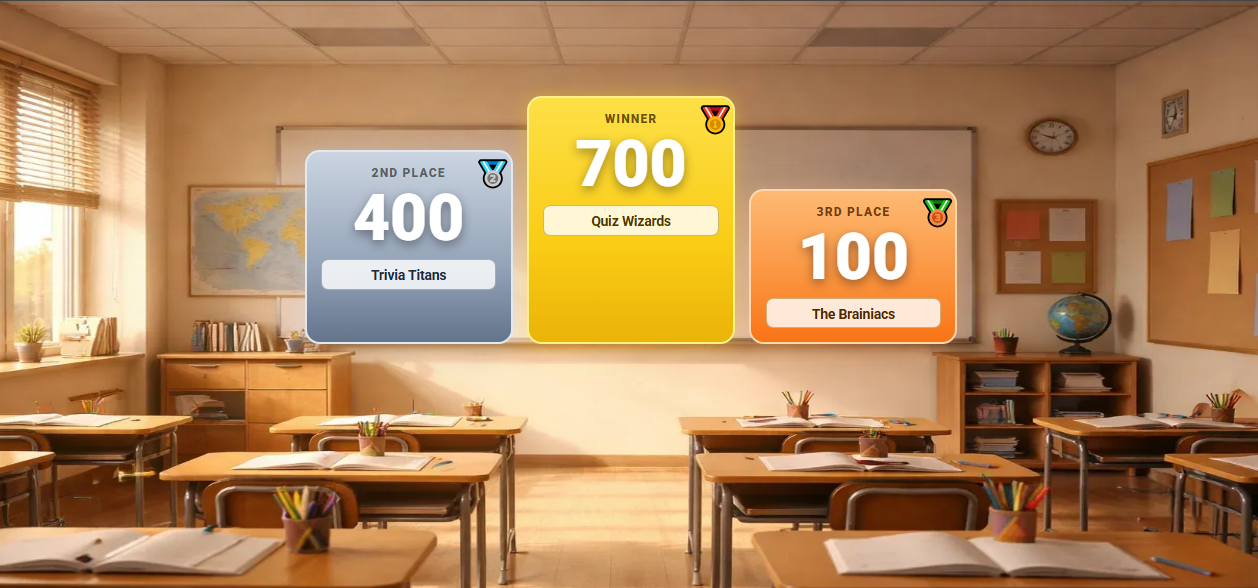 Presenter View: Cinematic winner celebration for the audience
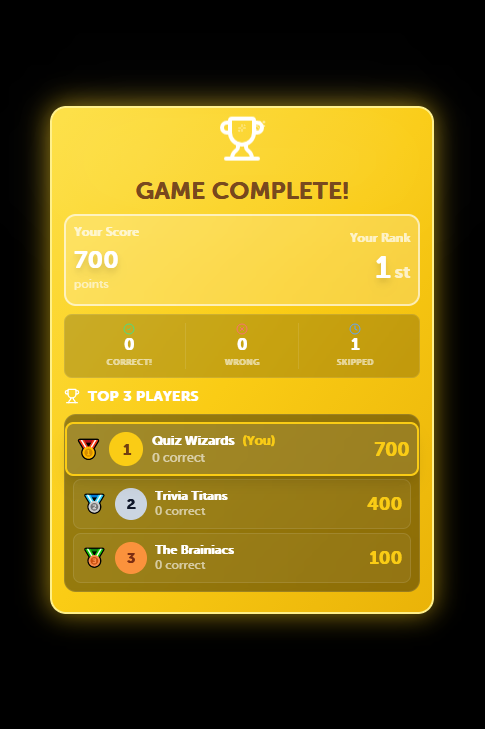 Participant View: Personal standing and celebration on their device
Celebrating Success: The Presenter display provides a grand announcement with animations, making it the perfect moment for the audience to cheer for the champions.
Host Controller
Your private panel to see answers, manage scores, and control the buzzer state. Audience never sees this screen.
Audience Presenter
The public display showing the question, the countdown, and real-time buzz-in animations.
Host Control Icons
Leaderboard
Toggle the live scoreboard on the presenter screen.
Music
Control background music and sound effects.
Fullscreen
Make the presenter view fill the entire projector screen.
Exit
Safely end the session and save player data.
7. Solo Mode
Solo Mode is designed for players who want to test their knowledge or practice individually without the need for team scoring or multiple participants.
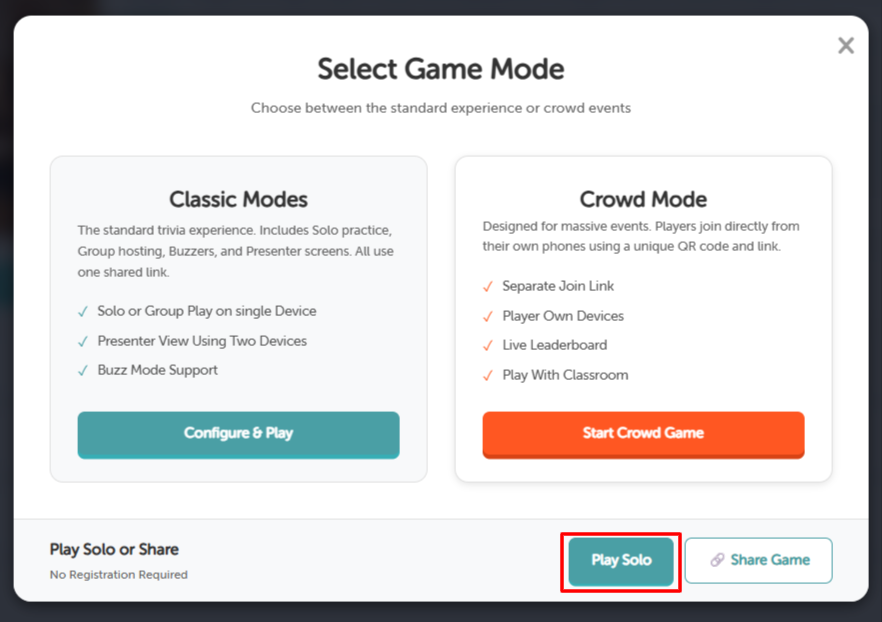
How to Launch Solo Mode
1. From the Game Preview page, locate and click the primary Play button.
2. A Select Game Mode popup will appear. In the bottom-right corner of this modal, you will find the Play Solo button.
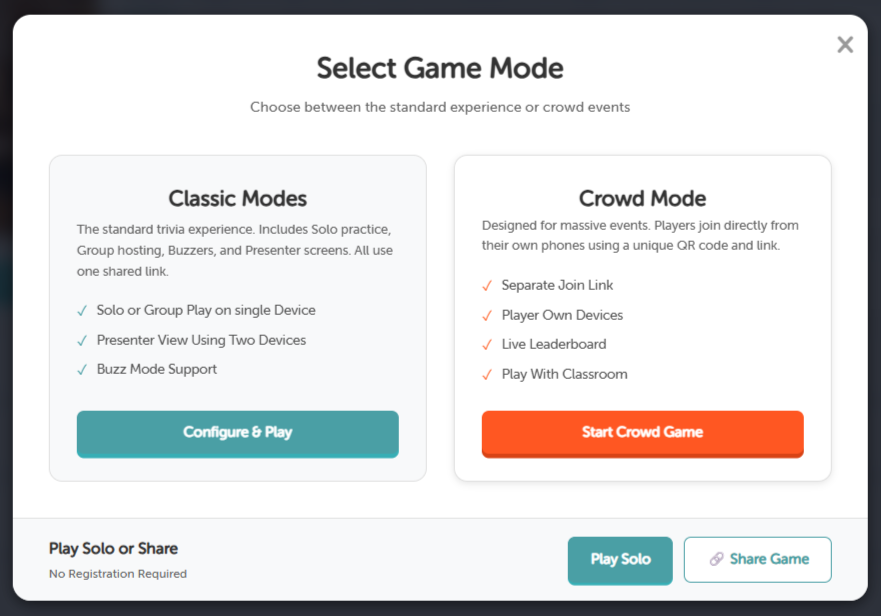
3. Click the Play Solo button to launch the game instantly in Solo Mode.
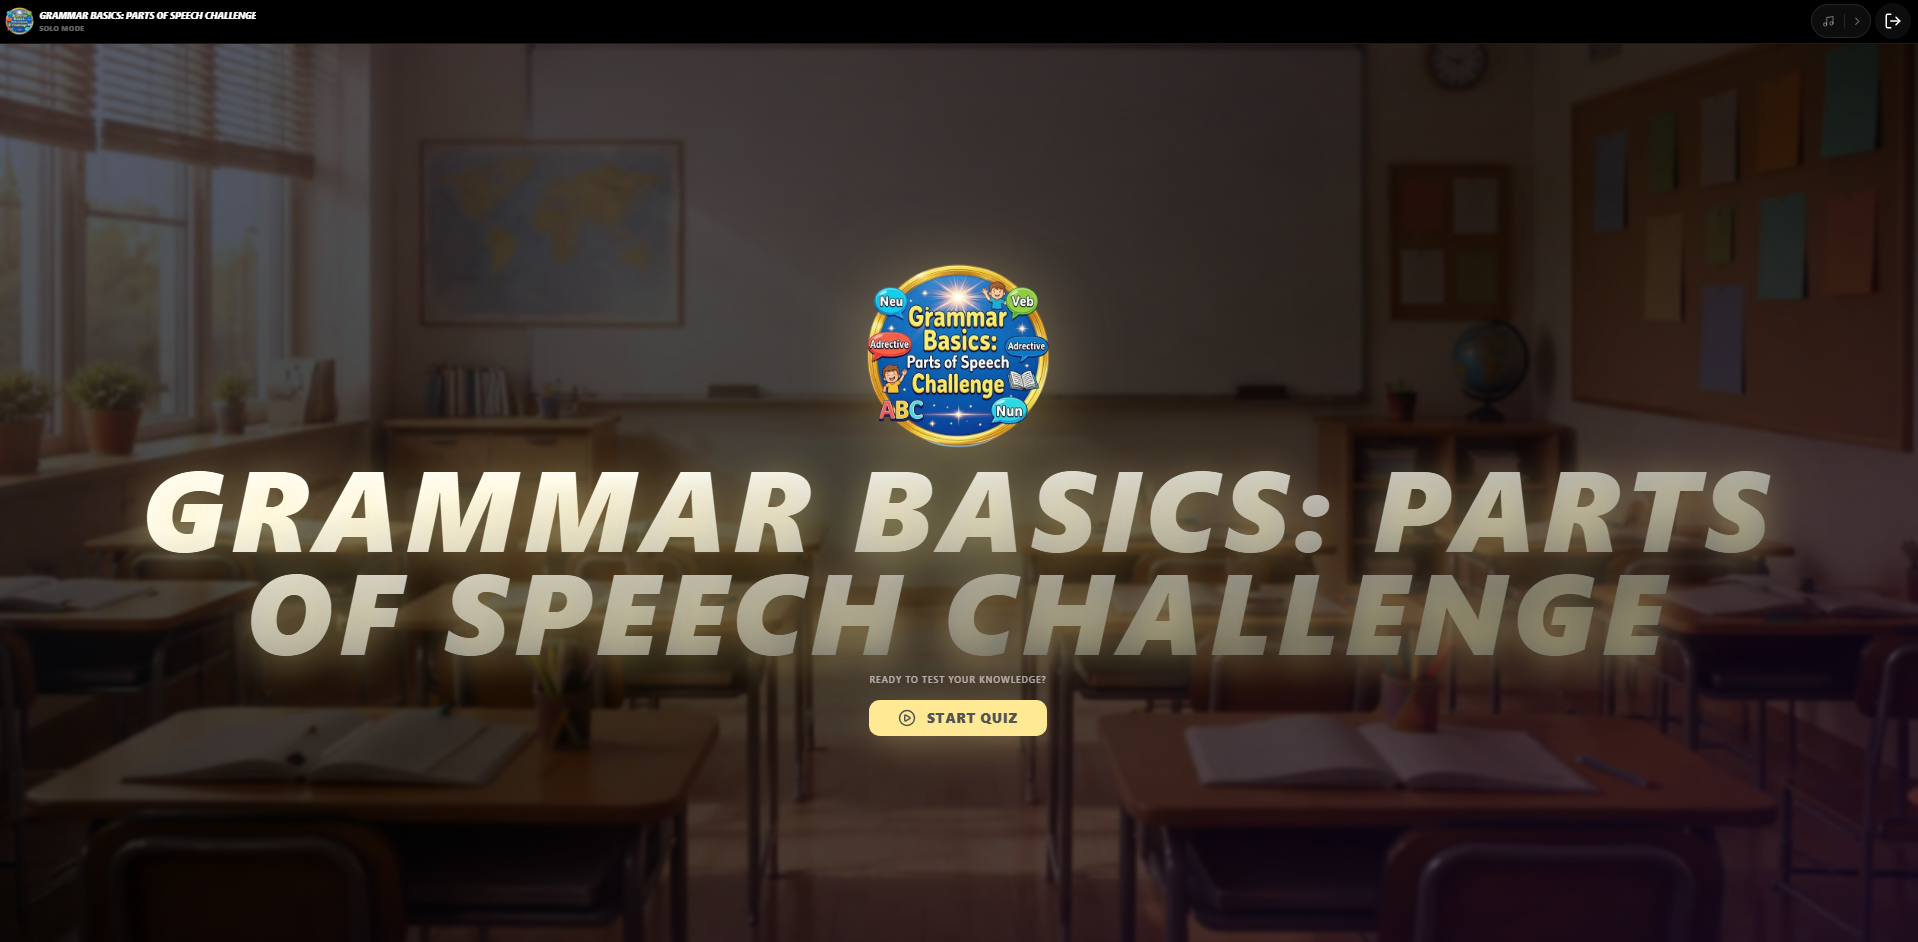
Solo Mode Gameplay
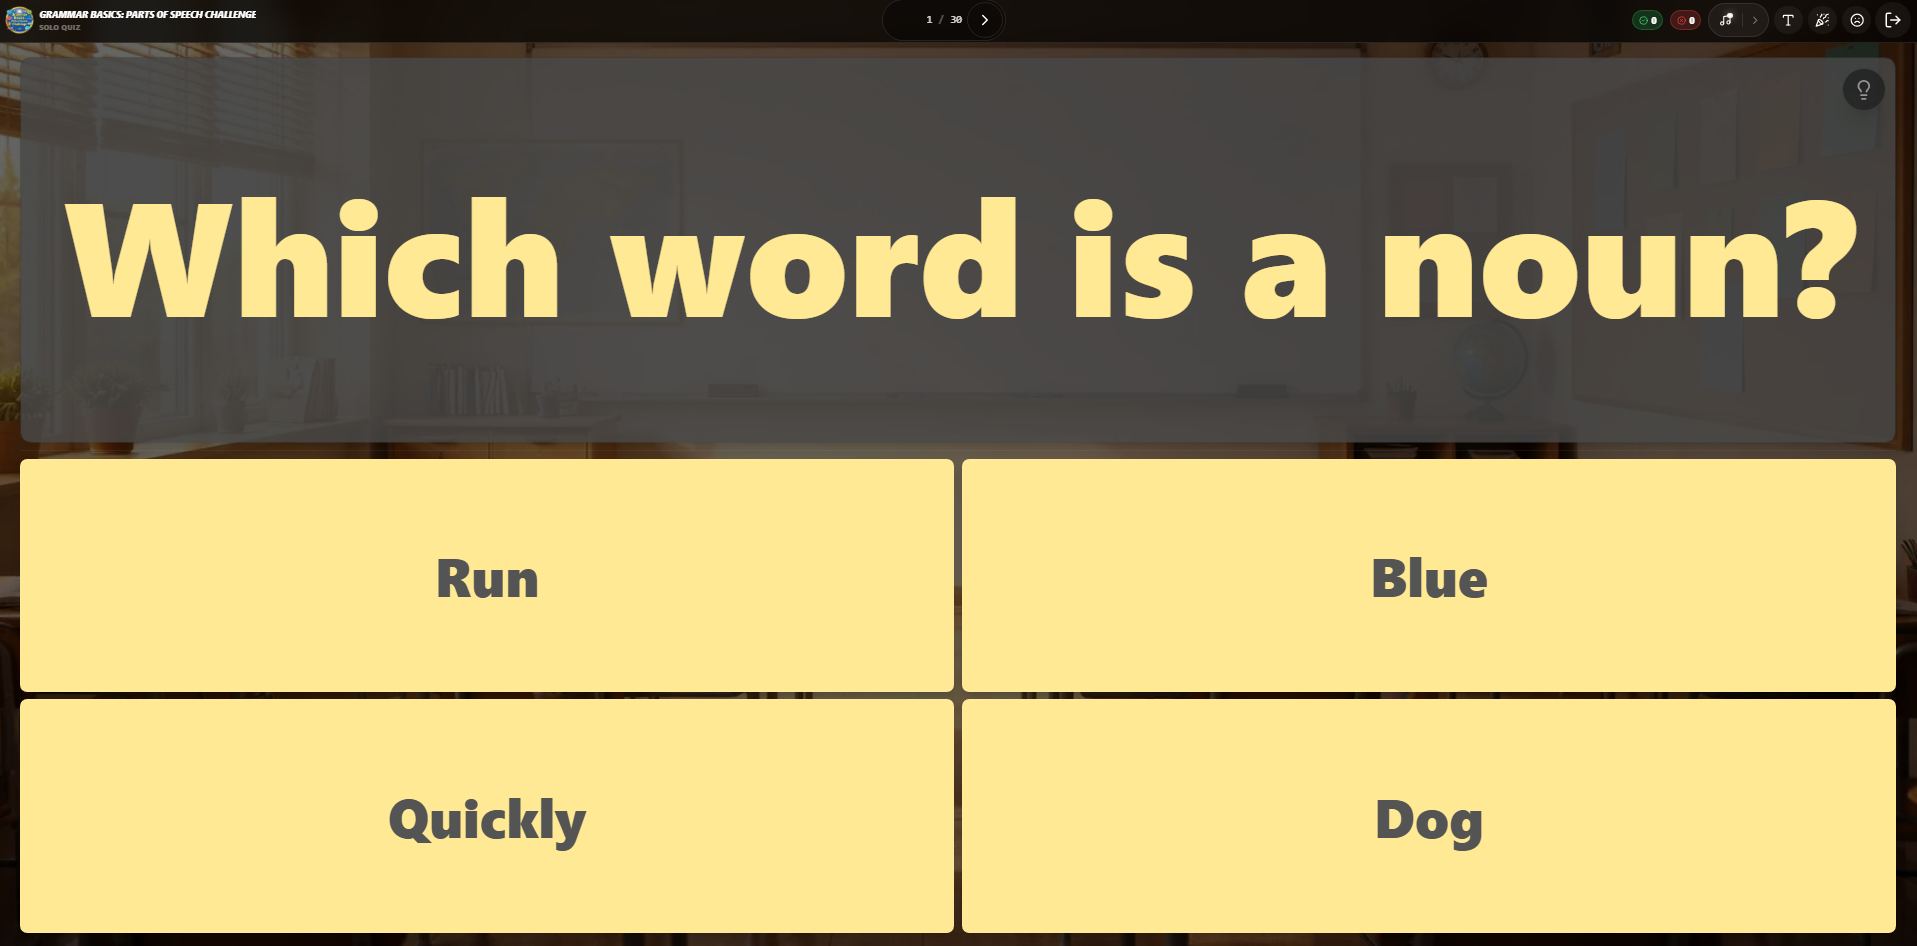
Once you click Start Quiz, the game begins. You will see the question at the top and the multiple-choice options below.
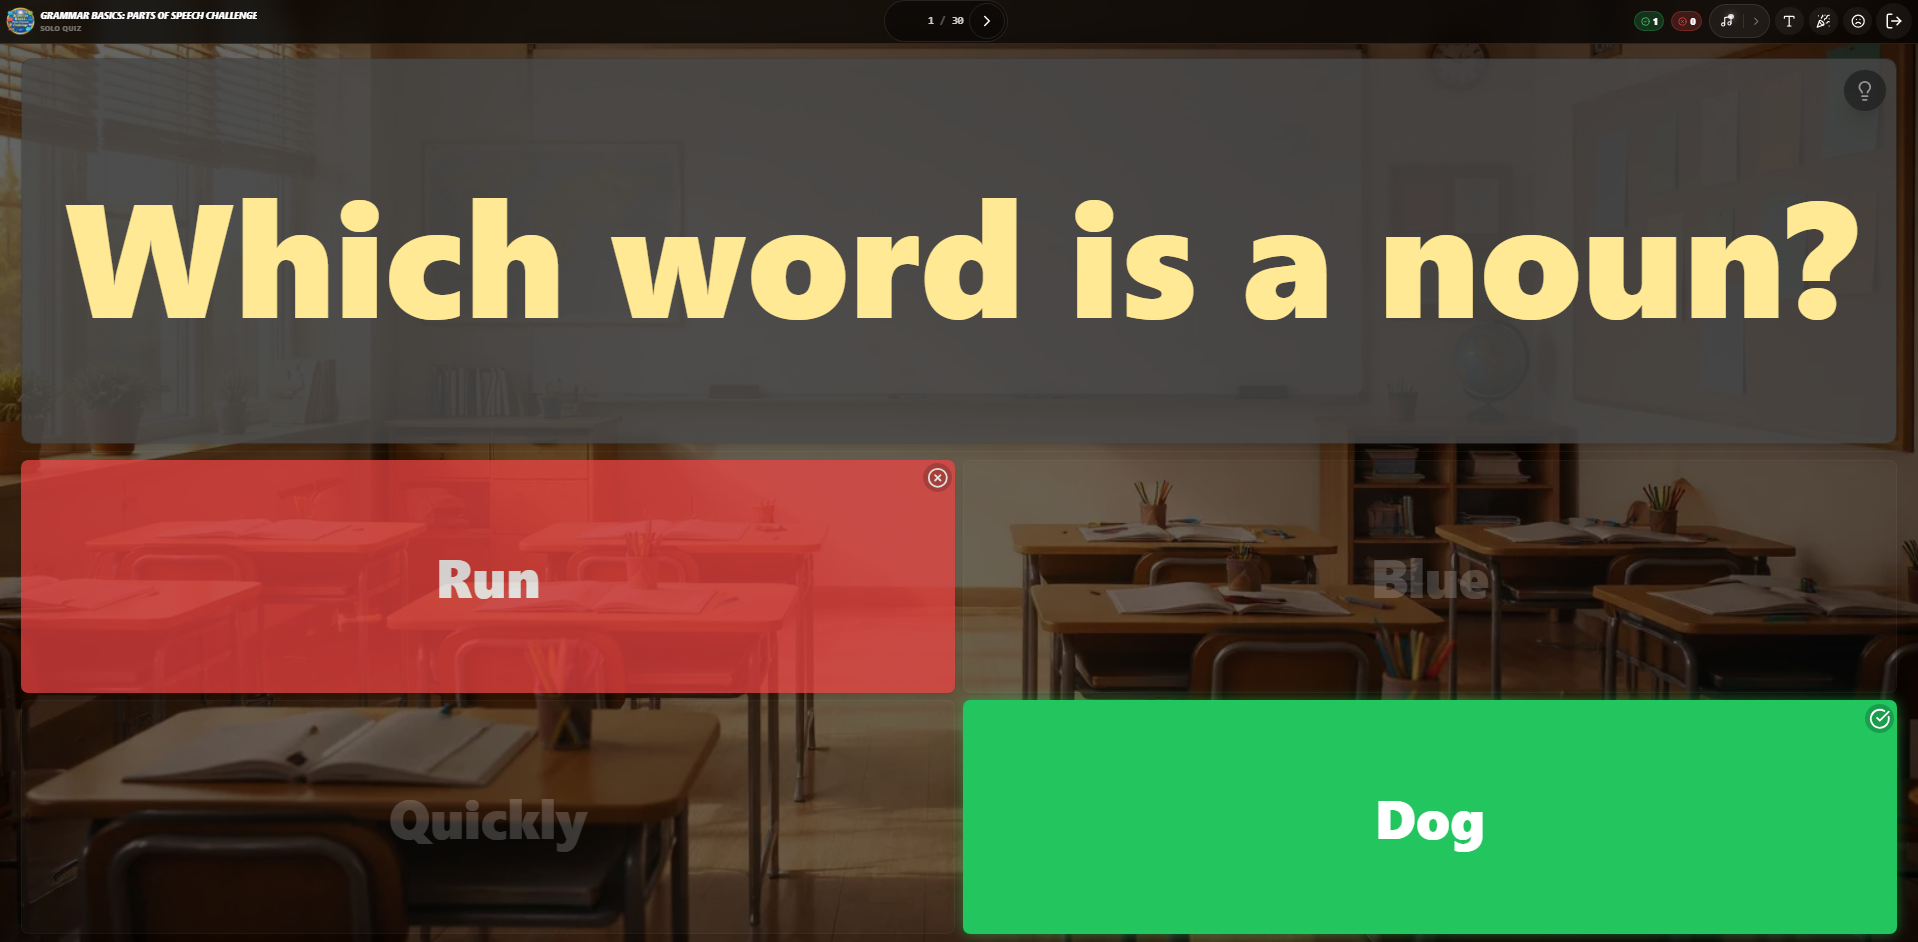
Answer Feedback
When you select the correct answer, the option will be highlighted in green with a checkmark icon. A celebratory confetti animation will also play across the screen.
Incorrect Answer Feedback
If an incorrect answer is selected, the option will be highlighted in red with an "X" icon. This provides immediate visual feedback that the choice was wrong.
Game Results Screen
Once you complete all questions, a final Results Screen provides a detailed summary of your performance.
The results screen includes:
| Feature | Description |
|---|---|
| Score Percentage | A visual progress ring showing your overall accuracy. |
| Total Points | The cumulative score earned during the session. |
| Performance Stats | Clear breakdown of Correct (green) vs Wrong (red) answers. |
| Completion Time | The total duration spent on the quiz. |
| Music Controls | Quick access icons at the top right to mute sound or toggle music. |
| Try Again | A button to restart the quiz and improve your score. |
Gameplay Controls
In the top-right corner of the gameplay screen, you have access to several quick controls to customize your experience:
Music & Sound
Toggle the background music and game sound effects.
Text Size
Adjust the question font size for better visibility.
Celebration
Trigger a confetti animation to celebrate your progress.
Feedback
Provide feedback or report an issue with the question.
Exit Game
Safely leave the solo session and return to the dashboard.
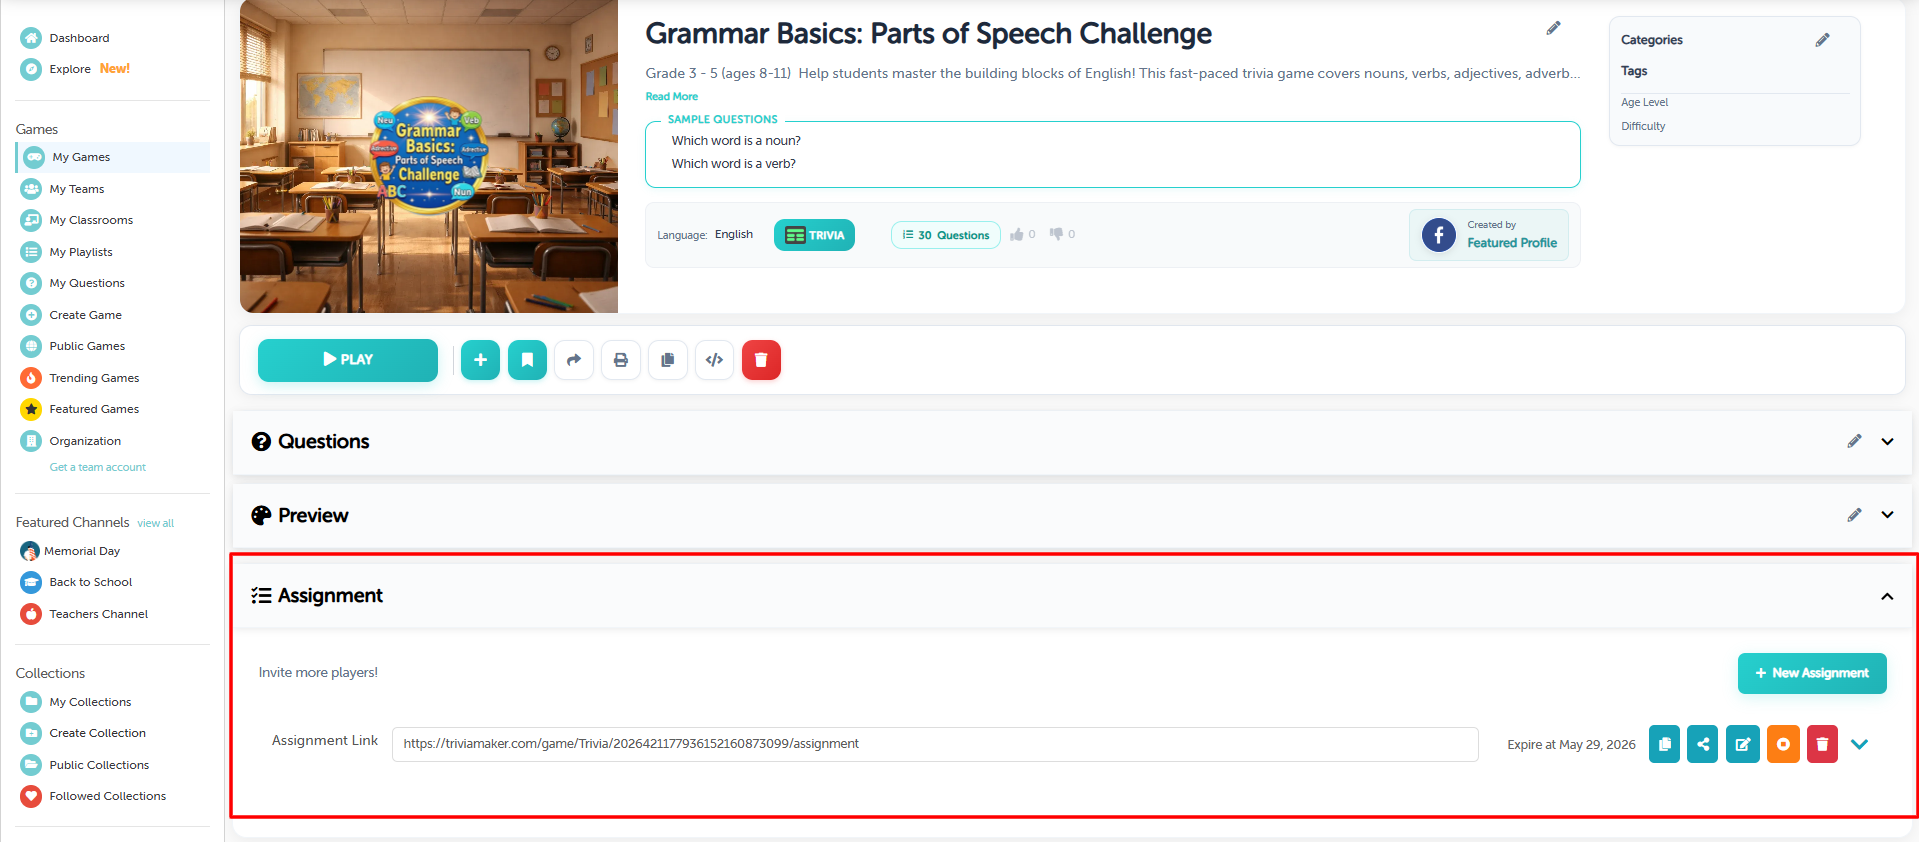
8. Assignment Mode
Assignment Mode is designed for asynchronous learning. It allows you to assign a trivia game to your students or team members to complete at their own pace, with a set deadline.
Assignment Dashboard
In your dashboard, you can manage all active assignments. You can see the unique Assignment Link, monitor the Expiration Date, and quickly create a New Assignment.
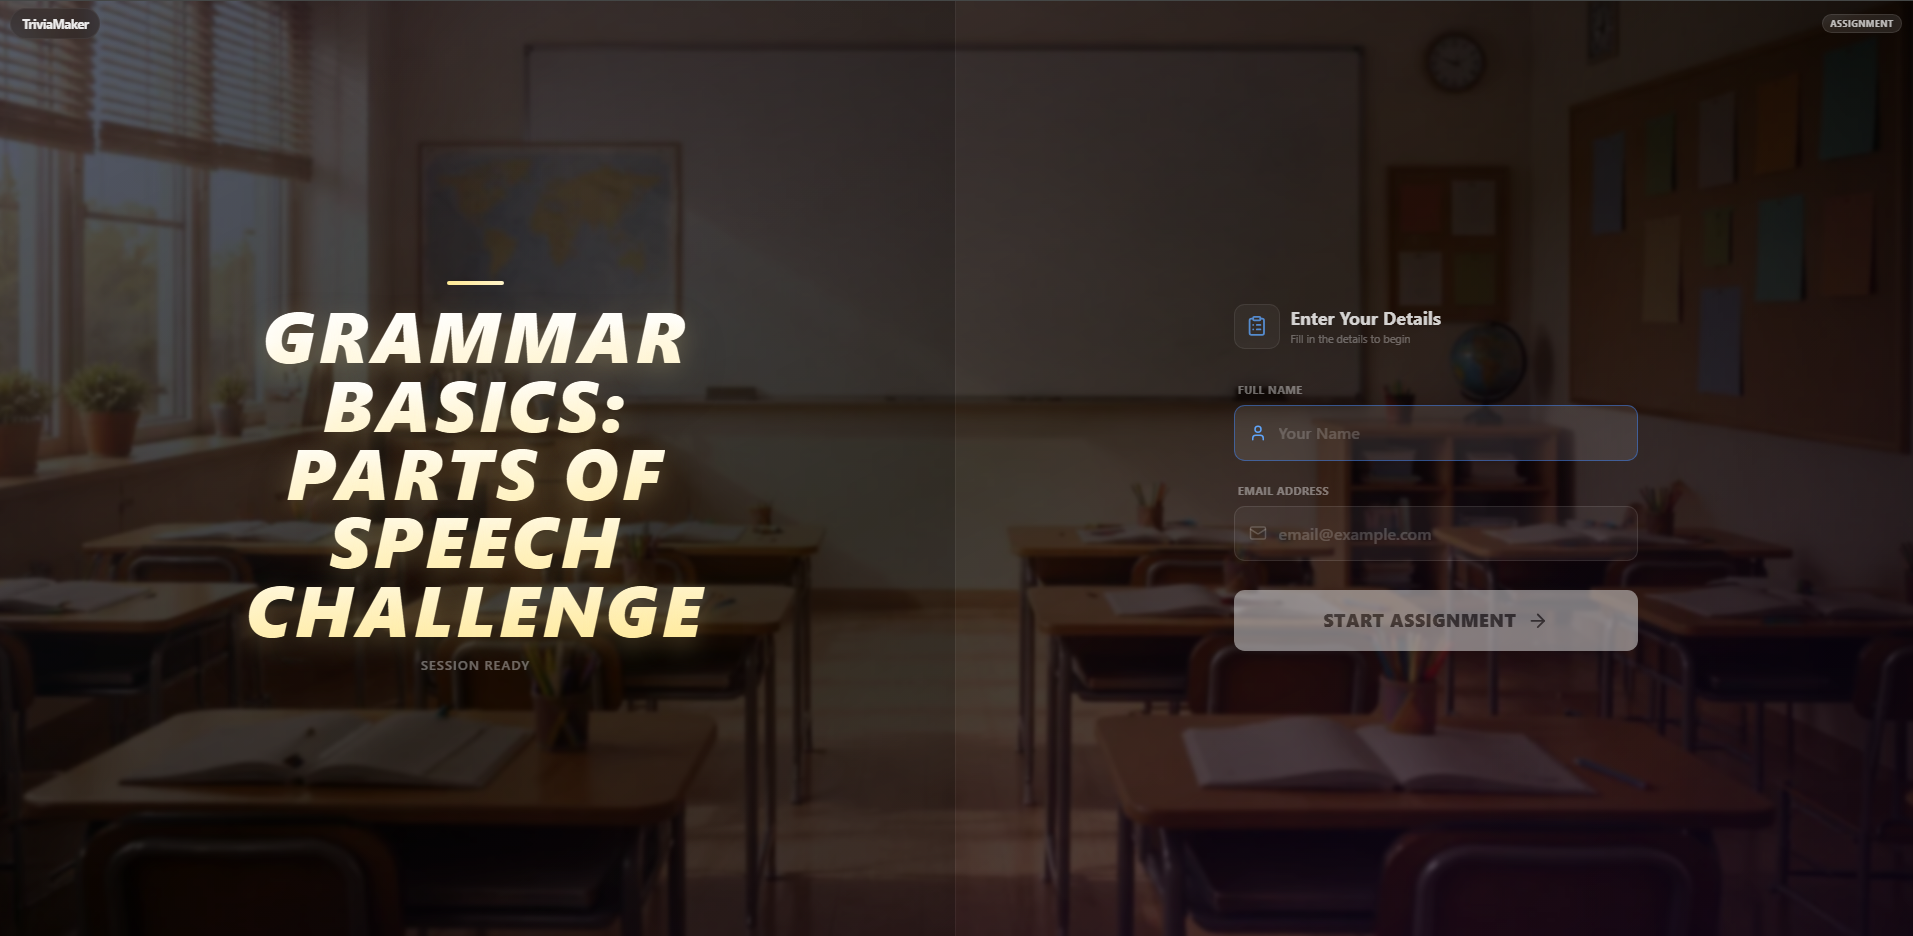
Player Enrollment
When players open the assignment link, they are greeted with a professional join screen. To track progress and identify players, they must enter their Full Name and Email Addressbefore clicking Start Assignment.
Assignment Gameplay & Stats
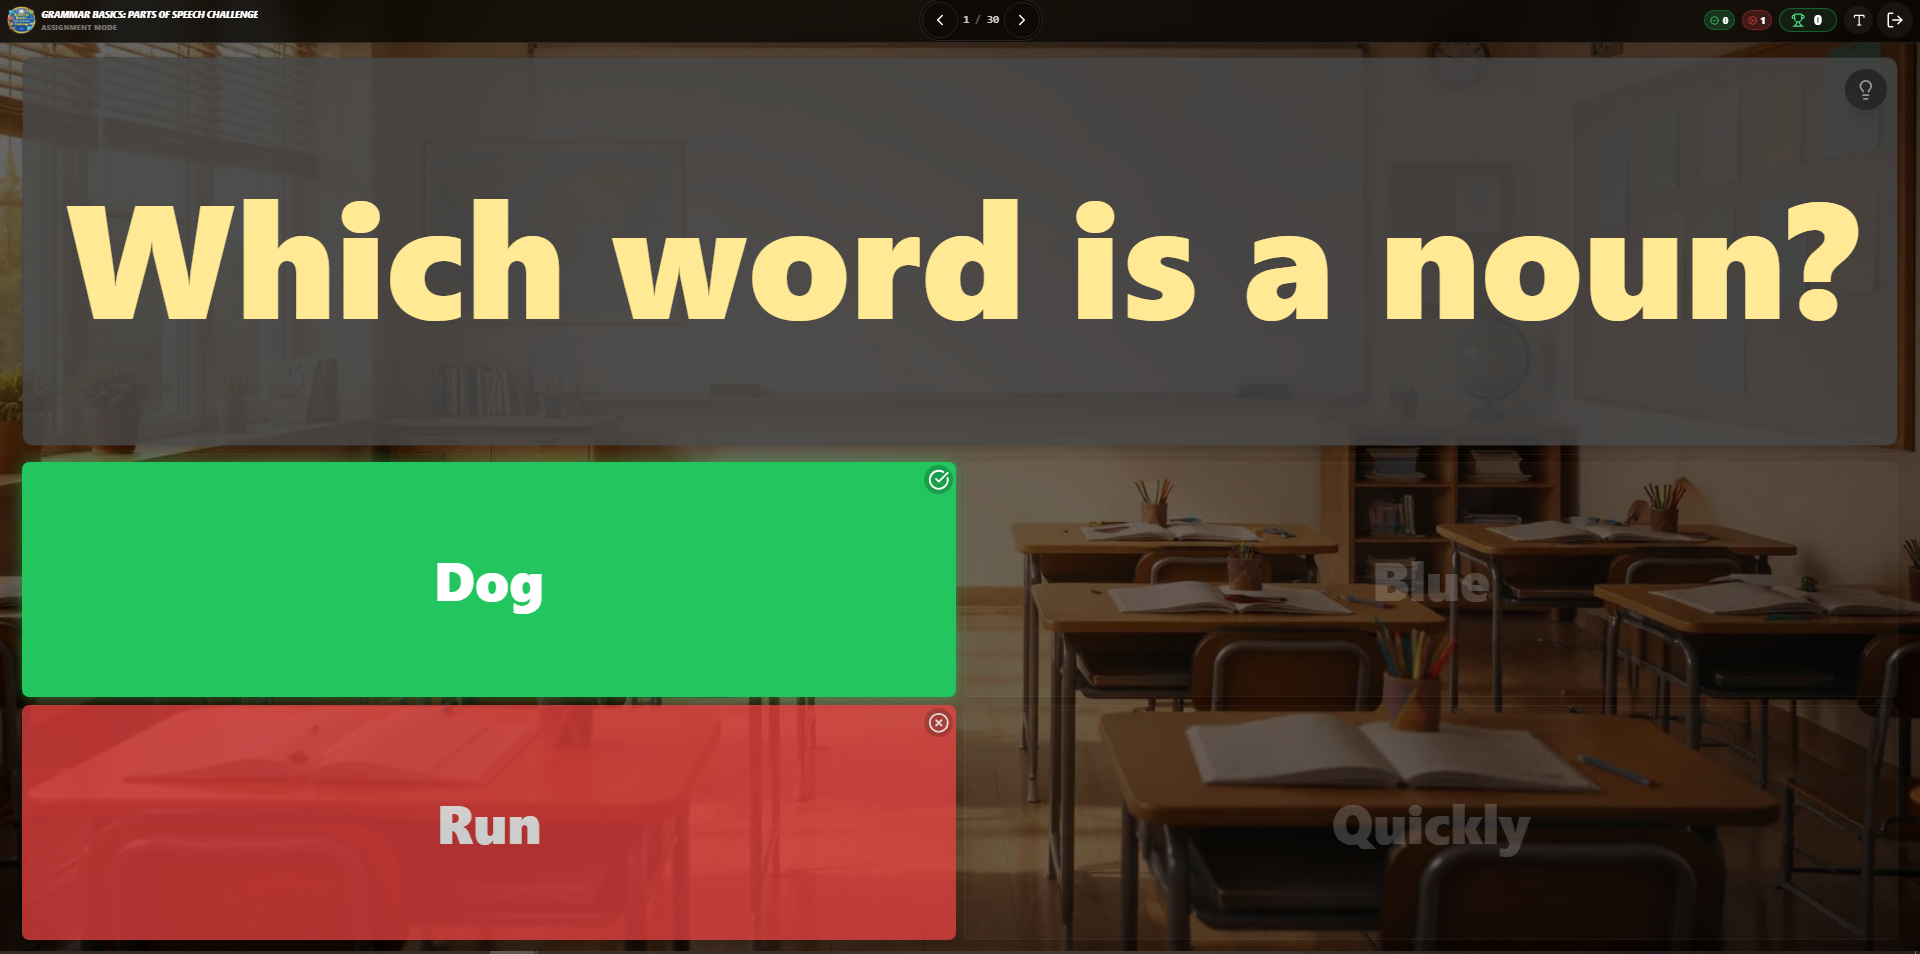
During the quiz, players can see their real-time performance stats in the top header:
When a player selects the correct answer, it is immediately highlighted in vibrant green with a checkmark icon in the top-right corner of the option.
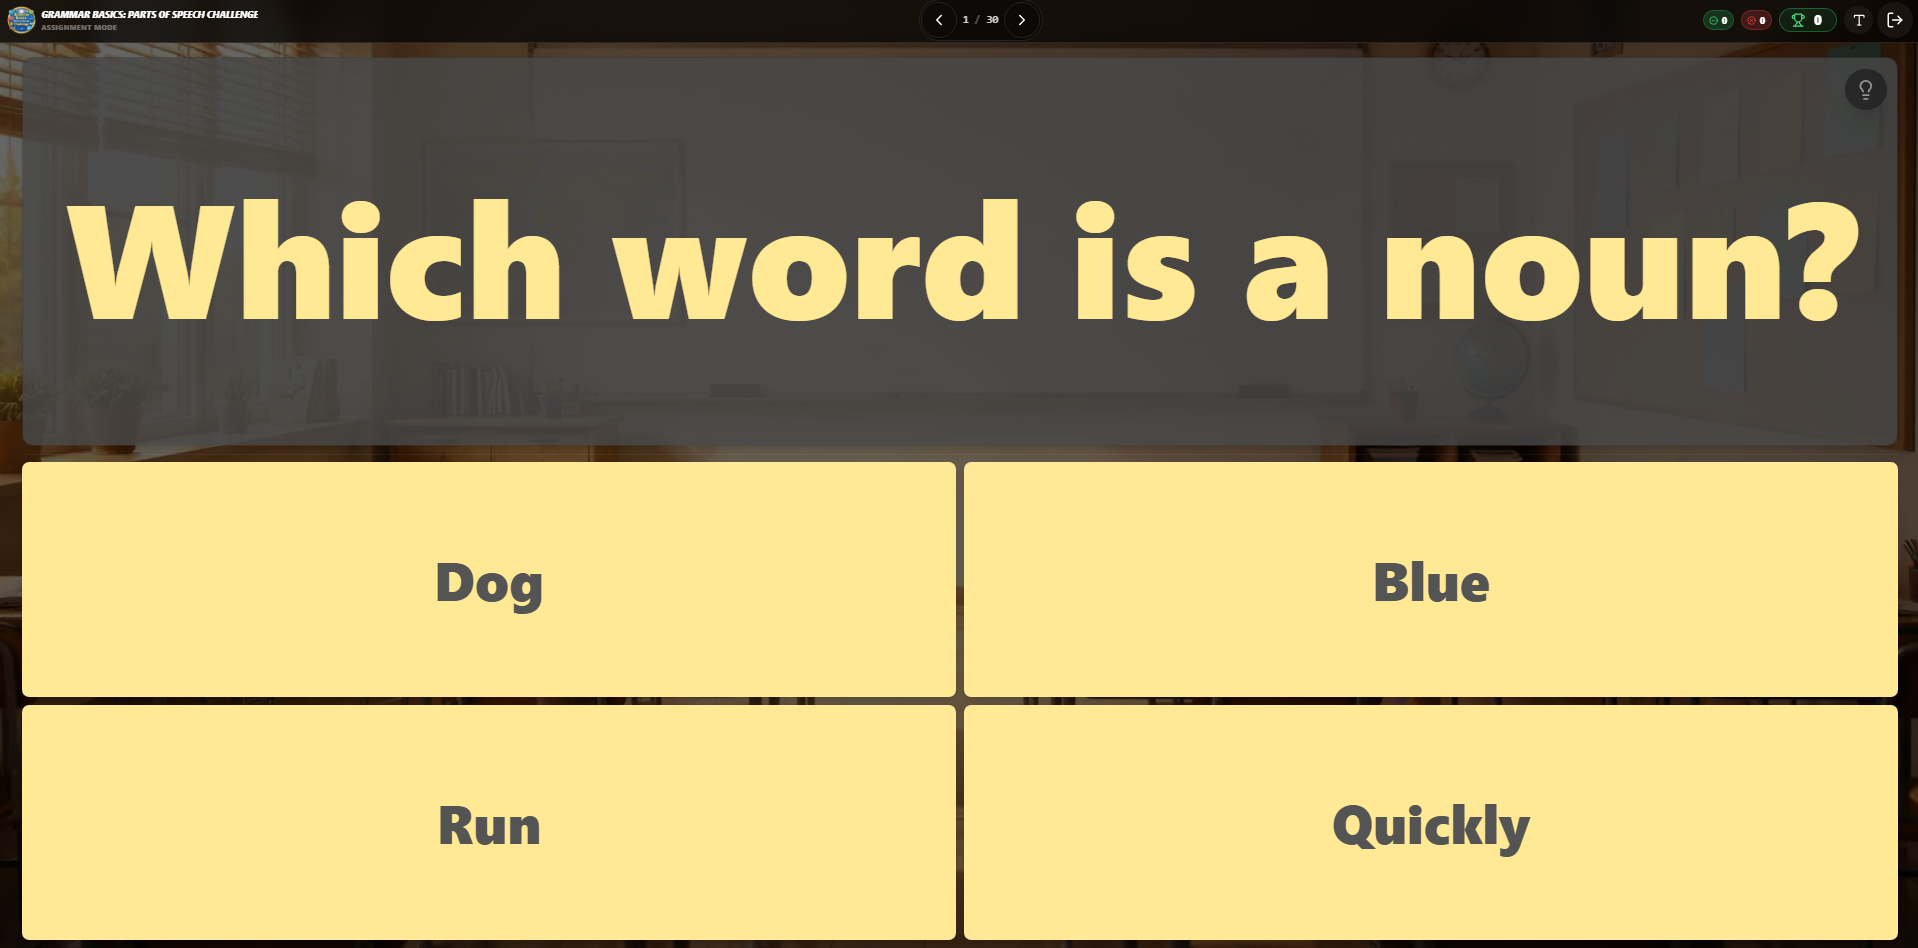
If a player selects a wrong option, the system provides immediate feedback by highlighting their choice in red and revealing the correct answer in green. The "Wrong" counter in the header will also increase.
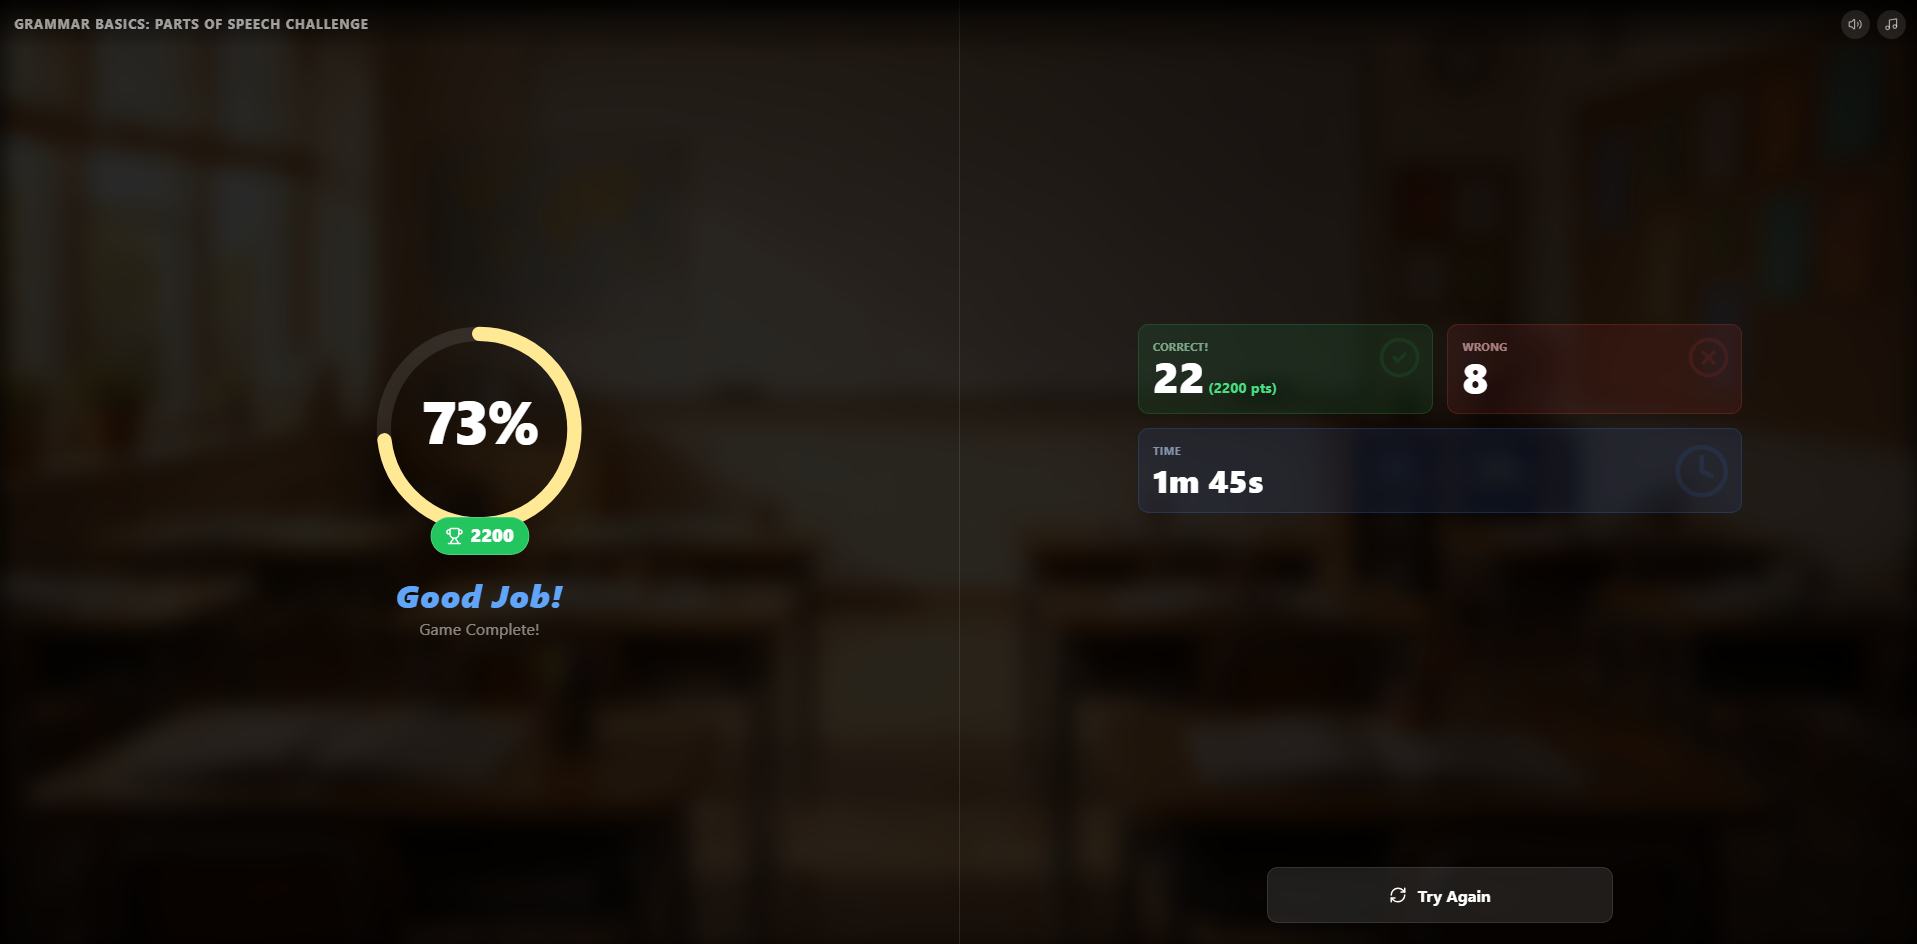
Assignment Results Screen
Upon completing the assignment, students see a comprehensive summary of their performance:
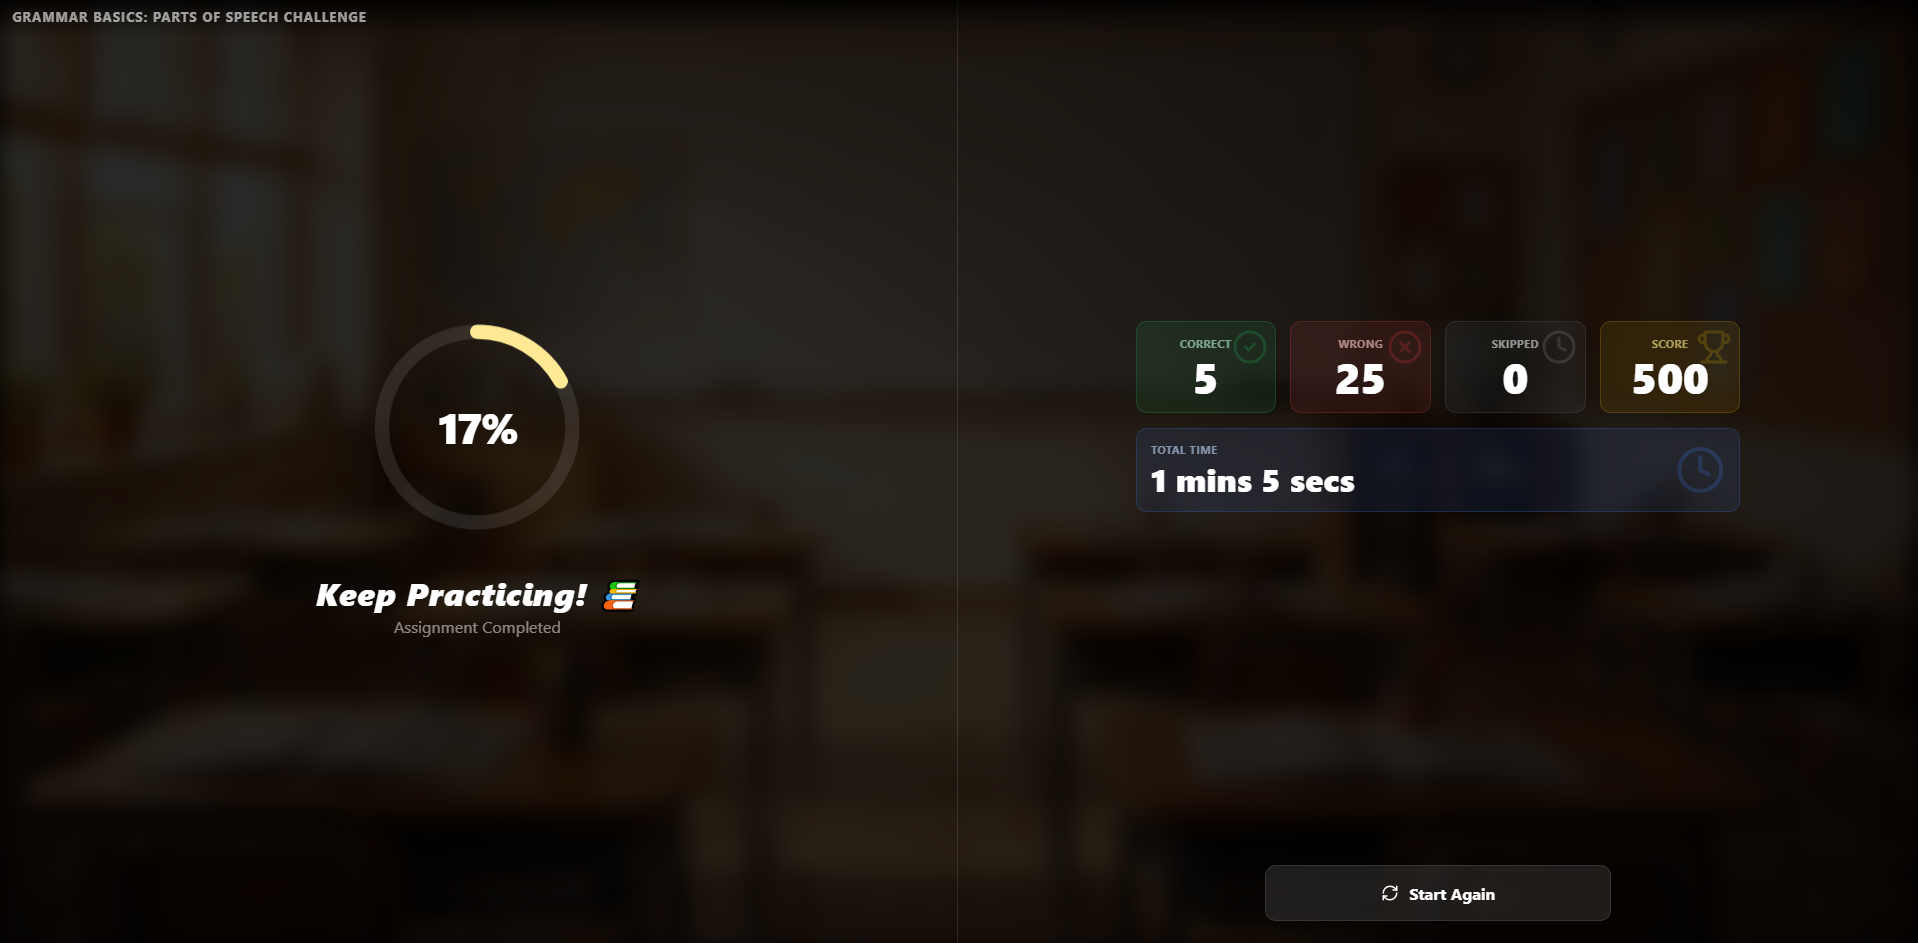
Completion Rate
A circular progress ring showing the percentage of correct answers.
Performance Breakdown
Counts for Correct, Wrong, and Skipped questions.
Total Time
The total duration spent on the assignment.
Start Again
Allows students to retry the assignment to improve their score.
Pro Tip: Review the assignment reports to see which questions students found most difficult. This helps identify topics that may need more classroom review.
9. Embed Mode
Embed Mode allows you to seamlessly integrate your TriviaMaker games directly into your own website or learning management system. This provides a professional, branded experience for your audience without them ever having to leave your site.
Configuring Your Embed
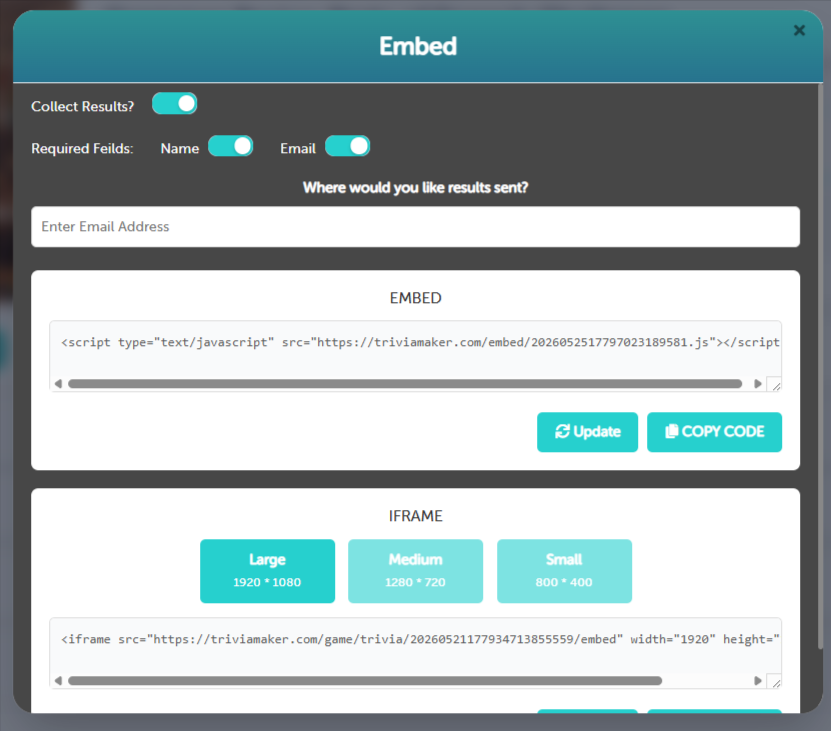
Before copying your code, you can customize how the embedded game behaves and how results are collected:
Collect Results
Toggle this ON to track player performance and scores.
Required Fields
Choose whether to require players to enter their Name or Email.
Results Destination
Specify an email address where you'd like the final results to be sent.
Update Settings
Click 'Update settings' to regenerate the code based on your choices.
Player Joining Screen
If you have enabled Collect Results, players will be prompted to enter their identification details before they can start the quiz. This ensures you can track exactly who submitted which score.
Full Name: Required for leaderboard and reporting.
Email Address: Used to send receipts or for host tracking.

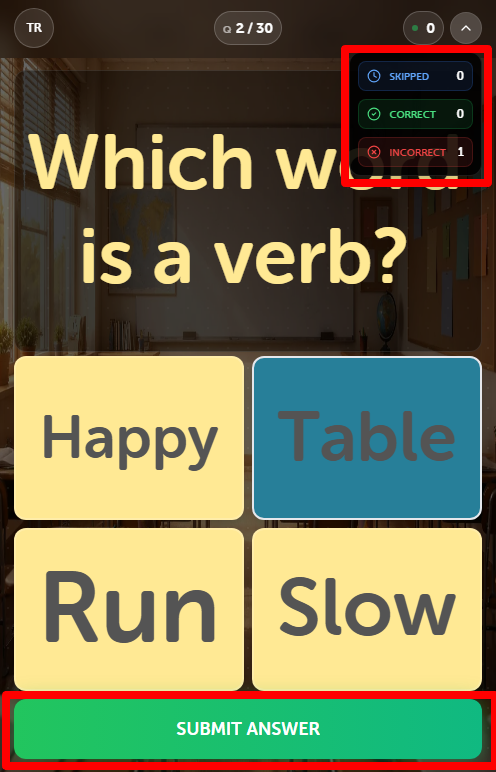
Embedded Gameplay UI
The embedded game features a streamlined header designed for a clean integration:
The interface includes a real-time Circular Timer for each question, a Scoreboard tracking correct vs. wrong answers, and Responsive Controls for font adjustments and exit options.
Answer Feedback & Visuals
Correct Answers
Correct selections are instantly highlighted in solid green with a checkmark icon in the top-right corner.
Wrong Answers
Incorrect choices turn red with a close (X) icon, while the correct answer is revealed in green.
Game Results Summary
After finishing the quiz, players receive a detailed performance summary:
The performance summary displays a circular progress ring with the total score percentage, a breakdown of correct/wrong answers, and the total time taken to complete the quiz.
Copying the Code
Once your settings are configured, you can choose between two primary integration methods:
- Embed Script
The standard method using a small JavaScript snippet. Example: <script type='text/javascript' src='https://triviamaker.com/embed/XXXXX.js'></script>
- iFrame Code
A traditional iframe approach for systems that don't allow external JavaScript execution.
Example Embed Script
<script type="text/javascript" src="https://triviamaker.com/embed/20260430177755165377157.js"></script>Important: Always remember to click the Update settings button after making changes to ensure your live embedded game reflects your latest configurations.
10. iFrame Mode
iFrame Mode provides a robust way to embed your TriviaMaker games using standard HTML container technology. It is highly reliable and offers specific sizing presets to ensure your game fits perfectly within your webpage layout.
Sizing Presets
When generating your iFrame code, you can quickly select from three professional resolution presets:
Large (1920 * 1080)
Best for full-page high-definition displays.
Medium (1280 * 720)
The standard balanced size for most web layouts.
Small (800 * 400)
Optimized for sidebar or compact content areas.
Player Joining Screen
When the iFrame loads with result collection enabled, players must first identify themselves. This screen is optimized to fit within the iFrame's dimensions while remaining fully mobile-responsive.
Embedded Gameplay UI
The embedded game features a streamlined header designed for a clean integration:
The interface includes a real-time Circular Timer for each question, a Scoreboard tracking correct vs. wrong answers, and Responsive Controls for font adjustments and exit options.
Answer Feedback & Visuals
Correct Answers
Correct selections are instantly highlighted in solid green with a checkmark icon appearing in the top-right corner.
Wrong Answers
Incorrect choices turn red with a close (X) icon, while the correct answer is revealed in green.
Game Results Summary
After finishing the quiz, players receive a detailed performance summary:
The performance summary displays a circular progress ring with the total score percentage, a breakdown of correct/wrong answers, and the total time taken to complete the quiz.
Players can click the Try Again button to restart the quiz and improve their results.
Generated iFrame Code (Medium Preset)
<iframe src="https://triviamaker.com/game/trivia/20260107176778300141385/embed" width="1280" height="720" frameborder="0"></iframe>